


Portraits are the quintessential elementary art project and for good reason–they are adorable and a keepsake that every parent appreciates. But some portrait lessons are better than others. It’s fascinating to me why some lessons work while others don’t. I’ve been teaching for a while now, so I have a fairly solid understanding on what techniques work best for the very young, but still, I couldn’t resist conducting a little experiment. Which technique/media results in the most sucessful portrait project?

My guidelines:
- Two 40-minute class sessions
- 3 first grade class
- 3 different media experiments: chalk pastel, oil pastel, tempera paint
My Goals
- To determine the most successful portrait project for little ones.
My definition of successful
- Accessible to all abilities, including special needs
- Engaged children
- Proud and empowered children
- No crumpled-up paper and unhappy faces
- A portrait that captures the child’s essence
Not too hard, right?
My Take on Portraits
Its important to note that I might have a different priority for this lesson than other teachers. I don’t use mirrors for self-portraits with this age group because I don’t think it’s necessary to get the features exactly right. As I move towards upper grades, this becomes valuable.
I love to use templates with portrait lessons for Kinders and even first grade students. They establish a face on which every child can draw features. It eliminates frustration when a child draws his head too small. Little kids really do draw small and if they do, it makes it hard to paint or color or really do much else. Templates are fast and when you have limited time, there is no better way to speed things up than to use templates.
But I didn’t use templates.
Had I used templates, more kids would have finished their lesson.
Instead, I used the letter “U” technique which works pretty well and has a 75% success rate. The other 25% drew their letter U’s very small and required lots of one-on-one to fit their features into their heads. Cute, but it does take up alot of teacher time.
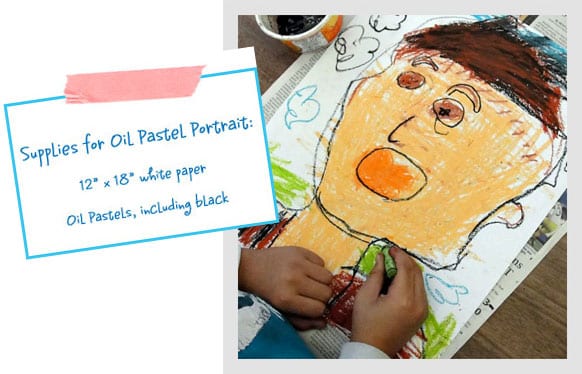
Portrait #1 Oil Pastel

I’ve used oil pastel for portraits a few times before with first grade. Success depends on the children’s fine motor skills. Since I’m not the classroom teacher who evaluates this skill, I have to go with my gut. In order for the oil pastel to work, the children need to be patient and willing to color in well. If they are a hyper group, then their ability to stay focused is not likely. My group was a bit on the hyper side but are an engaged group, so I went for it.
For all my portrait projects I used oil pastel to draw the outlines with. Children tend to draw small with pencils and less so with oil pastels.
Children drew a large letter “U” on their paper and after a presentation on the white board using children as models, I explained where to put facial features. I may have gone on too long with my presentation because the children were getting a tad bit restless. We used a light color brown or flesh tone oil pastel to draw the face, neck, shoulders, hair and facial features. I spent more time on how to draw hair as that is the one feature that can really distinguish one child from another.
We tried to color in the face, ears and neck before the end of class. Most were able to lay down a reasonable amount of color.
Day Two
Today was all about coloring. Children continued coloring their skin and added color to their eyes and mouth. They colored in their shirt and hair then worked on the background. Some left the background simple others created designs. I didn’t specify what they should do. For the very last step, children used a black oil pastel to outline all their features, hair and shirt. Many times when a child thought they were finished, I would encourage them to color a little bit more. This is tricky, because if you are too firm, they will balk. So lots of positive encouragement required, even if it’s the last class of the day!
So what do you think? Do you like using oil pastel? I can tell you one thing; it sure makes prep and clean-up a breeze!
First Grade Oil pastel Portraits….

Up next? Chalk Pastel Portraits
Want a free handout? Download by clicking the yellow button below and we’ll send you a free lesson guide on K-6 portrait making!


I do like the oil pastel portraits. I do let this age group look in the mirror for their self portraits, and the students usually have a blast looking at themselves and checking out their teeth, freckles, etc.
Believe it or not, I’ve have huge success with charcoal!!!!!
Pencil sketch first (guided drawing)
Finish with charcoal on top of the pencil lines!
OMG you’re a brave art teacher! Charcoal for little ones? Must try it!
Regular oil crayons are terrible for this. Use the crayola portfolio series oil crayons. You can order them in indiviual boxes or in a classpack, whichever suits your needs better. Portfolio series crayons are water soluble and can be wet blended with a brush and water after coloring. They can also be dry blended with fingers very easily. Also, if you draw with sharpie first you’ll be able to see your lines through the oil crayon so no one looses track of what they were doing. Get yourself a box of the Crayola Portfolio series oil crayons and have some fun!
I just looked these up in the Dick Blick catalog. They’re on my next order. Thanks for the recommendation. Can’t wait!
J. Cooper, I was doing a resist with oil pastel and was surprised that the Crayola ones blended with water. I was a little upset, but now since I do a huge O’keefe abstract realism project with my third grade drawing leaves/ flowers up close I am excited to see a new result of using a bit of water.
Thank you for this but
The pdf link does not work.
Hi Ashley! Thanks so much for letting us know that there is an issue with the link. It should be fixed now. Enjoy!
How do you prevent rubbing and transfer of oil pastel everywhere?
This is a common concern with both oil pastel and chalk pastels, but the truth is, I really don’t worry about it.
The goal with this (and any art project for kids) is to learn what a medium can do. And yes, oil pastels smudge. But that’s just a part of process.
So it helps if you can look at the process through the child’s eyes and see that in teh end, a bit of smudging doesn’t really matter.
BUT > should you have massive smudging, here are a couple of tips:
1. Make sure you are using student grade oil pastels. They have less oil and therefore tend to be less smudgy than adult versions of oil pastels.
2. Work Left to right with right handers and the opposite for left handers. Work from the top to the bottom. Direction helps prevent the hand from smudging the pastel.
3. Use a piece of copy paper to place under the hand while coloring.
Hope this helps! Let me know how it works out 🙂