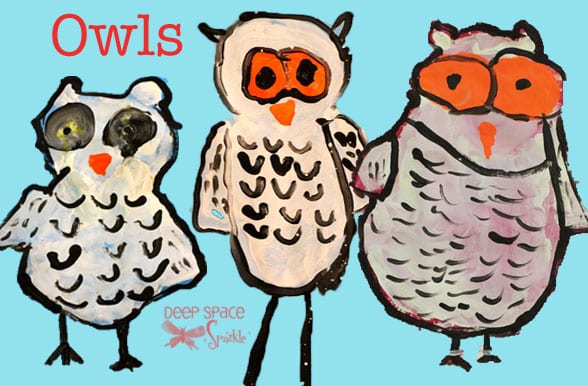


This just might be the most adorable owl painting ever. Inspired by 4Catslife’s owl painting I saw on Pinterest, I took no shame in trying to copy the piece as best I could. My kinder classes were the lucky recipients, but this lesson is easily adaptable to any age group.
Supplies
The supplies are simple: white 12″ x 18″ paper, tempera paint and small, medium and large brushes for the paper painting and splattering, medium for the owl painting and small for the black detailing.
How to Paint an Owl
The children began the project by choosing either turquoise or magenta paint for their sky. You can get creative here and add more colors but I wanted to keep the prep simple.
After painting the surface on the white paper (it’s okay to have some white paper showing), children began sprinkling and splattering white paint over the entire surface. It would help to have some baby wipes on hand to clean faces as the paint gets everywhere.
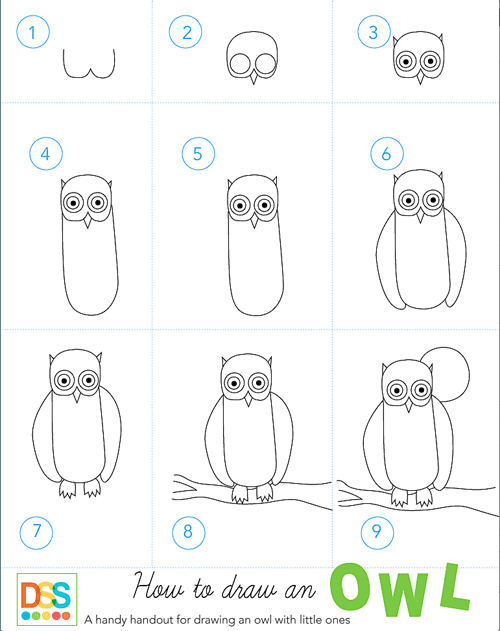
You can stop at this point and let the background dry, but who has the time? Onto the owl….dip medium sized brush in white paint and draw a circle (head), letter “U” (body), small side wings and two small ears at the side of the head (not on top). Color everything in with white paint.

This is an ideal place to stop to let the white paint dry. But if you need to press on, children can then choose to leave their owl white or use another color to paint over the white.
Laying down the white paint first provides a neutral backdrop for other colors. For instance, if a child painted a yellow owl directly onto the blue paint, the owl would look rather greenish. Perhaps not what the artist intended.
The Fine Details
Finish painting the owl, add big circles for eyes, add a beak and finally a brown branch. At this point, you might feel as though the project is just one big blob of paint. And it may be true. It’s the last step that really makes the difference. Using a small brush, dip into black paint and outline the following:
- The owls body, including wings, head and ears
- Add skinny legs
- Add dots for the pupils
- Add small feather strokes…little “u’s”
- Add details to the branches or add extra twigs
- Finally….ask the child to sign his name to the bottom of the artwork.
Now, I ask you…aren’t the owls absolutely adorable?

Click the banner below to get the Owl Drawing Guide sent directly to your inbox!


They look fabulous!! I will share on my facebook page as we are focusing on owls all month in our studio – will try this out soon with my 3 year old 🙂
Wonderful!!! Their owls have so much personality! There is a book called, THE LITTLE WHITE OWL, by Tracey Corderoy. It has beautiful, colorful owls with simple patterns. My 1st graders drew with black crayon and painted with bright colored liquid watercolors. They loved it! I am excited about trying your owl project. Thank you for sharing!
I know of that book…duh! I should have read it. Would have been perfect!
These are so sweet and full of personality!
Wow, these are fabulous, Patty!! Definitely one to ‘steal’!!
I know…I stole it, too!
I love that title, Patty! Kinder Owls! What a hoot! (pun intended………..:))
Patty, you are a superhero. I tried this owl painting today with my K’s today. We needed a painting lesson to fit in between some other stuff and I thought this would be perfect and I loved your images posted. We’ll finish them in the next art class, but will do the outline, eyes, legs, feathers etc with oil pastels instead of paint. Anyhow, they look great, but WHAT A MESS. Two messy paintbrushes per kid times two classes full of kids with no time to clean them up in between meant a LOT of brush-washing at the end of my morning and then I had two 6th grades and two 5th grades all doing their own bits of messy stuff. (THANK YOU to the 6th grade girls who washed ALL the brushes and paint dishes- I had just tossed the brushes is a bucket of water and the paint dishes into the sink.)
There were some lovely spatter-painted kids as well as snowy skies on their paintings. Messy messy! Like I said, you are a superhero!
Ha! I know…way too many messy brushes. The ones I use are pretty easy to clean though. They are small so clean-up is quick. The brushes that are a disaster to clean are the big fat ones I use for painted paper. Takes 30 minutes to get these puppies clean! Glad you tried the lesson. The painting all comes together in the end with the outlining.
These owls are arorable! I love how they all look so different, and you can see their creativity!
Michelle
Apples and ABC’s
I adore your blog and find inspiration every time I visit. I did this project over two days with my Grade 2 students and it was so successful!
http://thereisabookforthat.com/2012/10/26/owls-all-around/
Thank you for the step by step instructions that always accompany your posts!
I just did this with my KDG crew. They loved it, the parents love it, and It makes a killing on Artsonia!!
=)
thank you so much for sharing!!!
Forgive me for sounding nitpicky and bringing science into your art area ;), but my second grader is obsessed with animal trivia, so I had to do a little research before we do this project…. Your examples are adorable, but snowy owls don’t have “horns.” However, I did find that sometimes the Great Horned Owl can be white! So that is what I am showing him as an example, along with snowy owls as a different option. Lovely results from your kinders! Thank you for sharing so much of your planning with your blog-readers.
http://en.wikipedia.org/wiki/File:White_horned_owl_portrait.jpg
Thank you, Gina! My kinders had a great deal of FUN with this “Snowy Owl” project. I like to intergrate science and art. We are now backpeddling on this ear point and next time will plan to nix the cute triangle ears to be more correct for the Snowy Owls.
I’m not an art teacher, but I did these with my own kiddos. So fun!
http://donna-momof4.blogspot.com/2013/01/snowy-owls.html
Your owls are adorable! Looks like you had fun too!
Do you do this project over two 40 minutes class periods or just one? I was thinking of doing this project using blue painted paper they created the class period before to make it into a one 40 minute project, but maybe the owls need to dry before doing the outlining step. Help me gauge my time, if you can. Thanks!
Hi Alicia,
I think I did this lesson in one 40-minute class. I seem to recall kids painting owls onto wet paint. Using blue paper is a great shortcut, but another shortcut would be to use puck or cake tempera paint or even watercolor paint for the background. These two paints dry quite quickly allowing the owl to be painted onto a relatively dry surface. I like this option a wee bit more as it allows for that wonderful artsy quality. Let me know what you decide.
I need to do this lesson again. Just too cute!
Where can I purchase the 6 cup paint trays that I see in your pictures?
I buy mine form Blick. Here is a link to download all of my art supply lists with links on where to buy: https://www.deepspacesparkle.com/shop/art-supplies-for-the-art-room/