
In The Organized Art Teacher, I will offer creative ways to start the year off with an organized mindset. Let’s face it, art teachers aren’t known for their organizational skills. But I disagree. After perusing hundreds of websites, blogs, Facebook pages, and reading your comments on Deep Space Sparkle, I have come to the conclusion that art teachers are indeed quite organized!
Ever wondered how other art teachers store their old lesson plans and samples? What about creating a balanced art curriculum or how to track what each class created? And what about inside the art room…what’s the best way to plan a theme-based art unit? As the organized art teacher myself, I’ll show you.

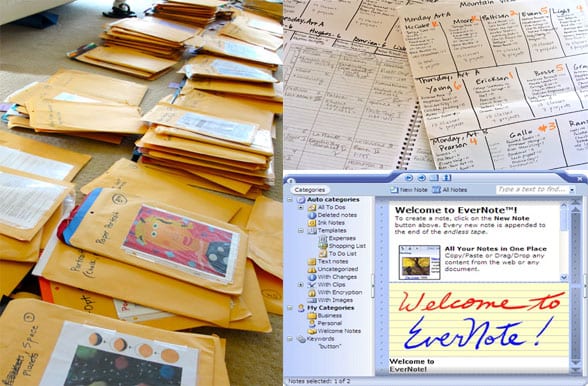
Not long ago, I stepped into my walk-in closet and cringed. Manila envelopes, stuffed with art lessons, occupied more space than my clothes. It wasn’t long ago that I re-classified my bedroom closet to art storage, but this had gotten out of hand. I had started to amass quite a collection of art lessons and given the fact that I rarely repeat a lesson. So it’s understandable that I outgrew this system.
Identify Your Organized Art Teacher Style
The manila envelope system worked well for a while, but because I don’t repeat many lessons, the manila envelopes turned into a huge storage problem. While I hate to throw anything away, there were many items that didn’t have to be stored. This is a general list of what I found in the envelopes:
-3-4 teacher samples (I kept saving them after every new class, instead of keeping the best one)
-20-30 lesson handouts (drawing aids, idea sheets, etc)
-Photo clippings of subjects (calendars, magazine clippings, Internet pictures)
-Picture books associated with the lesson
-Lesson step art work for tutorial purposes
-Templates (if applicable)

EDITING TIPS for the Organized Art Teacher
To make the envelope system more efficient, I gathered all bins that held the envelopes and dumped the contents over my bedroom floor. I grabbed some post-it notes and made several categories.

There are more, but you get the idea. I selected categories as my guide with the knowledge that categories are my best reference tool. You might consider technique as your best reference tool. If that’s the case, you would label your post-it notes with watercolor, pencil crayon, collage, etc.
Once all the post-it notes were done, I placed them all over my floor. Then the hard work began. Sorting through each bin, I placed each manila envelope containing just one art lesson in one of the post-it note piles. My goal was to reduce the amount of envelopes and also reduce the amount of support material for each lesson. Your goal might be the opposite: to gather all the support materials, teacher samples, etc and put single lessons in each file. You need to figure out what works for you.
EDITING THE LESSONS
No one wants to throw out lessons but I had many that I had no problem parting with. Here is my criteria:
-If a lesson hasn’t been tried in 2 years, toss it. This could be a seemingly cool ceramic lesson that you saw in an art magazine, but since you don’t have a kiln, well…what’s the point? Don’t fool yourself thinking that you’ll need this fantastic idea someday in case your budget affords you a kiln. Believe me, you’ll find something else to do by then.
-The lesson looked great but just didn’t work out with your students.
-The lesson took way too many classes to finish and the results or learning experience just wasn’t that overwhelming.
-You don’t need teacher samples, handouts or calendar visuals to do this lesson (many directed line drawings fall under this category).
Once you got rid of the unwanted lessons, start sorting the ones you do like into the post-it note files.

I decided which lessons plans were good enough to do again or had a compelling enough concept that I knew I would use in the future. Then I attempted to store as many art lessons into manila envelopes. This time, however, I purchased larger envelopes (14″ x 18″) and kept only the following per lesson:
One teacher sample
Original copy of handouts
Magazine clipping, print out from Internet, etc. (Placed in a plastic sheet protector)
I edited well enough to combine 4-7 lesson plans in one envelope. I recycled the hundreds and hundreds of handouts that I accumulated, put the picture books back on my book shelf and recycled the teacher samples and tutorials into paper bins for future paper scrap art projects. Now if I want to do a Van Gogh art lesson, I can pull out the envelope and see what I have done in the past.
The idea is for me to have reference materials. This is best for the way I teach. Remember, this only works if you don’t like to repeat lessons often.
USING A BINDER The Organized Art Teacher Way
I asked my Facebook friends what type of storage system they use for art projects and a majority responded with the binder method. Jill Linnell organizes her binder into types of projects (how to draw, holidays, kid literature, artists, etc.) She places student examples in the same page protector for easy reference. Keri Smathers Pye takes her binder a step further and fills her binder with student samples and uses the binder during open house nights and art shows. Brilliant!

When I first began teaching, I spent a lot of time on the computer trying to find art lesson ideas. Many ideas were found on school websites, art gallery sites and product supply sites. I printed the ones that looked interesting and placed them in sheet protectors and in binders. The binder method is a great place to store lesson ideas, printed lesson plans and ideas. I even have one for my Deep Space Sparkle (DSS) lesson plan booklets.

THE COMPUTER ROUTE
Far and away, the most efficient storage method for art lessons is on your computer. An organized art teacher can scan artwork or take photos (which I think is easier) and then upload into Google Docs. Some teachers keep their lessons stored in folders on their computer. One of my favorite systems is Evernote. If you’ve never heard of Evernote, you are in for a real treat. One thing that is great about Evernote is that I can privately clip and save all my internet finds into Evernote. This is in contrast with Pinterest (which I love) that stores all my finds publicly. I suppose there are some things you just want to keep private!
If you like to photograph your student’s art work, here are a few tips:
-Use a photo editing program like iPhoto (for Mac users), Photoshop Elements or Picnik. Once you upload your photos, you can then crop and reduce the image size which is super important if you are using your photos for web purposes. I need to resize every single photo I use in this blog to a maximum of 600 pixels or my blog would take forever to load. If you use Blogspot or a hosted WordPress site, you don’t have to worry. They host your extra large photos for free. You can also group student artwork together into galleries to further your organized art teacher goals.
-Place artwork on a flat surface and stand above it to take the picture. I have a low table in my art room which is perfect (no standing on chairs). To make it easier later on, try to include the full artwork in your viewfinder. This makes cropping unnecessary.
-Since I teach in a public school, I try never to photograph children’s faces. That’s why you will rarely see my student’s beautiful expressions on my blog. But if you do photograph your students, make sure you have permission in writing first.
-Don’t use a flash. Most point and shoot cameras today have a setting that allows great photos without flash. On my Sony Cyber Shot it’s the ISO setting in the menu.
Whew! That was a lot of information! I tend to use all three storage methods (Folders, Binders and Computers) but which one works best for you? Has anyone tried Evernote? Or Google Docs?
LESSON PLANNING FOR THE ORGANIZED ART TEACHER
I love the New Year. The urge to clean out my kitchen drawers and edit my paint-splattered t-shirts only happens in January. And with all the resources available through my lovely computer, I don’t even need to leave home to purchase a calendar or find inspiration for tidy shelves. Here are some things to print out, to help you get a leg up on your lesson planning for the rest of the school year.

CURRICULUMS
I’ve posted about lesson planning many times, how to develop a curriculum to the basics of lesson planning and there is one thing I’ve learned; everyone does it differently. I’ve looked at other art teacher blogs, organizational blogs and even read a few books on art lesson planning and it always comes down to this: be inspired by someone but then add your own twist.
ART TECHNIQUES
When I plan my lessons, I use techniques as a guideline. I often teach the same technique to a grade level but use a different subject matter for different classes. For example, if I’m teaching a double-loading technique with my fifth grade students, I might do a classic Van Gogh style flower and vase with one class and a Royal King and Queen with another. It benefits me in two ways: I don’t get bored (which I often do with teaching the same lesson over and over) and it provides me more opportunity to test and try new art lessons for my readers!
Planning and documenting is important, mostly because my memory just isn’t what it used to be and I do so many different lessons. I don’t like to be too strict and unforgiving with my lesson structuring because a lesson just might not be as successful as I thought, it could take more class sessions than I had planned, etc. So I keep it loose and easy.
PLANNING UNITS
I have never been a “units” type of art teacher. And it’s for good reason: it’s hard! Units are hard for me because I don’t teach all grade levels every week. In fact, my rotations are mixed by grade levels, so I see my Kinders, Fifth and Sixth graders for 8 weeks and then boom…gone for another 8 weeks.
But I have tried this year and have figured out the best way for me to organize a unit: mood boards!
The whole idea for an organized art teacher is to gather pictures, stickers, visuals, illustrations and even typography of items that interest you. I used Pinterest as a starting point, pinning then organizing themes into boards.
For my State Farms and Fairs I found an adorable cow painting. The perspective was different and I knew that my older students would really enjoy drawing a cow from this angle and playing with pastels to achieve the dewy appearance that makes this artwork unique.

ART SUPPLIES: THE SKINNY ON BRUSHES
Ordering art supplies can be a daunting experience whether you classify yourself as an organized art teacher or not. It’s hard to know what kind of paper works best, which set of oil pastels to buy and what will end up gathering dust.
Having the right brush can mean the difference between a satisfied artist and a frustrated one. It’s taken me a while, but I now have a favorite brand and feel confident recommending it to you:
Royal Big Kid’s Choice Soft Grip Brushes
I love the plastic handles and the soft rubber grip. The plastic handles mean that you won’t have to deal with peeling paint typical of the wooden brushes. If you’re not an art teacher who will benefit from the assorted sizes, don’t worry. The brushes come in smaller packs. The ones I use most often are the large red square tips and the large green round tips. The small green tips are especially useful for applying a black painted outline. I do this often so a small brush is very important in my art room. If you are a classroom teacher, I don’t recommend packs. They just aren’t necessary.
For most tempera and watercolor paint projects any school grade medium round brushes (size 8 or 10) will do the trick. These are all you need. For detailed work, have on hand some small round brushes (size 2 or 4). I don’t have a favorite brand but my advice is to look through an art catalog like Dick Blick, Sax or Enasco and search for brushes designed for tempera and watercolor. Buy whatever fits your budget.
 For Kinder through to at least 3rd grade, stock up on enough Crayola “So Big” brushes for the class. I’m not brand particular here, so just buy the cheapest ones. The idea is to get the paint on the paper as fast as possible
Acrylic Brushes
If you like to use acrylic paint (I don’t) then you’ll need stiff bristle paint brushes that can stand up to the paint. The pack on the left is about $15 for 24 brushes. Remember, if you use acrylic paint, you must clean your brushes very well. If not, plan on throwing out those brushes. I have collected many different types of brushes and the ones I always wish I had more of are oval wash brushes. These are the large soft brushes that can absorb lots of water–or watercolor paint in my case. I like to use them to apply a broad layer of watercolor paint over a resist like oil pastel. Kids love the ease of the paint application and it’s speeds up the art process too! I hope you find this list a little bit helpful.
Storing Supplies

Large cupboards flank the perimeter of my art room. I fill them with paint bottles (watercolors, tempera, metallic, glitter paints, etc.), paint brushes. I try to sort my tempera paint bottles by color and for most of the year it stays that way, but by the end of the year, it’s just a big mess.
Flat drawers under my sink counter are perfect for pastels, painting and prep supplies (water containers, plastic trays for paint, palettes, sponges, etc.) When I’m prepping a lesson, this is where I stand. Everything I need is one drawer pull away.
This section contains affiliate links.
DOWNLOAD THE ORGANIZED ART TEACHER FREEBIE
Follow Us
Thanks for the tips. I am trying to organise my work from last year over the summer before I go back to school. Lots of good ideas here.
Hi Patty, I completed the same daunting task about 6 months- I keep all my lesson materials in A3 clear plastic envelopes they are very sturdy and can see at a glance what is in the folder. I use a brother labeller to label each folder. I keep all the lessons ideas and plans in a A4 plastic folder within the folder along with thin books and calendar images etc. My ultimate goal is to get everything online with power points to use with a smart board – It is such a help having done this – Student samples if they are 3D are on display or stored in large plastic tubs- I have recently started photographing them to get more space – like you I see around that many students per day but have my own art room- blessed to have not had to move rooms for the last 11 years and will retire there. Now on 6 weeks Summer holidays here in Australia. Happy New Year to you and your family.
Wow! Great post. I store a lot of my stuff in google docs but I’m going to check out evernote. Thanks for the info.
Barbara
Grade ONEderful
Wow, I love this post! I am very organized in my classroom since I do a 4 year rotation of the masters for 3-8th grade and the plan is the same each year for K-2 but my organization at my children’s art studio is a bit scattered! At school I use manilla file folders for each grade, for each project, with all the samples, drawing aids, and material lists. I can’t wait to work your ideas into the studio. Thanks a bunch!
I had never heard of Evernote….I looked into it and now I am hooked! I have started to organize all my stuff into notebooks and I like that I can find things much quicker!
Oh good! I love Evernote too. It’s such a great way to store articles from blog posts. Glad it worked for you.
just came across your post on Pinterest. Great post with great ideas! I use OneNote (which is on most computers with Windows 7) it is very similar to EverNote.
This was such a great inspiration. After 20 + years of teaching i am still lost and feel like i am reinventing the wheel each week. I am going to try the binder idea. Thanks for your unending generousty.
Hello, and thank you for being a great resource. I teach 150 students art weekly and know exactly how you feel when it comes to not being interseted in repeating a project. Sooooo many great ideas out there waiting to be explored. I made a few lists from which to choose and build my annual plan…like a salad bar. Definately need to teach the elements of art and design (lettus), then add the months theme (Fresh mozz. cheese), choose the best technique for the theme (black olives), something to give the students the context they need for understanding, like a book (light vinegarette dressing) and I always teach a character trait with each lesson like patience (sun-dried tomatoes)… I take photos each year of my classes and have them printed by Blurb… I don’t have past project items lying around – just mounds and mounds of experimentation…..what a mess! Time to figure that one out!
I am at three schools this year. Besides using a wheeled bin to carry some of my lessons, laptop and grade/plan book in, I began creating powerpoints so that students could see a variety of ideas related to a project. At times, we do not have a projector, but I have found gathering the kids close has created a cozy environment in which to debate and discuss artworks. My large visuals are categorized by animals, fish, envoronment and sometimes artist or project.
I need to get a projector!
really great ideas here! Thank you for sharing it’s always interesting to hear other teachers’ process! You bring up wonderful tips!
This year as a pr-k teacher I’ve decided to create an art studio for our four and five year old students.but I’m quickly discovering that the parents also are the one’s wanting to learn.
But back to the idea of a studio..I’m starting from scratch the basic art supplies for a clàssroom but I’m not sure how to setup the space any ideas? Oh and the studio is outside with plastic milkcrates, wood, and mudpit near by by a foot!
I started using the Seesaw app to upload student work to a portfolio for each student and it’s so nice to have all of their examples in once place to pull from. It also makes grading a breeze!
I use Artsonia as a way to save my students art work digitally. I also find the web site useful when I am looking for ideas or student examples for an upcoming project.
i’ve been trying to come up with a way to organize plans per class every class per grade level may not be on the same part of the project on the same week or day. How do you keep that organized?
I do like your other organization idea and will definitely ue them
Very useful
Hi there! Just a note- you can actually store privately on Pinterest also- you just create a board and toggle switch the public to private. It will show a lock icon meaning only you can see it.
Thanks so much for all the great tips- trying to get organized on my 2nd year of teaching Art, with about 15 years of “stuff” left from the previous teacher.
How do I teach first grade to paint like Judith leyster the jester painting?
Do you have a lesson plan packet for purchase of THE MASTERS?
Right now, we have Master “Bundles” in our shop. You can find lessons, worksheets and videos on one particular master grouped together as a bundle. We have a larger collection that is available to members in our membership program, The Sparklers Club. Each month, you receive a new “bundle” and access more bundles. We have lessons from Rousseau, Calder, Miro, Matisse, Monet…so many! You can join our waitlist to receive notification when our enrollment opens.
WOW! I love your ideas on organisation. Your blog has covered most if not , All aspects of the art room teacher
Thank You
Great! quite inspiring. Thanks for all these Ideas.
I’m going to be starting art classes for our homeschool group and your information is detailed and incredibly helpful. Thank you!
Great Ideas posted here.
I need ideas for for saving large works of art. Any ideas?
This was super helpful compared to all the other sites I’ve read about this topic.. I’m a brand new art teacher just barely getting into it.. 20 years old and super nervous about all this… this gave me a lot of peace, thank you for taking the time to do this, super grateful! If you have any more tips for a girl like me, let me know, anything at this point helps 🙂
I’m a beginner Rt teacher., I tought reading for several years, I would appreciate your lesson plans and places to get lessons.
Any ideas how I deal with virus. There can be no sharing.
I want to download but it will not let me go down the page to submit. My email is Pjallen@usa.com Phyllis
Please reach out to support@deepspacesparkle.com and they can help.
Dear Patty! Very regardful work! I wish you all the best! Zoli
Lots of great tips!
I like to organize my lessons by art concept. I have bins full of Manila folders, each one has the lesson plan, materials (books, templates, etc) inside.plus I write on the folder when I do the lesson. I try to do lessons on a two year rotation so I don’t repeat too often. Each month has its own art concept, plus holidays.
Works for me!
Thanks for the tips! I will use them for sure.
I am inspired with yoour art ideas.
So many great ideas for organizing art supplies and lesson plan materials! I have found that making folders out of two large pieces of construction paper taped together on 2 sides makes a great folio for storing student artwork. I also print out and laminate the Elements & Principles of art handouts to use as tutorial placemats to protect student desks or worktables. My blog is https://ukendoart.blogspot.com/
Loved this! So helpful!
Good ideas
OMG, that text is amazing. You really inspired me. Thank you a lot!
Hello
Need to know if will teach a 10 year old
And need to know where is the place
Thank you