


The 6th grade car mural completed last Spring, marked the 10th year I facilitated a collaborative ceramic tile mural project. Within that span, 12 murals were created to help graduating 6th graders leave their mark. It’s been the most wonderful experience; bringing parents, teachers, district personnel and students together.
After I posted 5 or 6 murals on Deep Space Sparkle, questions from readers pored in. Answering each email and explaining the mural-making process took time so I created this post to explain in great detail how to create this type of mural.
I looked over a PDF I made yesterday and discovered the letter I wrote to potential mural-makers at the end of the PDF. I felt strongly that a collaborative mural be part of everyone’s art curriculum back then and I still do.
Here’s the note…
Embarking on a mural project takes a fair amount of commitment. By purchasing this PDF booklet, you’ve already made the decision to go ahead with the project or you might just be thinking about it. Whatever the reason, I wanted to share with you how significant this project has been to our school.
For years my children’s school did not have an art teacher. When my youngest entered kindergarten, I was hired by another school in our district to be their art teacher. The next year, I was hired to teach at a second school. Their art program was rich and extensive. All students participated in visual art (taught by me) and ceramics (taught by a ceramic specialist). 6th grade students embarked on an extensive project of creating a ceramic tile mural. Beautiful, hand-built tiles dotted the school walls. I was insanely jealous. I couldn’t get over how one school could have so much and another school, just 5 miles down the road, could have so little. Shouldn’t all kids have the opportunity to create such a beautiful legacy as a ceramic mural?
Having no ceramic experience, I acted as an assistant to the ceramic teacher at the school with the mural legacy. I was completely won over by the sheer creativeness and beauty of the pieces the children were creating. I took meticulous notes, jotting down ideas, tips, strategies, etc. I knew I had to bring this project to my children’s school.
I made a proposal to hire the ceramic teacher to head up a mural project at my children’s school, but too many logistical problems got in the way, and when my oldest son graduated 6th grade, my dreams of his class immortalized on the school wall faded. But not for long. The Principal and 6th grade team of teachers hired me to head up the project for the next year. I was terrified. I had no idea how clay worked. I worried about all that could go wrong. But a quick look at our bare school walls, motivation was rekindled.
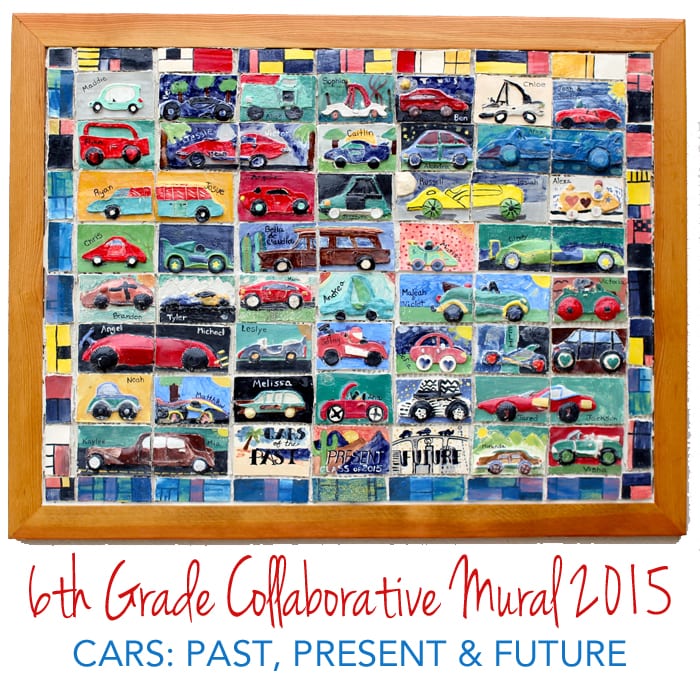
This past year was the fourth mural I helped create at my children’s school. The bowl—the green area surrounded by four school walls—now has added color and brushstrokes of joy. Our graduating class of 6th graders work collaboratively on this annual project and all of them know how special it is. The mural has become a tradition, being unveiled during graduation night, and I couldn’t be prouder as children point to their tile as cameras whirr, click and flash.
These murals are not just an art project, or an activity to meet a state standard, they are expressions of childhood that will not be forgotten. The murals represent pride in our school. And pride in themselves.
I worried that last year might be the last mural I made as I don’t know what my reduced schedule would look like this year. I’m happy to say that I will be back to make another.
Last year’s Car mural had its ups and downs. Here are a few pictures to take you through the process:
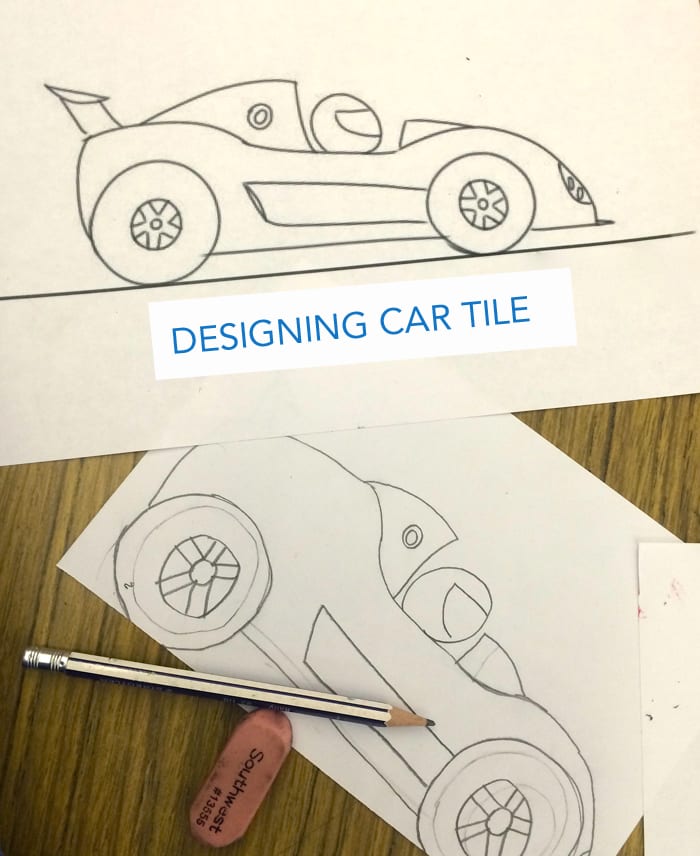
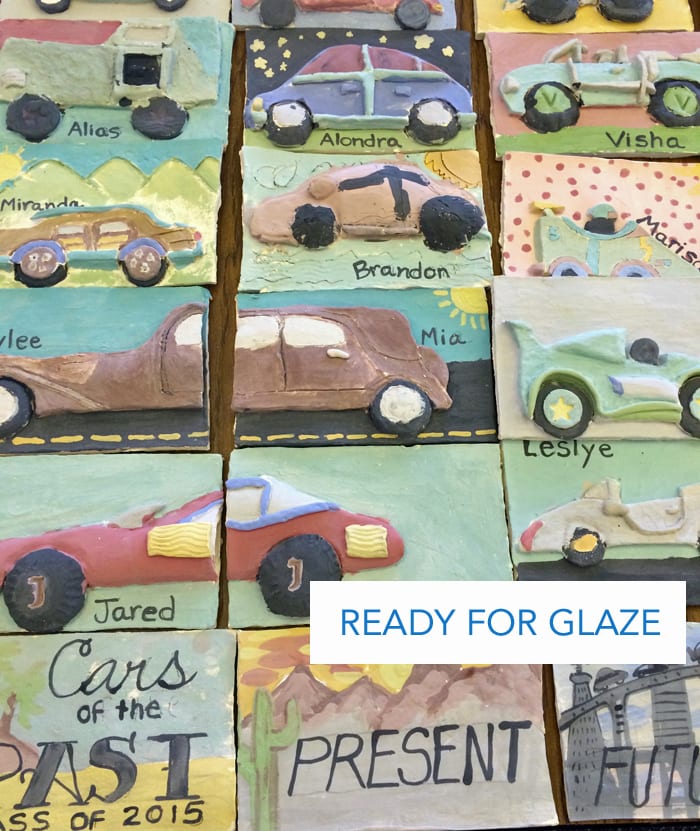
1. After the 6th graders, teachers and me decide on a theme, I do research for the viability of the theme. If I can come up with enough images for 6th graders to consider, then the theme is set in motion. I photocopy lots of different resources from stock photos to reference books.
Depending on the style of mural, children work in groups, in pairs or alone. This year’s mural allowed children to work in pairs or alone.
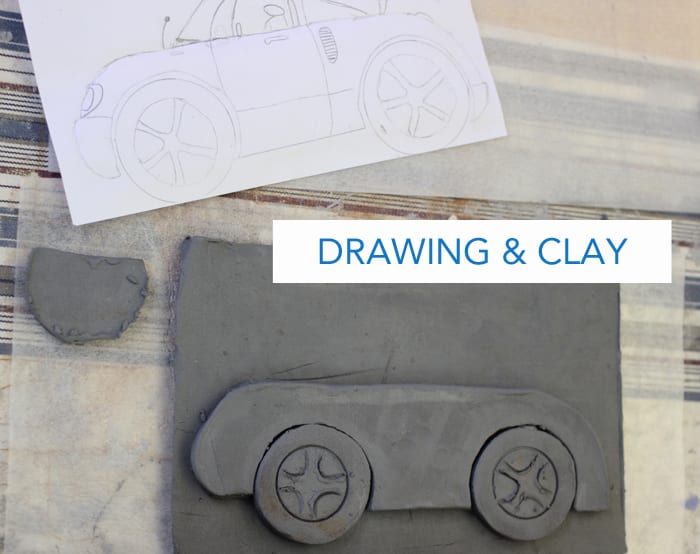
2. Kids transfer their drawings onto clay
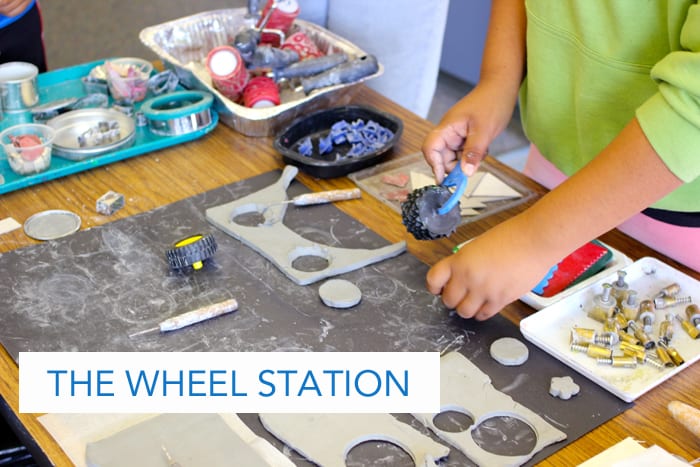
3. Sometimes, it’s necessary to have stations set up to perform certain clay functions. This year, we had a wheel building station.

4. After the tiles are created, I place them on a shelf (with air flow) and allow them to dry for about 5-8 days. If it’s super hot and dry, as it usually is in Santa Barbara, I cover the tiles with plastic to slow down the drying time. This helps prevents cracks.
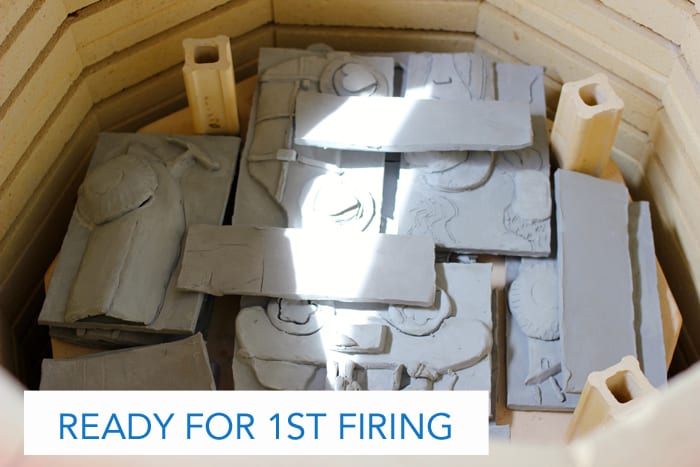
5. First firing is a breeze as all the tiles can generally go into one load.
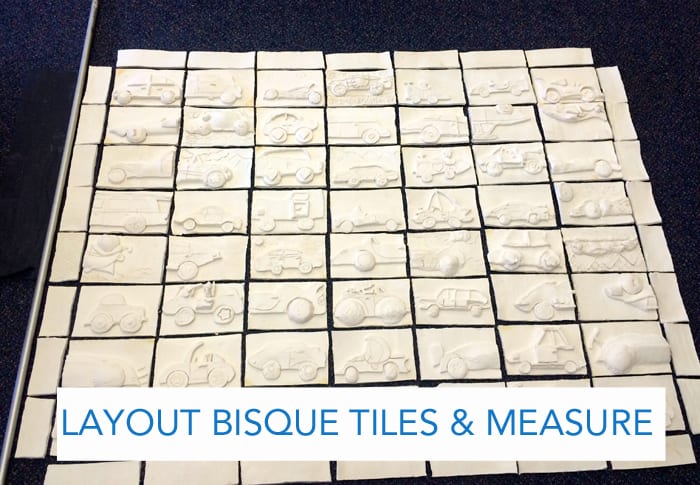
6. After the tiles come out of the kiln, they are white and hard. Now is the time where I lay out the pieces and measure the perimeter for the carpenter. He gets busy creating the frame.
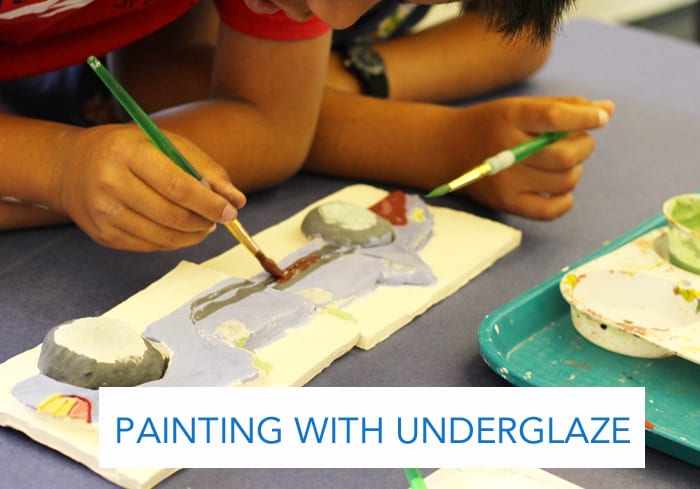
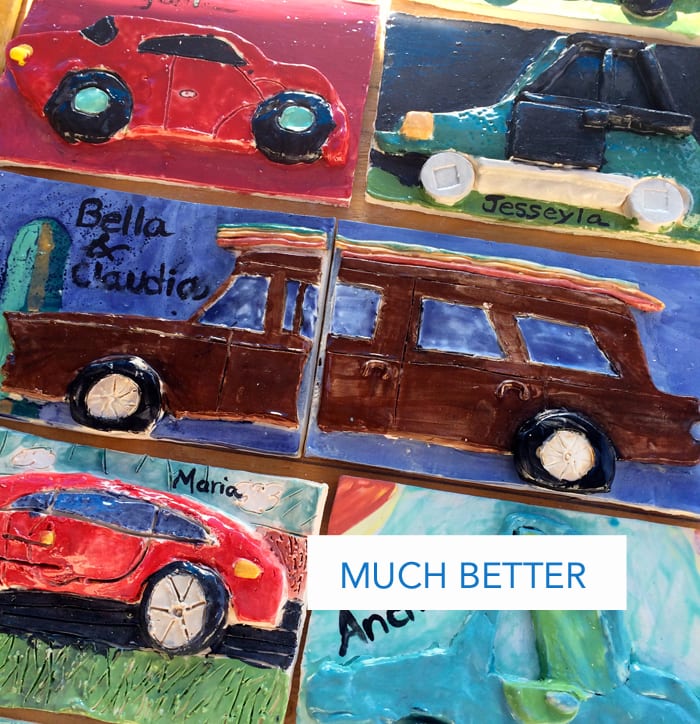
7. I find it easier to paint color onto bisque (fired pieces) rather than wet clay but I’ve done both ways.
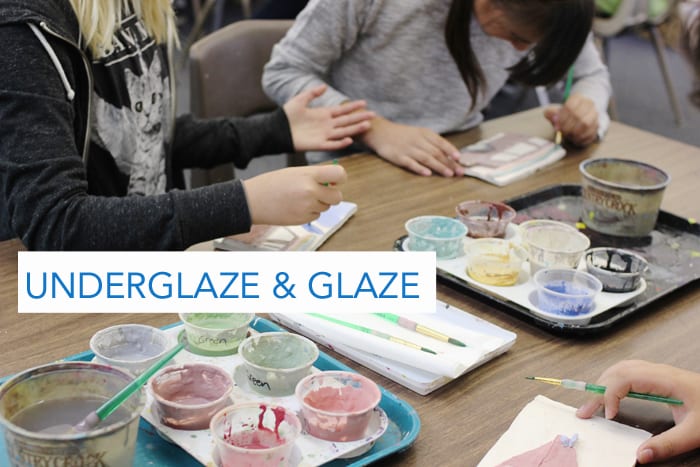
8. Kids who paired up must sit next to each other to ensure that their car sections have the same colors.
9. After the kids paint, I dip them in glaze. Except this year I used a brush-on glaze…
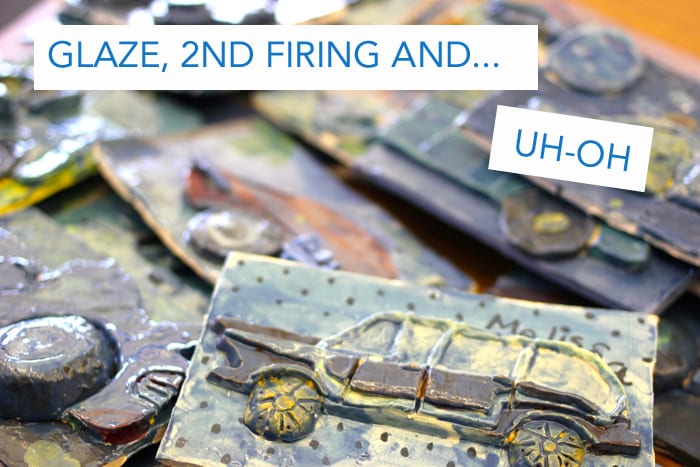
10. Thought the brush-on glaze was clear but as it turned out, it was a bright Danish Blue. Still can’t figure out where I got blue glaze.
11. Half the tiles were affected which meant that half of the students needed to redo their tiles. Repeat steps 2-7. It’s important to note that their classroom teacher was amazing facilitating an extra clay session. Thanks, Emily!
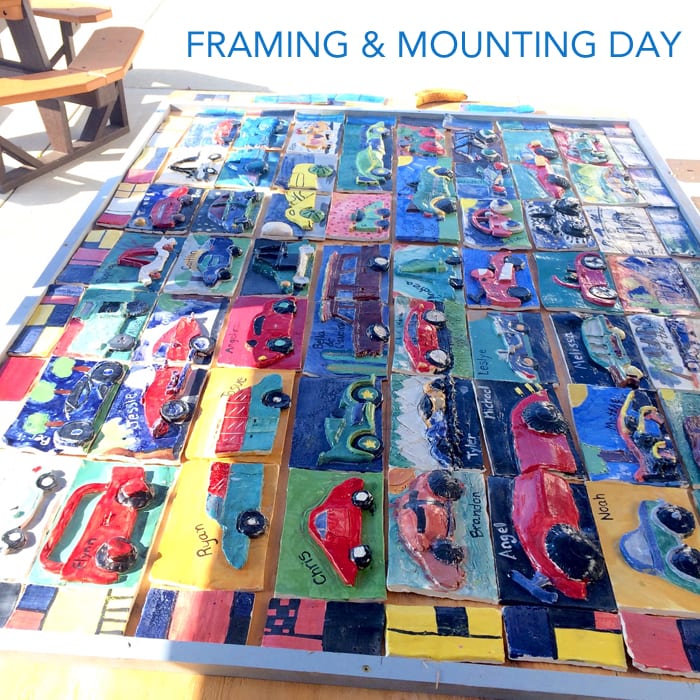
12. And with three days to spare before graduation, we managed to frame, install and grout the mural. This was made possible by the two amazing district guys who work on every mural. Couldn’t have done it without them.
Looking forward to our next mural!
ARE YOU A SPARKLER? Over 300 art lessons are available inside the Members Club. Access to videos, resources & trainings for one low monthly fee.
CLICK THE IMAGE TO SIGN UP FOR NOTIFICATION OF OUR NEXT ENROLLMENT


This lesson is out of this world. Absolutely creative!!
I LOVES this idea! I have wanted to do something similar at the school that I teach in this year (sounds very similar to your old school-not a bit of children’s artwork anywhere!) The only problem I have is we do not have clay or kiln, so I had thought about letting my 6th graders paint bath tiles with paint. Have you tried this and if so, what kind of paint and sealent worked for you? PS: I have a very limited budget too! Thanks a million!
Incredible! I don’t have a kiln. Could this be done using another clay type- sculpey or air dry clay?
Hi Jana,
For this type of mural where it is meant to be displayed as an installation, I would only recommend kiln fired clay. Other clay simply wouldn’t last.
Can you tell me about the framing and mounting process?
I was very forunate to have our school district take care of the framing and mounting. Because this was considered a school beautification project, the district went through official channels to make the mural secure.
basically, the mural was mounted onto backer board, which was framed within a wooden frame. The tiles were glued and grouted and then the frame was hoisted to teh wall and secured.
Enjoy!
Can you tell me about the framing and mounting process?