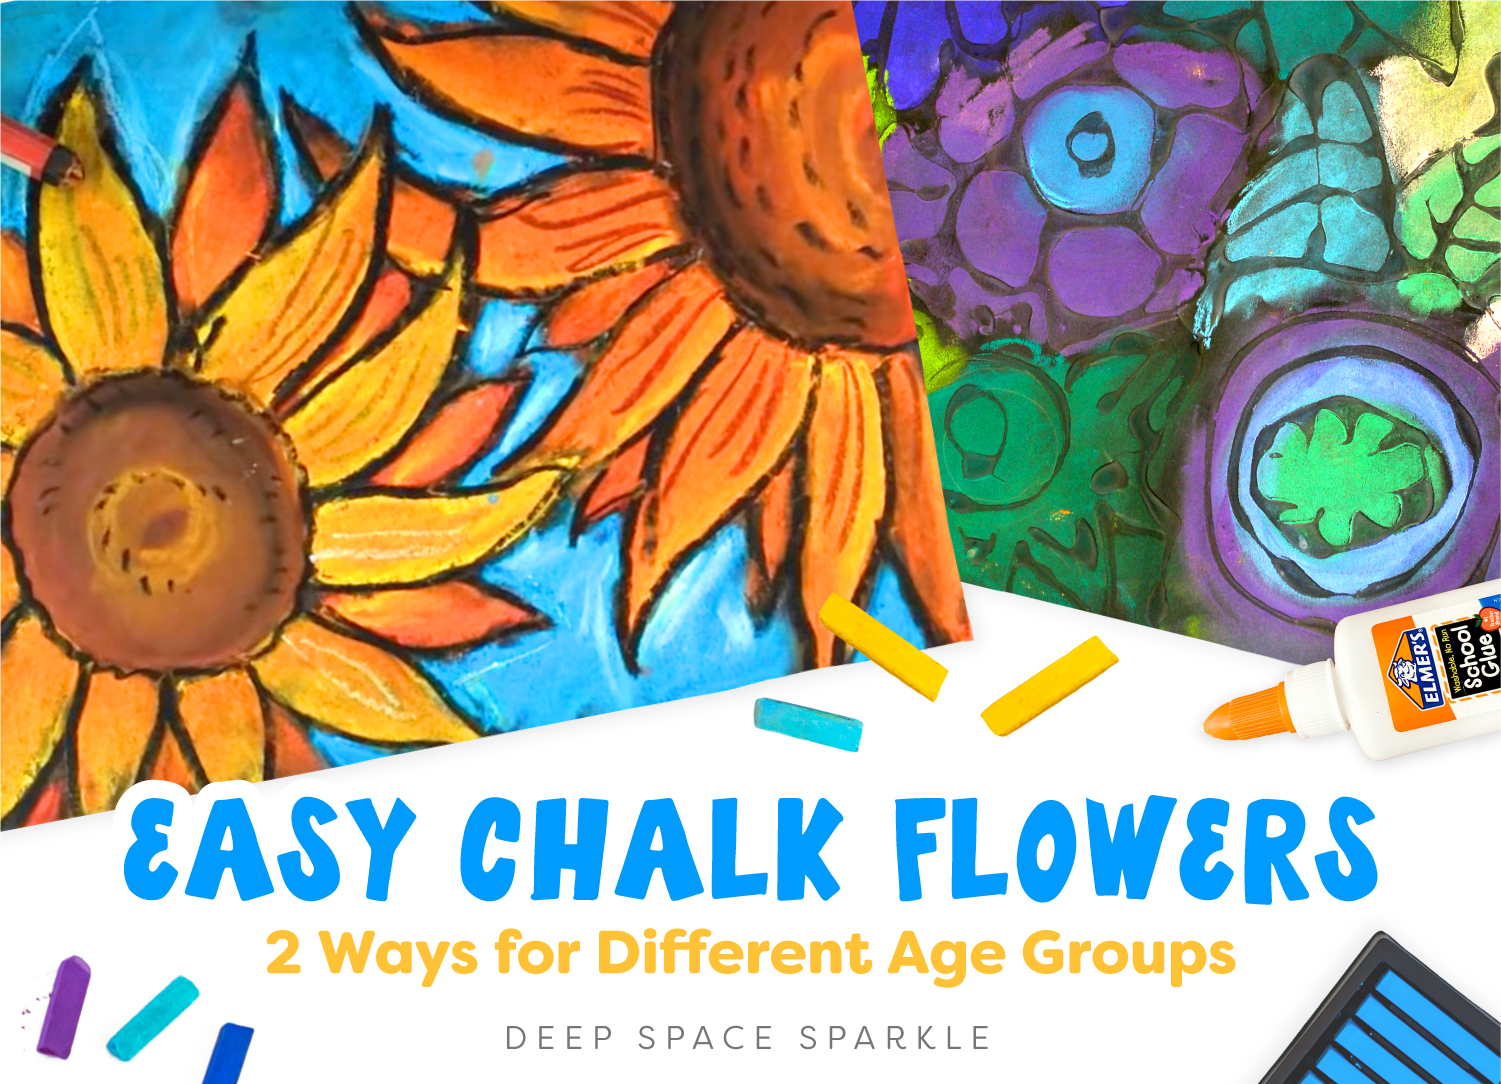


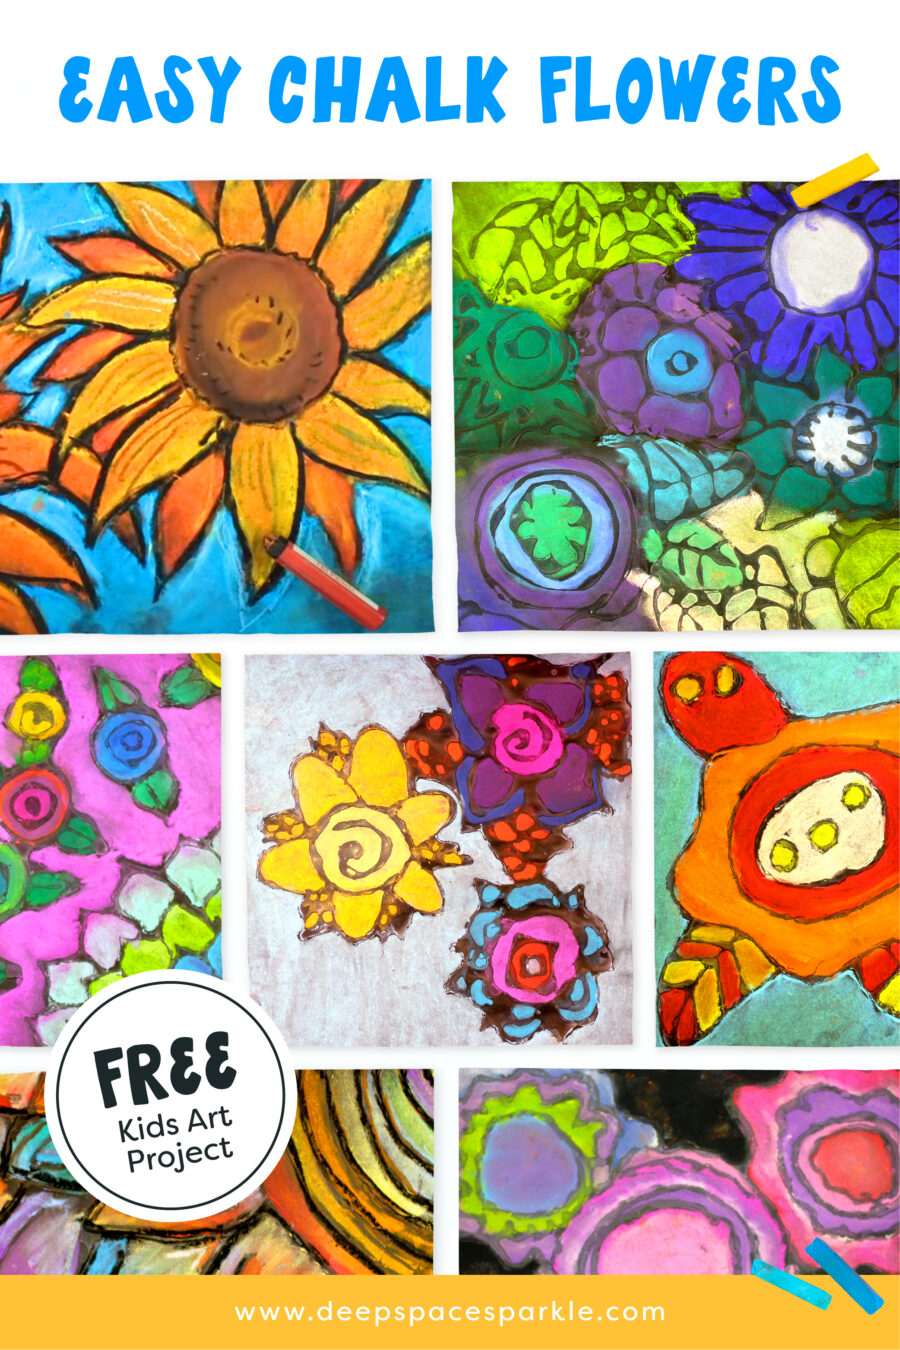
Chalk is an underused art medium. Too dusty. Too messy. High maintenance. And spraying? Forget it. But with these chalk flowers…
I say ignore the bad rap and go for it. Chalk pastels, also known as soft pastels, are an incredible product for kid’s art-making. Similar to old school finger-painting, chalk is truly like painting with your fingers. Kids love it. And when I say that, it’s true. In all my years of teaching, I’ve had maybe two kids who didn’t like the feel of chalk. They totally get into it and come up with the most beautiful expressions of art.

If you are wondering if you should spray chalk art, you can read this post.
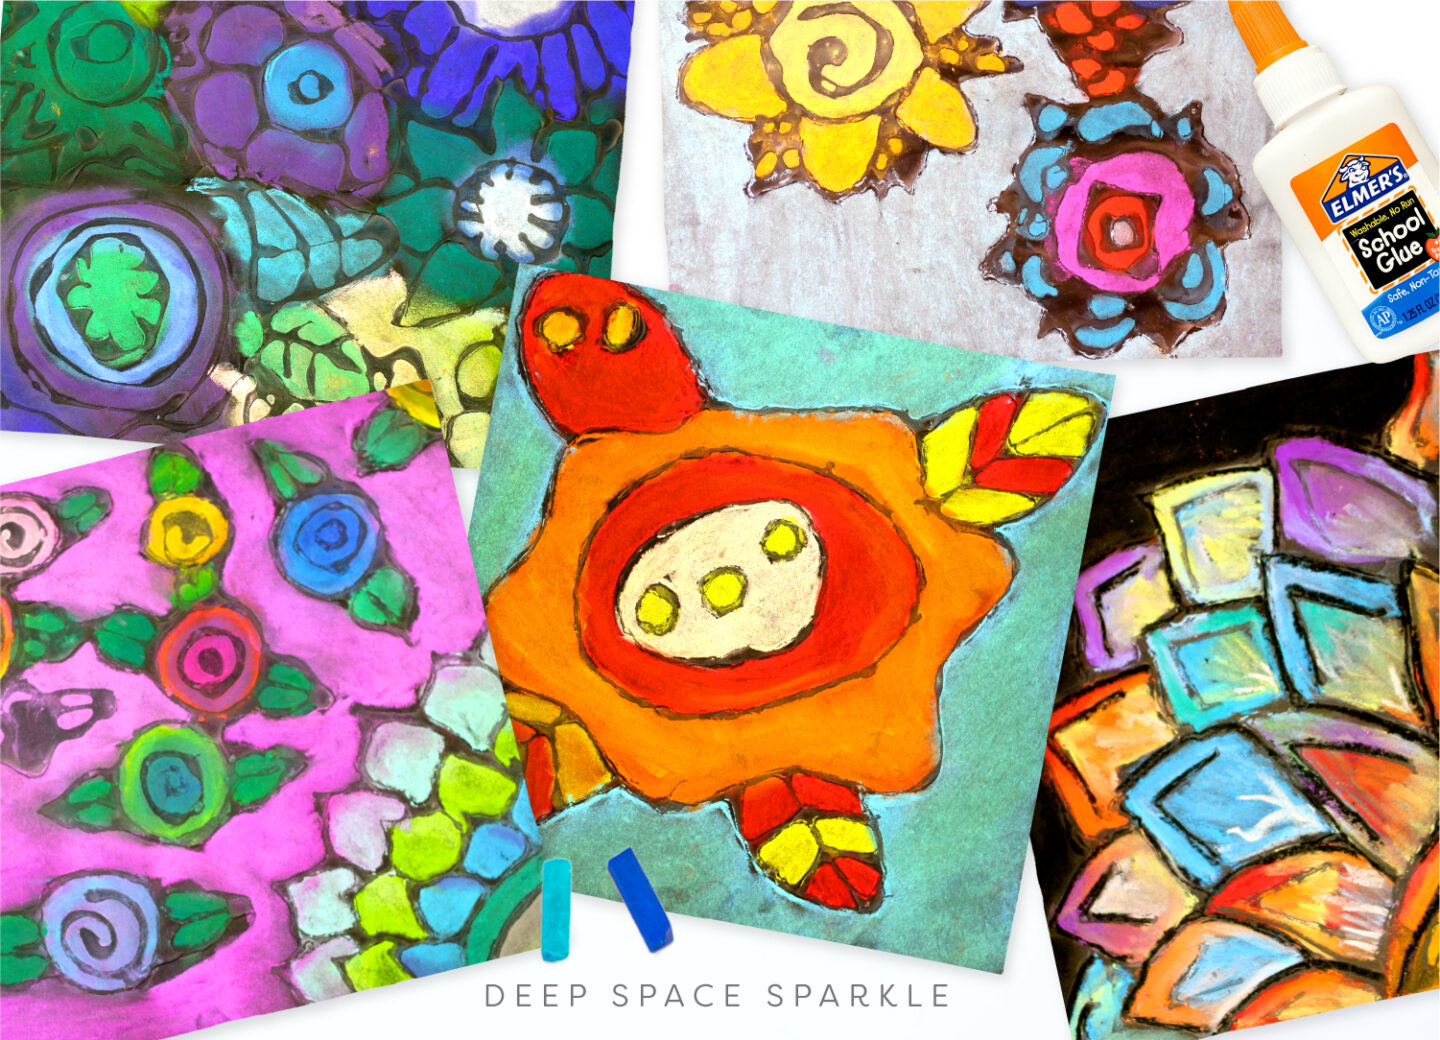
Here is one of my most popular lessons, Chalk Flowers (with the kids!) that uses two techniques:
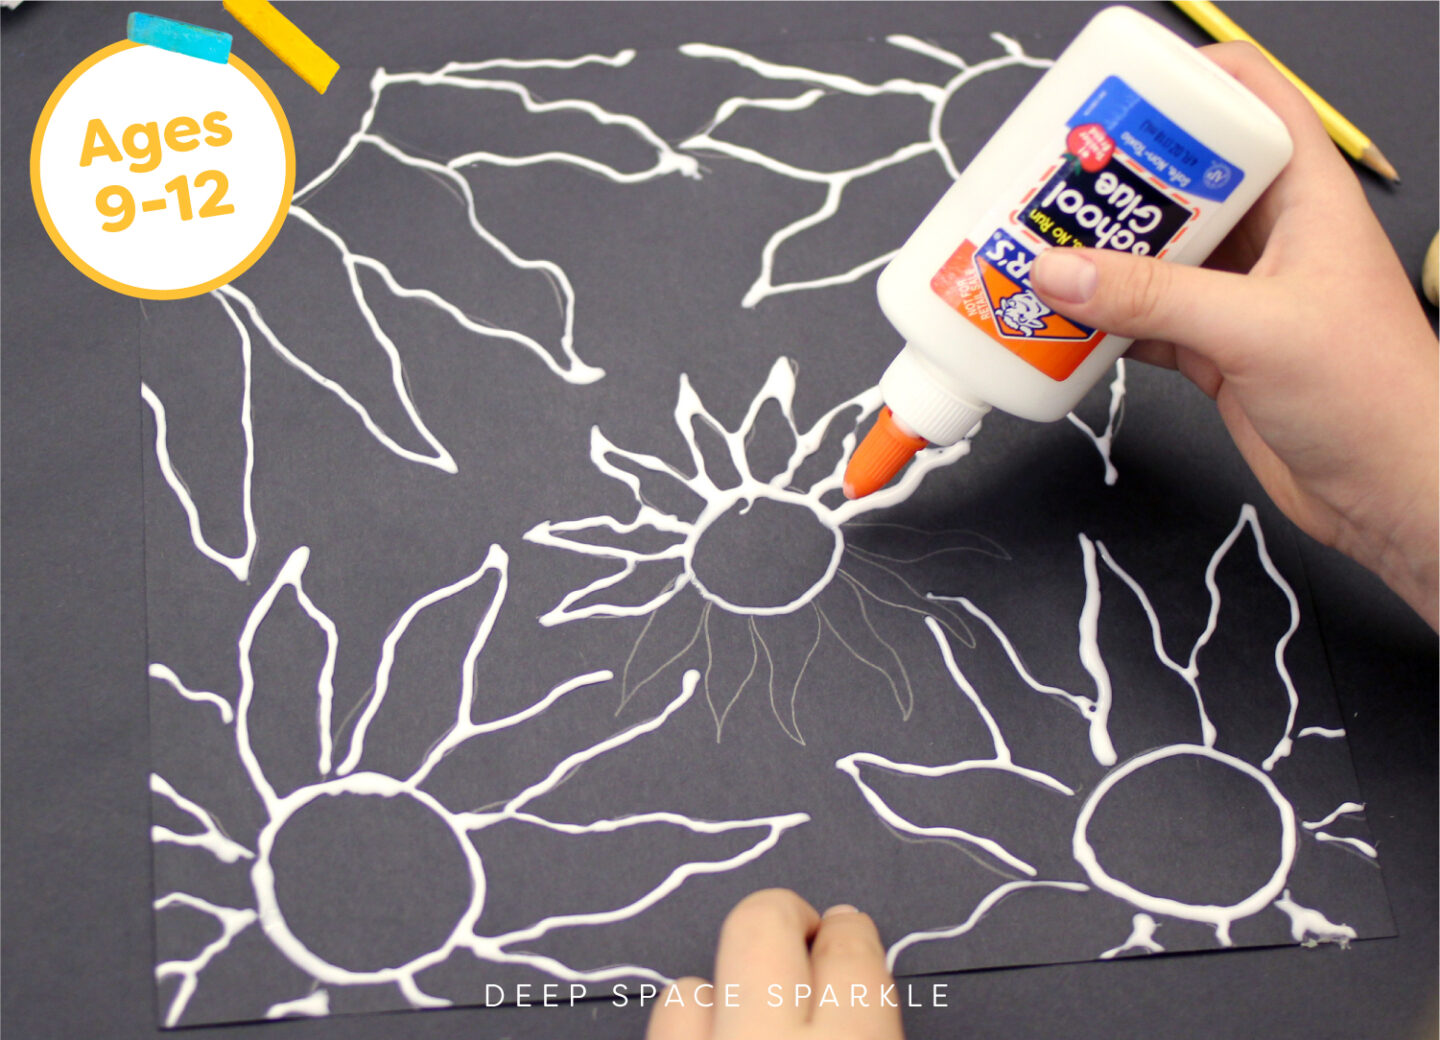
- Pencil, white school glue & black paper for older kids ages 9-12
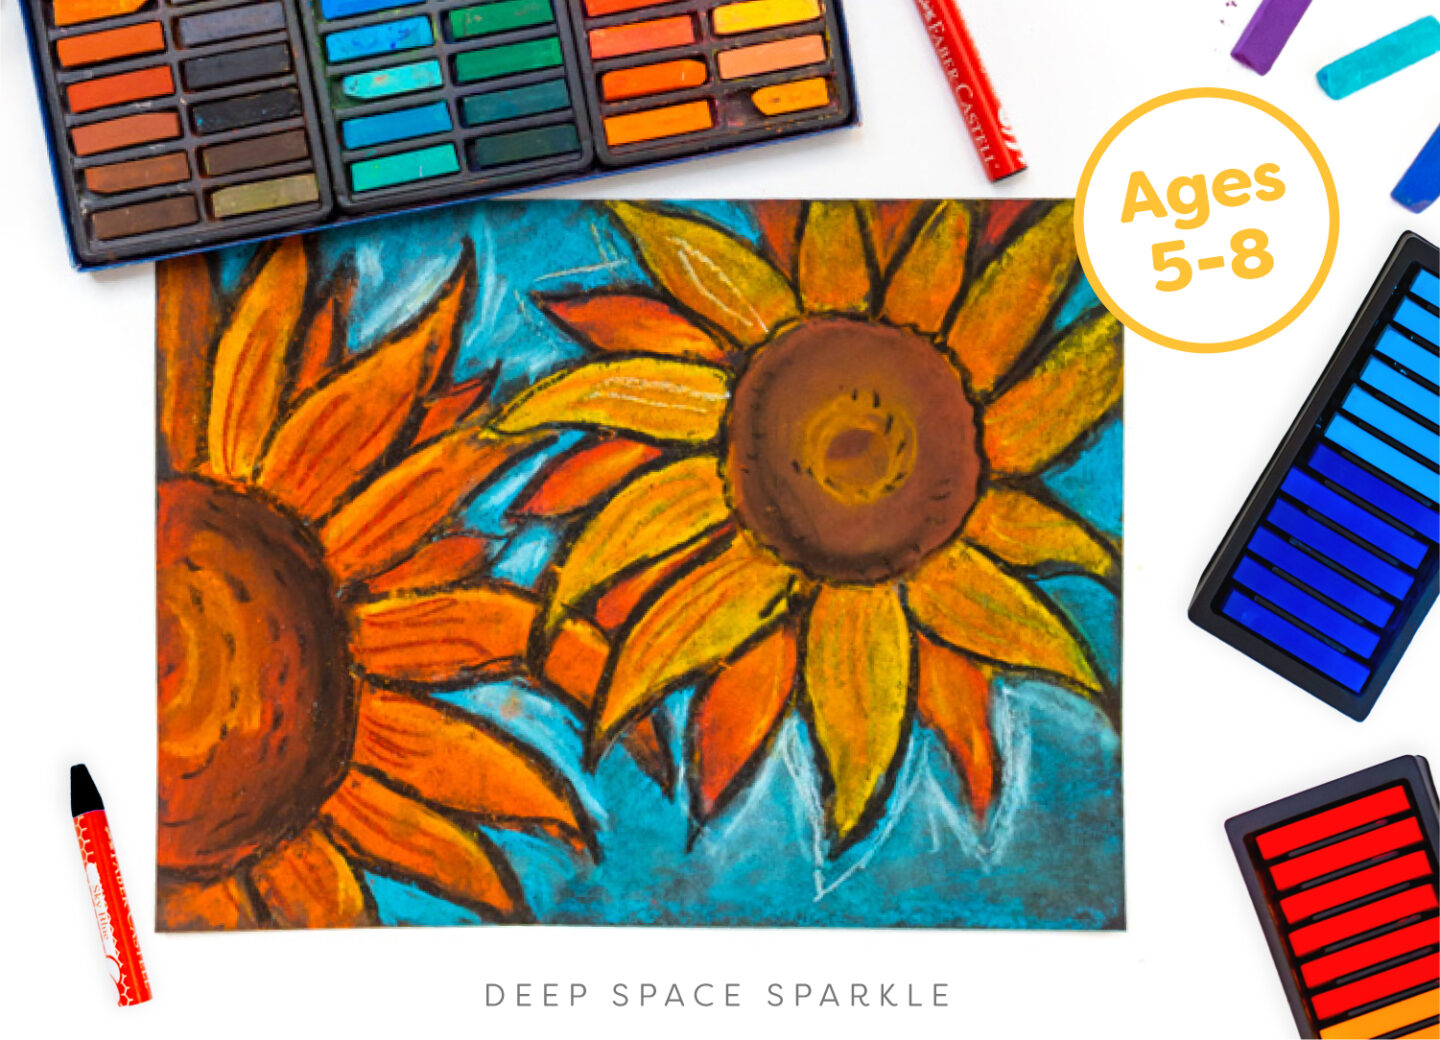
- Black oil pastels on black paper for younger kids 5-8
Sometimes using the right art technique can make or break a project depending on the kids age group. Older kids can manage the handling of the glue better than younger kids. In fact, younger kids can barely brush glue onto paper, let alone draw with it. So unless you want to help your students a great deal, use oil pastels with the younger set.
So much easier and age-appropriate.
For both projects you’ll need black paper. Here’s the thing: it doesn’t have to be large. I like the 9″ x 12″ size or even 12″ x 12″. This makes it easier for the kids to color the entire paper and not get too bored.
Start with the drawing. If you are using glue to draw with, it’s okay to draw simple shapes with a pencil. Some kids may want to skip over this step and draw with the glue. The trick to drawing with glue is to make sure the bottle can squeeze an even stream of glue onto a piece of paper. You should test it first. Then, treat the orange plastic tip as you would a pencil lead and just draw. Start at the left and move to the right if you are right handed.
Let the glue dry over night on a flat surface. Don’t use a tilted drying rack. Drips. Drips. Drips.
For the oil pastel option, don’t use a pencil at all. Show little ones real or photographs of sunflowers or flowers and start drawing. Really little kids (ages 3-5) can be helped by using a plastic container top to trace the sunflowers center. Then the children can draw their petals.
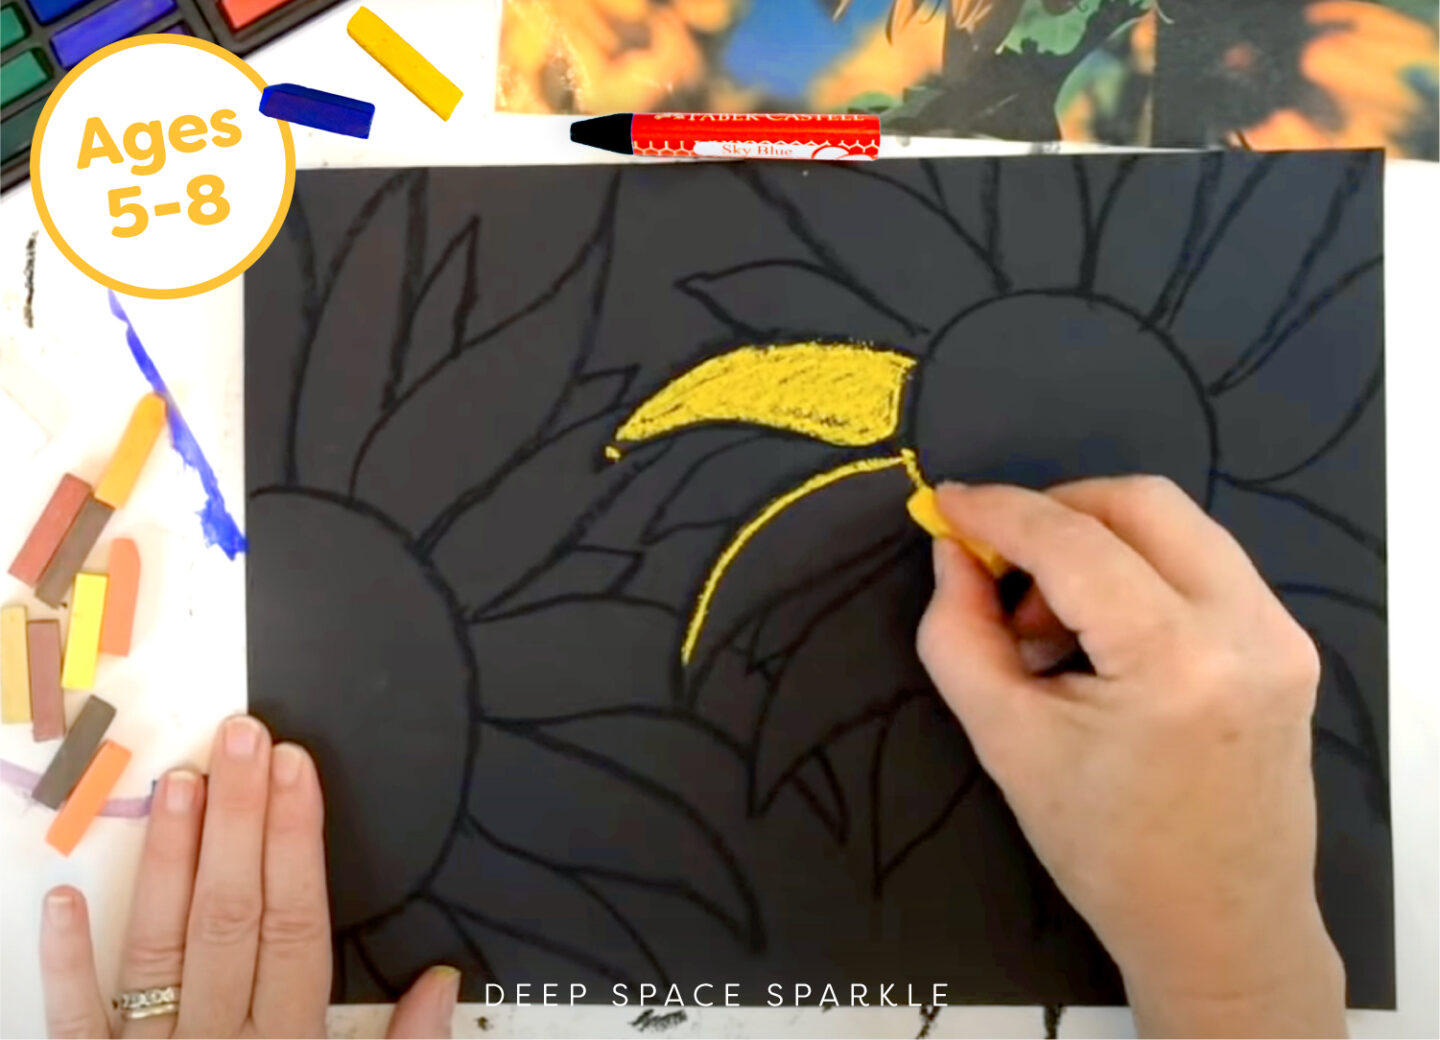
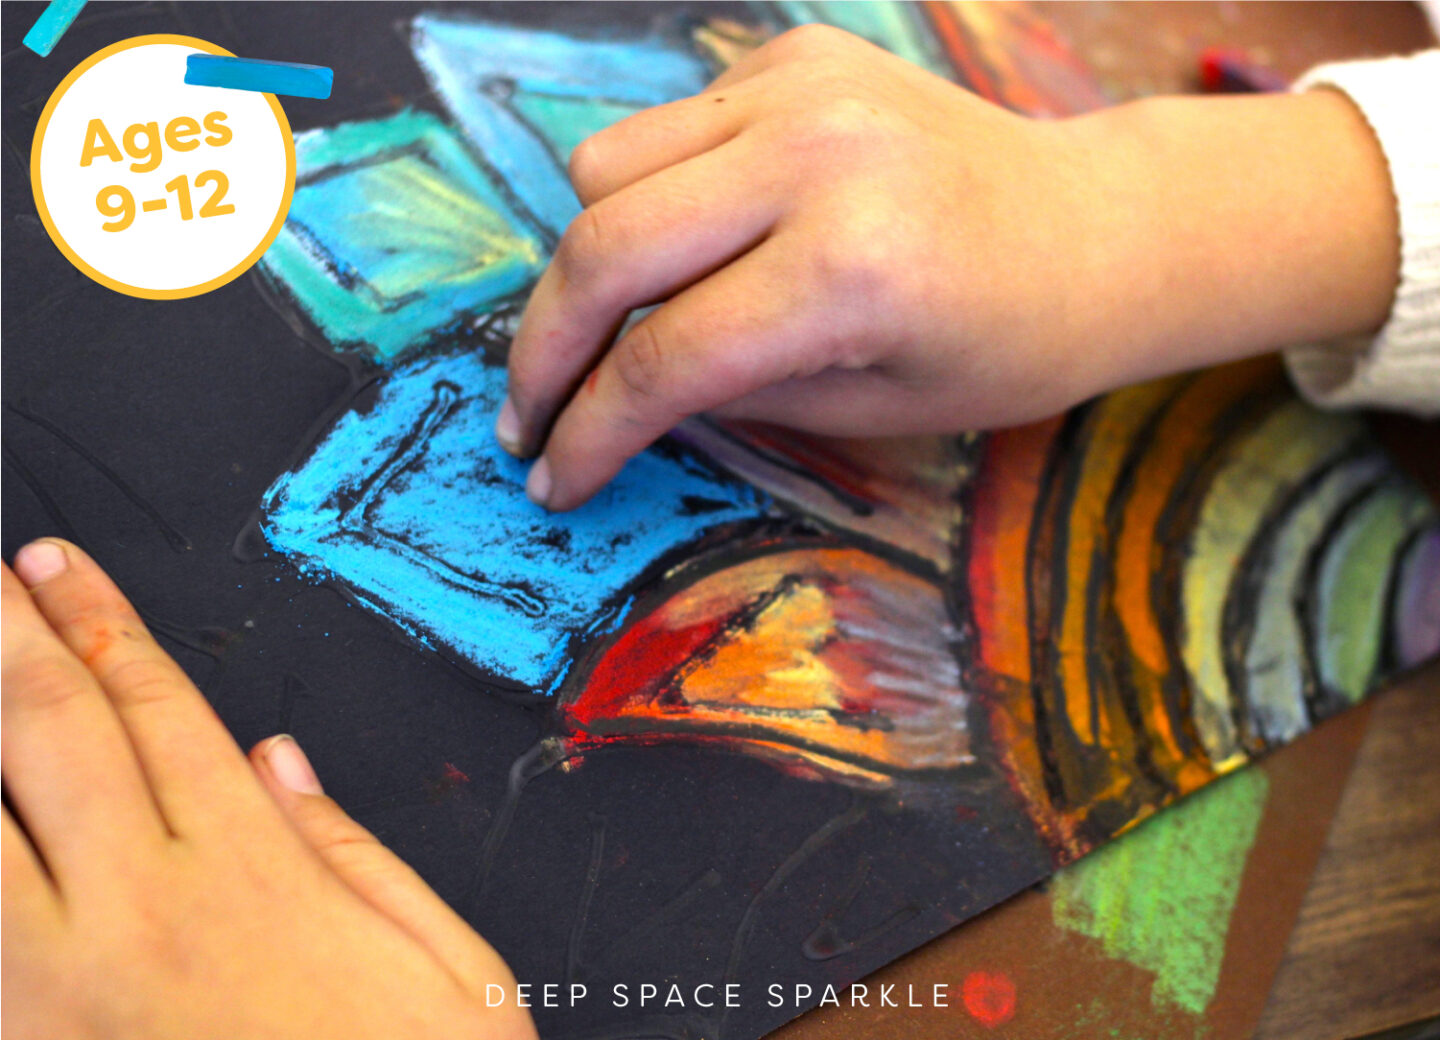
I have tried so many brand of chalk pastels in the last decade. I like the pastels that feel harder as I think they are more vibrant than the softer variety. Start by coloring the petals and then moving to the background. It’s really effective if you use a complementary color for the background.
Yellow > Purple
Orange > Blue
Red > Green
In this video, I show you the steps to drawing and coloring a Chalk Sunflower:
Art Supplies in Chalk Pastel Sunflower:
Tru-Ray Sulphite/Construction paper
Click the banner to receive your free How to Draw Colorful Chalk Sunflower guide in your email inbox!

Chalk flowers with glue (top of gallery) and oil pastel (bottom of gallery). Which do you like? Have you tried the glue method before? Tell me your BEST tip for working with chalk pastels with kids in the comments below…


I just finished a glue and chalk V-tree project with my 4th graders in which they first drew their trees in pencil and then painstakingly went over all the pencil lines with glue and added texture in the sky with dots of glue for stars, and in the grass with zig zags. Then I directed them to make sure and color the tree, the ground and the sky different colors and I showed them how to blend two similar colors and they went to town!
I would add a photo if I could figure out how- and yes they love this project! Kids usually like being messy…
This project sounds beautiful! You can’t share photographs in the comment section of blogs but you can on Pinterest, FB or Instagram. If you do any of the above, just add the #deepspacesparkle. I’ll find it!
You can also join the DSS course FB group and share lots of stuff there.
https://www.facebook.com/groups/DSSstudents/
I also love chalk/pastels, but alas, my district has banned the use of these materials because of asthma and other breathing problems. Sigh…
You’re right, the kids LOOOORVE chalk, (so do I!) especially with the dried glue lines to help contain it. They are always amazed that the chalk doesn’t stick to the dried glue.
A couple suggestions to help keep things cleaner while drying: 1. Have the kids make a border about 1/2″ from the edge of the paper, so no glue is intentionally placed at the edge. 2. Have them put their gluey paper on top of a larger piece of recycle/newsprint/other cheapo paper, and CARRY it that way, as well as placing it on the drying rack with the larger paper still under it. The larger trash sheet catches any runoff.
It’s interesting that you chose to use a sunflower as the subject for your glue & chalk demo. When I first started my current art teaching job, one of the first projects my 5th & 6th graders did was sunflowers with glue and chalk (tho’ they had a choice of black, blue, green or tan paper.) It was for a state flowers contest, and one of my students has her glue & chalk sunflower on permanent display in the national Botanical Gardens in Washington DC, that opened in 2005 or 6.
A really good project for middle to high school students has them draw with glue on WHITE paper, with very light pencil sketch under, or drawing on the back and tracing with glue with light table. Then watercolor. When that’s dry,outline the dried glue (and maybe edges of paint areas) with extra-fine Sharpies. Fabulous and incredibly adult-looking.
MY KIDS REALLY LOVED IT!!!! THANK YOU.
I actually just finished a project very similar to this last week. Just posted about it on my blog: http://sunnysidearthouse.blogspot.com.au/2015/10/glue-and-chalk-pastel-peacocks-flowers.html
I actually had success using glue with children aged 6-12 yet I only have 10 a class so that probably helps. I actually used both methods in one class as I had 4 extras who were not there the first week when we did the glue so they used the oil pastel method. Its good to have the choice of glue or oil pastel depending if you have one or two weeks for the lesson since both turn out really lovely.
Our subject was flowers and peacocks (I have a thing about peacocks right now).
Does anyone else clean up the glue lines with a cotton tip? I try to do this as it makes the glue lines less dusty and show up more yet its pretty time consuming and most kids can’t be bothered.
Thanks as always Patty for the wonderful inspiration and posts.
Fiona
Does it take long for the glue lines to dry? I only have 40 minute classes and “art on a cart”, so although we live in a dry, high-desert climate here in Western Colorado, I worry the glue won’t dry quickly.
No. The glue doesn’t dry quickly. You must wait until it’s dry before moving onto the next step. About 6-8 hours. You may want to use oil pastel instead of glue if you need to do the lesson in one sitting.
Hello, Just wanted to say ,”Thank You!!!” I did the chalk flower art project with my son’s 4th/5th grade split class last week. I brought in various types of sun flowers for the students to see…we discussed all the variations of color, along with the different shapes of the petals & texture. They all came out amazing!!! Thank you again, Julie
Yay! So happy to hear this. I love this project because every kid will bring forth their own colorful version. You made my day!
Thank you for sharing. The quick video clip was helpful. I love the look of this project and think it is great to do as it just turned to spring. I am trying it today with third graders. I brought in fake flowers and calendar flower pictures to inspire different types of flowers, petals and colors. I was wondering if you spray the finished projects with anything?
Hi Kelly,
Thanks! I’m glad you liked the video.
I don’t spray pieces unless I’m putting the artwork in an art show. You can send the artwork home sandwiched between a newspaper.
Patty
I do this project with third grade and the results are amazing. Occasionally, some of the glue doesn’t dry glossy. The matte black glue doesn’t look as nice. Any suggestions? I first thought it was a brand problem, but I have had this happen with Elmers and Crayola white glue.
I used Elmer’s white glue and it never dries glossy. It’s generally a matte black finish. It might look glossy because of the photograph. 🙂
me encanta las propuestas de esta pagina, las quiero hacer con mis alumnos
I love it Definetely going to do it .6 and 7 year olds
This is good
Looking forward to experimenting this technique !
I love this. I look for crafts and art project for kids to do at the State Park I work at. This is just the right kid of project we need for the kids. Thanks, for your page. The kids will enjoy thinking about all the flowers they see at our park.
Fantastic ideas! Thank you
Love it!
Thank you!
Teach art to homeschoolers
Love this activity! I cannot wait to do it with my girls.