


Have you ever wondered what goes into running a creative business? This series is all about building and cultivating your own creative business from finding inspiration to e-commerce platforms to the nuts and bolts of operating a website.
The Business of Creative Blogging: Pinterest
Are you looking for ways to increase your blog traffic? Look no further than Pinterest. I love to use Pinterest to source ideas for art techniques. I scroll through my feed or perhaps do a search. I pause on the pins that connect with what I am looking for and if the image is interesting, I click through to the web page for more details.
It’s that final step that you want your potential readers to take when they see a picture from your blog. The ever important click through.
Here’s how to make your photos not only Pinterest-perfect, but easy to pin.
1. Create one main or title image: It takes a bit of work to create an image that includes some text and a bit of graphics, but it’s the most important thing you can do to increase your blog traffic.
The idea is to create a main image that includes:
- photograph of your post topic (art lesson, finished product, etc)
- text that include the title of your post or name of your project
- your blog name or logo
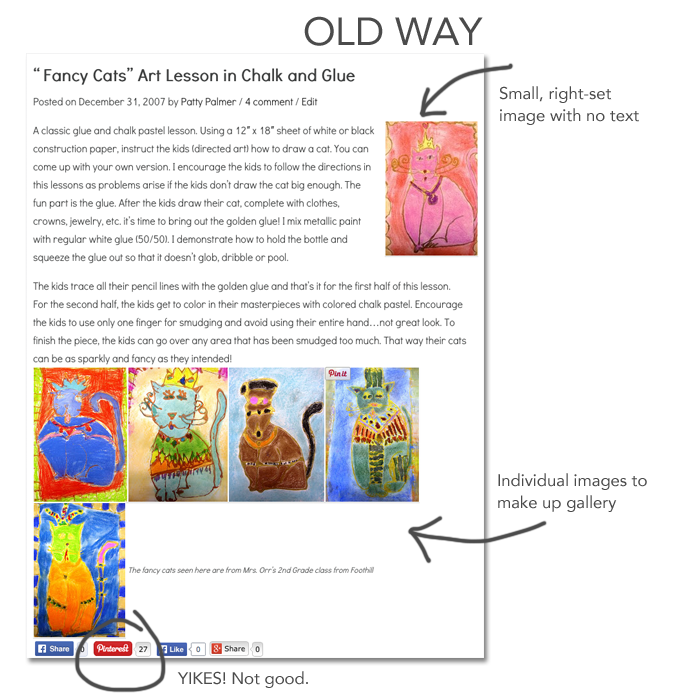
I won’t lie. When I first started blogging seven years ago, adding photographs to a blog post was as easy as uploading my images from my camera and letting blogger do the rest. I had control over the placement of the photo, the title and text, but that was it. Looking back, they were a Pinterest nightmare! Sadly, I still have posts on my blog that reflect this old post style.
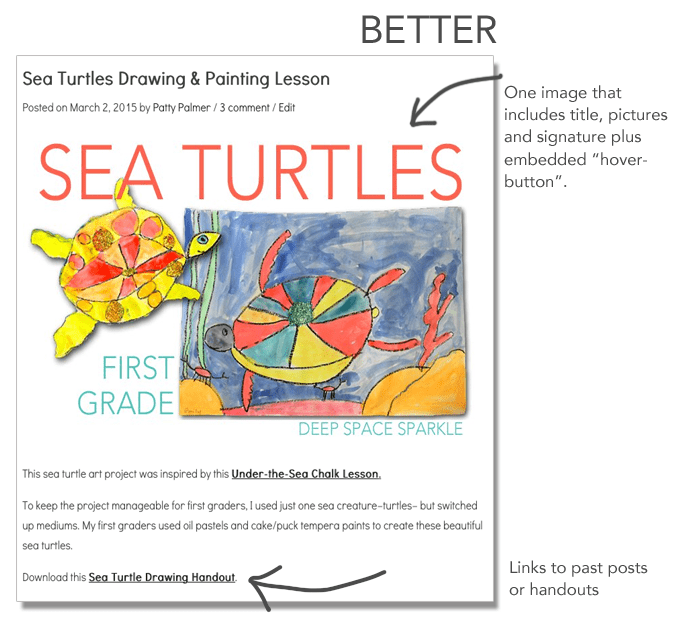
Today, I create a main image that includes some form of text, graphics and editing, step-by-step photo-tutorials, a student gallery plus (and this is relatively new) an image just for Pinterest that doesn’t even show up in my post. I’ll save that trick for another time.
It’s a lot of work.
But rest easy. To improve your traffic, just focus on that one main image that appears above the text in your post.
Optimally, the image should be at least 600 px wide. Your website might reduce the pictures for you (does Blogger still do that?) but if you have a WordPress blog, you’ll need to resize your large photos. The width of your post might be less than 600 px.
For Pinterest, they say that the image size that receives the most re-pin is 700 x 1330. This gets you a nice vertical image that doesn’t truncate. I don’t use this size for my main post photo because it’s too long but if you were creating an image just for Pinterest, then it would be a good size.
I use Photoshop for all of my photo-editing and graphics. Easier and free programs include PicMonkey and Canva. If you are new to graphics, scroll through Pinterest and notice how bloggers combine fonts with photos. You can learn a lot by playing around with the free graphic-building programs. Canva is especially amazing as they provide templates and all you do is slide in your image and replace the existing text with your own.
2. Pin-it Buttons
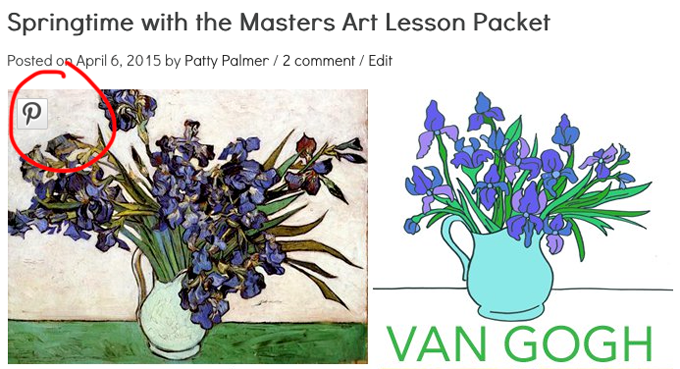
Once you have your stylized image, you need to add a way for people to pin your awesome content. Hover buttons are super popular now and most everyone who reads blogs expects a Pinterest hover-button on a blog’s photo. You can design your own hover buttons that is unique to your blog or you can use the standard Pinterest button. Basically, a hover button doesn’t appear in your photo until after you “hover” your mouse over that area. Hover buttons are usually at the top of a picture. The reason blog readers like them is that you can easily pin the exact image you like instead of selecting an image from a page full of pictures. Or, as in the case of a “Share-it” button that appears at the bottom of a post, some images are chosen for you.
Melissa from Blog Clarity has a great post on how to create your own Pinterest Hover Button. This tutorial shows how you add a button in self-hosted WordPress blogs.
If you are on Blogger, check out this post that shows you how to add a Pinterest Hover Button.
Pinterest also has it’s own tutorial for adding the hover button.
Pinterest offers a wide range of sharing options for Blogger. You may opt to add a share-it button at the bottom of your post. For a long time, that’s all I had and it worked well.
3. Optimize your Images
Once you have a compelling main photo that includes your post title, blog name and a great image, you’ll need to optimize it for Pinterest. This means adding a description to your photo. As an added bonus, adding descriptive text to a photo makes your photos searchable for Google. This means even more traffic!
Here’s what to do:
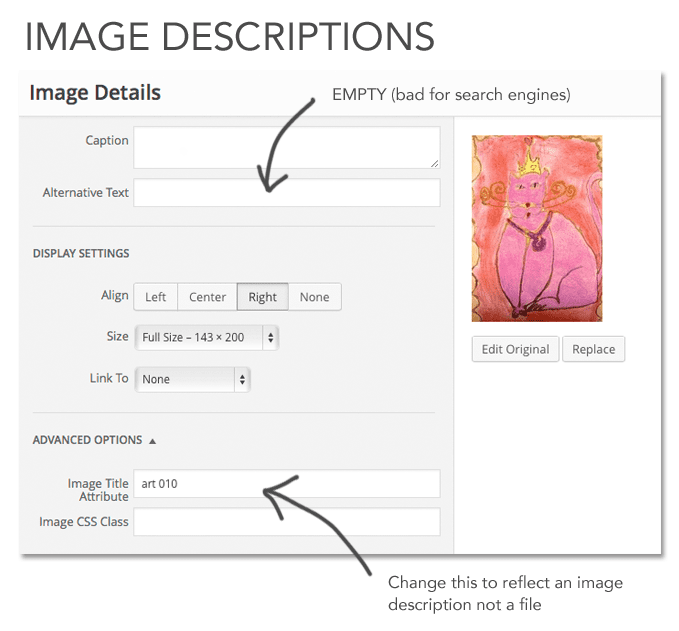
After uploading your image to your blog’s media library, take a look at the box that pops up. Whatever name you use to save your photo will appear in these boxes. You want to change that.
In this example, you can see that my fancy cat has a name of art 010. This is the name I gave this photo when I edited it and then saved it in photoshop. But it’s a poor name for search engines and Pinterest, so it’s not wonder this post only got pinned 27 times.
A better example is this:
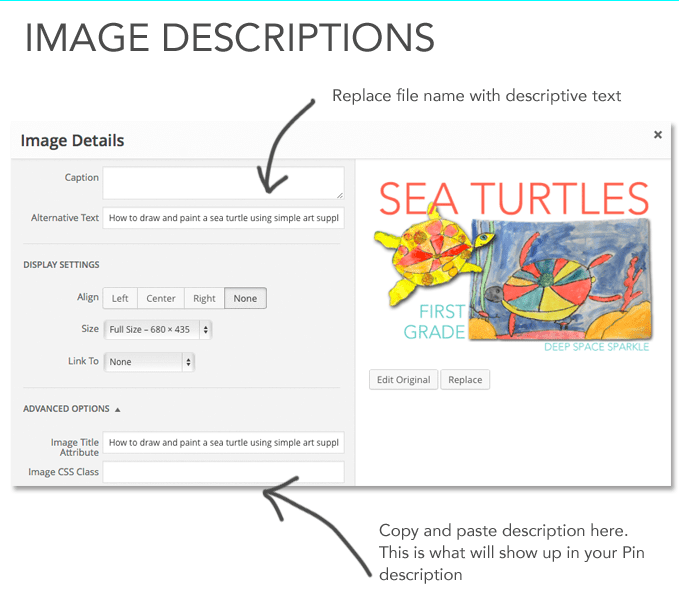
When I uploaded the main sea turtle lesson photo to this post, I deleted the name I saved in photoshop (sea-turtle-cover) and replaced it with descriptive text. I copied this text into both the Alternative Text and Image Title Attribute box. When this photo gets pinned, either by my hover-button or share-it button, this text will automatically show up in the Pinterest description. This means that you can write the Pinterest description from your own blog. Pinners can change the description if they like.
Customizing just one picture in your post in this manner will greatly increase your chances of the post being pinned, discovered through Google and shared.
4. Developing your Brand
Creating a signature style is part of branding your blog. You can certainly change over time but it really helps to set aside one or two fonts that you love and use them in most of your blog images. Everyone has their own style–just like the students we teach.
When I rebranded last year, I focused all of my posts, products and lessons with two main fonts. I use Avenir and Learning Curve. The two fonts help maintain a consistent look for my readers. Even if you never see the “Deep Space Sparkle” in the corner of my images, you may recognize the look of my graphics.
You will have your own look so there is no wrong way to create or pick fonts. Just choose what you like and try not to introduce more than three fonts per images.
Your turn
Now it’s time to take a look at your blog and ask yourself these questions:
- Do I have ONE MAIN IMAGE for my post that describes the content visually?
- Is there an easy way for a reader to pin my content?
- Do I use text in my MAIN IMAGE?
- Have I added a descriptive text to my Alt Text Fields or do they contain image file names?
How did you do?


This was helpful, Patty. I didn’t know about the image attribute and alternative text. That’s good to know! Thanks!
Thank you for posting this! I am getting my website and blog started and will be working on getting it up in June. I want to be able to utilize Pinterest so this will be so helpful. Thank you thank you thank you!!!!!
Thanks for including a link to my blog post about adding the Pinterest hover button on Blogger blogs. I also have instructions for WordPress too: http://www.digitalkonline.com/blog/add-a-pinterest-hover-button-to-wordpress-blog-images/