


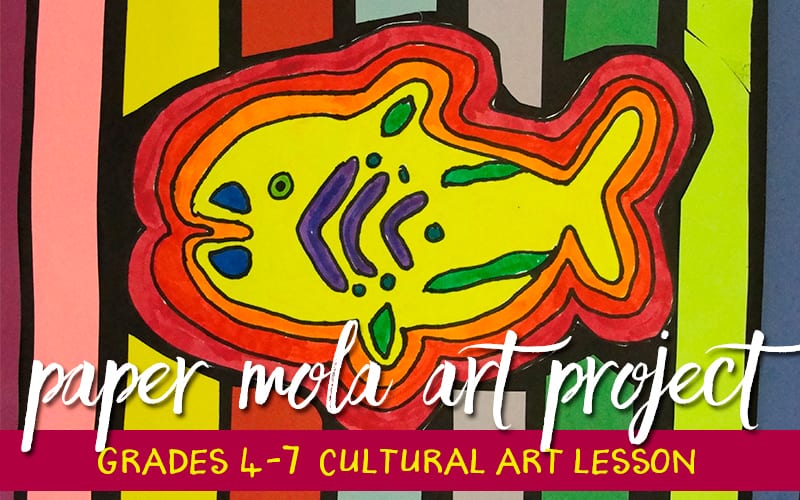
PAPER CUT MOLAS
Molas are cloth panels that form part of a blouse for the Kuna women of Panama. They use a quilting technique called reverse appliqué to create the design formalizers of fabric. Because I used to be (and hope to be again!) a quilter, I know all about reverse applique. It’s pretty fun to do but darn hard to explain to kids. After a few attempts I decided that it’s just best to say that a Mola is a fabric panel with colorful strips sewn in. Sometimes it’s best to keep it simple.
Take a look at this blog, Postcards from Panama. There are some wonderful photographs of Molas. I wish I could see them in person. Aren’t they wonderful?


How to Make some Paper Cut Molas
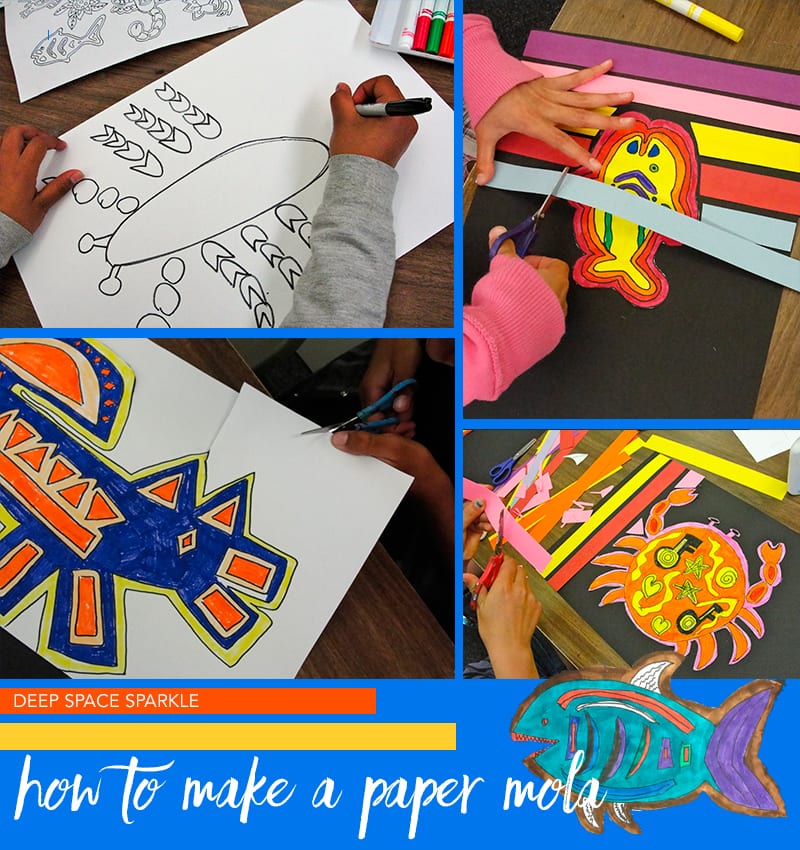
I used the project in the book, Dynamic Art Projects for Children by Denise M. Logan as inspiration and used the wonderful handouts that accompany the project. You can also create your own. I showed the kids how to start their drawings by drawing the main body or largest shape first. After a few quick demos on the board, the students picked their favorite Mola shape and drew their image onto a piece of 12″ x 18″ white paper using a black marker.
I like broad tip Crayola markers for coloring. I set a tray of them on each table group then demonstrated proper marker technique.
Take a look at this video that shows how I color drawings. It really helps to trace around a shape and then color slowly; giving ample time for the ink to flow onto the paper. After the image is colored, cut it out.
Glue colored pieces onto black construction paper and glue strips of paper along the borders.
Tip: leave a little space between the colored drawing and the strips of paper.
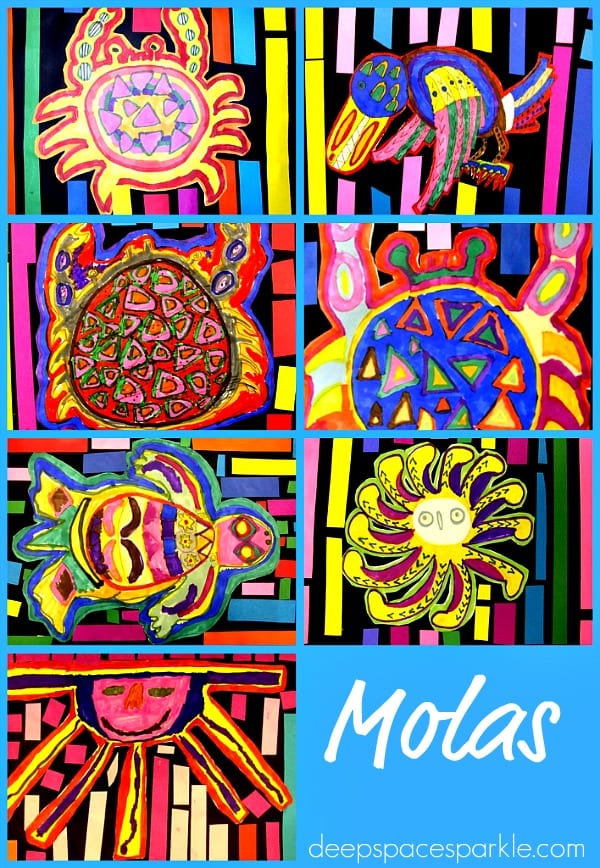
Fifth Grade Paper Molas….


These look nice, Patty. Our high school social studies teacher has several authentic molas that he has brought in for me to share w/my students.
I have made molas w/6th graders, and, using construction paper, actually did a “reverse applique”. We started w/one paper and the shape of an animal (or other choices) and simple repeating shapes in the negative space drawn w/pencil. It was cut with an Exacto knife. Then, that paper gets placed on another paper, and the animal shape is repeated inside it, and additional shapes inside the shapes; then cut again. This step is repeated (inside the animal shape other shapes can be made) and when all the layers are done, they are flipped and glued together. By flipping it all, the pencil lines cannot be seen (they are on the back of each layer). This wouldn’t b so easy w/younger kids, as it’s too hard to do w/a scissors.
I did the same project last year with my year 4/5s- I just loved the results. What I did was I created a lot of simple templates of the traditional animals- I found some quilting fabric with the designs on line from the US. I also purchased some molas on Ebay to show the students. After tracing the animal shape out we cut it out. We then glued it onto another piece of paper and then cut around it leaving a 1/4 inch border. I suggested to the students that they use complimentary colours . The students then cut out some simple shapes to decorate the animal. They even used the hole punch to create dots which again glued onto a slighty larger scrap of paper and it was cut out to make eyes. We used glue sticks for this encouraging them to glue the small pieces and carefully placing them onto the original animal shape. The decorated animal was glue to the black paper background. To speed up the creation of the back grounds I cut strips of coloured paper about 1/2 in wide. The students were then able to with cut lots of rectangles etc and made the most amazing patterns. I would happily email you the images.
ebay has some fabric by andover- link is as follows http://www.ebay.com.au/itm/Mola-white-Andover-Border-2-yds-/310332613093?pt=US_Fabric&hash=item484143e1e5#ht_677wt_905
Cheers from afar
Cheryl H
Dear Cheryl,
I am interesting in creating molas for Hispanic Heritage night with my Kindergarten students. Please the images so I can generate different ideas.
Thanks,
Vannette
Found a website for the mola fabric
http://www.swdecoratives.com/.
Cheers Cheryl
just started following your blog…loving it :]
These look fun! I’m going to try them with my 5th graders this year. Thanks for all of your wonderful projects!
I made these no-sew molas with my middle school students. They were a great success. I got the idea from dick blick: http://cdn.dickblick.com/lessonplans/no-sew-molas/no-sew-molas-no-sew-molas.pdf
I really liked the explanation of a reverse applique “Two to four layers are ideal for this
project. Layers will be created using
either an appliqué or reverse appliqué
technique. In the reverse appliqué
process, a shape is cut and removed from
the piece to create a negative shape that
functions as a window to a layer behind.” I thought I would pass along this explanation.
Outstanding!
Your site and videos are saving me! I am volunteer teaching at a startup Christian school in a low income area. All my life I have done art occasionally but not taught it.
Thank you so much.
I like this website because so much useful stuff on here : D.
I am delighted in the demo. I am in research to do a “Sip and Art CREATION” for Young and Mature adults using the MOLA as the historical ART that is a uplifting of any individual achieve with COLORs
it is really cool and i would love to do it with my family
great project
These are great. I just tried with my 4th graders and I am struggling to get them to draw BIG. They are making everything so tiny. Any tips?
Love it. Want to do it!
This looks like a really fun project. Would love to try it.
Love this!
wOULD LOVE THE MOLAS