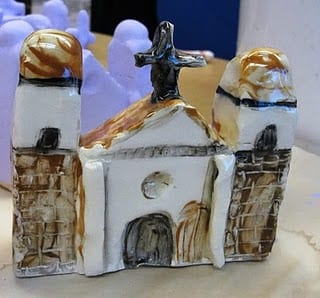


Third and Fourth Grade students in California study missions. We are lucky to have the beautiful Santa Barbara Mission right in our city.
Here is an easy project that I incorporated into my ceramics unit but you could easily do the same project with air dry clay and acrylic or even tempera paints.
WHAT YOU’LL NEED TO GET STARTED…
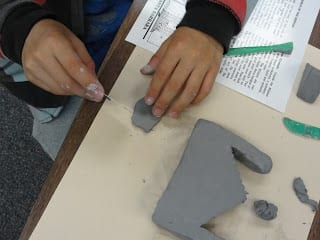
Slab of clay approximately 6″ x 4″ x 1″ thick
Clay tools: small plastic knives, plastic credit cards, small wooden dowels, etc.
A credit card
THE MISSION:
Start with a rectangular slab of clay. I don’t measure but the size is approximately 6″ x 4″ x 1″ thick.
Put a tray of clay tools on the table: small plastic knives, plastic credit cards (from mailers), small wooden dowels, etc.
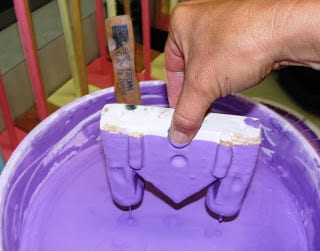
Using the credit card, cut out two triangles from the top of the slab. (see diagram)
The resulting shape will create the two side columns.

Make a ball with some clay. Cut in half with the credit card. Place the two halves on top of the columns and attach using proper ceramic techniques (scratch both surfaces with the dowel and add a tiny bit of water).
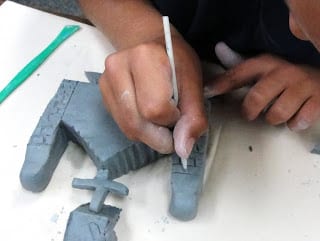
Using the tools, etch in bricks, windows, make columns and doors. Refer to the pictures for ideas.
Add a cross on the roof. I like to make a hole in the roof and “drop” the cross into the hole to secure. I have to warn you though…if anything falls off with this project, it’s definitely the cross!
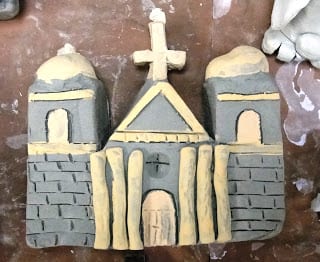
Allow to dry completely. if your mission is more than 1/2″ thick, stick a few large pencils up through the bottom so that the clay can expand. If using air dry clay, this step is not necessary.
Don’t forget to scratch in names!
Once dry (about 10 days), fire in kiln according to clay specifications (I use Laguna Clay cone fire 6).

Set out the underglazes (or acrylic paints for non-firing clay) and let the children paint a simple color palette of orange, red, brown and black. For white, don’t paint at all. The clay is a natural white once it is fired.
After the underglaze, dip the pieces into a glaze of your choice. I use Duncan Dipping glaze because it’s so easy but you may have a brush on glaze. Use whatever works. If you are using air dry clay and acrylics, there is no need for a glaze.
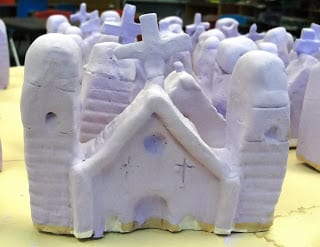
This is what it looks like when the purple glaze dries. The kids freak out here…Fire at cone 4.
Want a free download to another Deep Space Sparkle ceramic lesson? Click the yellow download button below and we’ll send you a PDF lesson plan on how to make a ceramic snowman!


Have you ever heard of Danielle McDaniel in Nashville, TN? She is known as THe Clay Lady. I use her materials and one time firing method and I love it! Check her out http://www.theclaylady.com/
Thanks for the recommendation! I'll check her out.
Hi Deep Space,
I LOVE this project and have never seen anything like it before. Will try it as soon as I can. Thanks so much for the idea!
Wow! these look really Great!!
You inspired me to start my Blog!
and you keep inspiring all of us!!
Thanks Bunches
Tami Smith
-bluemoonpalette.
Enjoying your blog! Glad I found it!
– AZ
Hi Patty! I want to pass on to all your readers that I have started my own art teacher blog, called There's a Dragon in My Art Room. It's just getting off the ground, but I'd love comments, critiques, advice, etc. You can find my blog at: http://plbrown.blogspot.com/
Beautiful! I noticed this year that I did lots of 2-dimensional art. I think next year I want to do some sculptural projects with our children. This one looks like a winner. Thank you for sharing.
I am working on this project with my 7th graders. It looks great. I have never done a facade this thick before. I did poke the pencil in about half way up the pencil, is this sufficient?
We are using the “Mission Nuestra Senora De La Concepcion,San Antonio, TX 1755.” from the “Picturing America” collection which can be accessed online, but my school received the materials as part of a grant from the National Endowment for the Humanities. I am really excited to try this project and pass along to others about the “Picturing America” site that has alot of quality American artwork and resources.
The holes help prevent blow-ups in the kiln. As an added precaution, allow lots of time for the slabs to dry out. Good luck!
love these missions my brother is working on one now
Hi Patty,
I think you mean cone 04, not cone 4. I don’t think many teachers have access to a kiln that would fire all the way up to cone 4 but just in case, you want to fix that so the sculptures won’t over vitrify and stick to the kiln shelves forever.
Thanks for all you do!
~Emily