


I’ve tried many different lessons to with my five and six year old kids and this one is my favorite.
Step One:
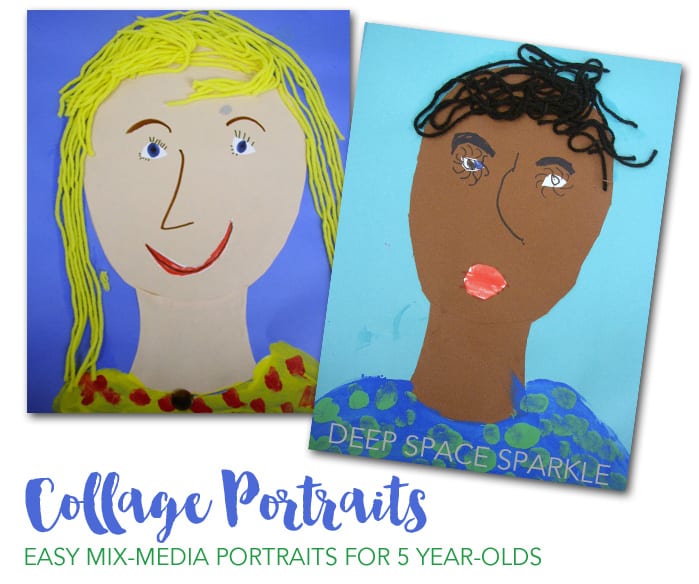
I start with an oval template and instruct the children to trace onto skin tone colored construction paper. Then, we trace the neck template and glue both onto a piece of 12″ x 18″ sheet of colored paper.
Step Two:
Once the “faces” are glued on (tip: use a glue stick not white glue), the children cut out oval shapes of white paper for the eyes.
Note: The combination of step 1 and 2 takes a full 30 minutes!
Step Three:
For the next class, we work on coloring in the eyes, adding eyelashes, nose and a mouth. Then we add the hair. I cut strings of yarn in different shades of black, brown, yellows and oranges. The kids paint on a mixture of glue and water (easier to control) and pat on their “hair”.
Step Four:
For the next class, the kids add decorations. With tempera paint, the children paint shirts, bows, flowers, etc. I give them a tin of buttons and if they wish, they glue buttons to their shirts.
This lesson took three, 30-minute class sessions, but I think it was worth it. The children were very proud!

New to portrait making in the art room? Download this free guide by clicking on the yellow download button below and we’ll email you the K-6 portrait making guide!


Hi,
thanks for the comment on my blog, the kids loved this lesson! I have plans to use many of your ideas, I LOVE your blog! Thanks for sharing all your wonderful ideas!
oho good dear !!!! very interesting blog and a good posting !!! you must maintain your blog, its interesting !!! Nice Buddy
________________________________
Research Paper Help
This is important for children because when they are at the Kindergarten they need to experiment and this is the best thing to get it.By the way. Sildenafil Citrate implement some of those techniques.
I did this with my kids and they loved it! I teach at 2 different schools, and I had one of those days where I ran out of glue!! I had to improvise with the last of my 6 kindergarten classes, but here were the results!
http://ashleylperry.blogspot.com/2011/05/school-cell-phone-pics-really-low.html…they loved it!
oops…the link is http://ashleylperry.blogspot.com/2011/05/school-cell-phone-pics-really-low.html
Sorry but,
viagra ,
Sorry but,
viagra ,
Thanks for your comment on my blog! 🙂 It’s my first year teaching so I’m still trying to figure things out…I guess I will probably always be figuring things out. Your blog has truly helped me through this year!
Thank you so much for sharing your wonderful art ideas! I just started teaching art classes after school and was searching for ideas when I found your site. Tomorrow will be my second day of teaching. You must be a great teacher. Your kids are lucky to have you!
Thank you, my kinder’s will do great portraits now!!!! LOVE…
Do you have a face/neck template to share?
Hi Tammy! I think there is a face template available in this lesson- https://www.deepspacesparkle.com/inside-the-kinder-classroom-portraits/ We have a lot of great advice, tips and suggestions for creating portraits throughout our website. Try using the search bar and if you’re a Sparkler log in first before you search in order to get the most results!
There’s not a template for this project. IF you recall of where to find a suitable size template, please share! Thanks again!
Thank you so much Bethany! Most I have/or have found are too small for this activity. I’ll check out the link you sent!
Hi Tammy! Patty here. When I made my templates, I just took a 12 x 18 sheet of paper (the kind we use as art teachers!) and drew an oval about the size that I thought would be big enough for my Kinders ( 8″ – 9″ oval). That’s all you really have to do. Then, if you want, just add a neck and cut out :).
Question??? Do you put the glue/water combination on the ‘yarn’ or on the construction paper?
Thanks Patty! That’s what I wound up doing! It’s not perfect though! LOL
This water/glue thing isn’t working so smoothly as I expected! Is there an easier way to do this? I am doing a sample and painted the glue mixture on the yarn for the hair but it is not sticking at all. I can see this being a disaster with the kids trying to do this also. There has to be a better solution! Any suggestions from anyone? Maybe I am over thinking this or just not doing it correctly! I’m a visual learner!!!! HELP!! LOL
Hi Tammy! This is Bethany from Team Sparkle. I spoke with Heather from the Creative Team and her suggestion is to paint the glue/water mixture on the paper, and then the kids “pat” the hair onto the glue! I hope that helps!
Hi,
I cannot download this handout. Hoping for some help. Thanks!