


Sometimes I need a make-up day for my students to complete unfinished projects. Sounds great but there is always a group of kids whose portfolios contain all finished pieces. Wouldn’t it be wonderful to have an entire class of these kids? It’s not likely, so for them I like to offer a project that moves beyond typical free-choice art and allows them to create a simple art project that still teaches technique and offers creative opportunity.
Of course, for me, the prep has to be easy and the instructions crystal clear. I don’t have time to offer a step-by-step lesson as I’m usually offering assistance to the kids who are finishing up projects.
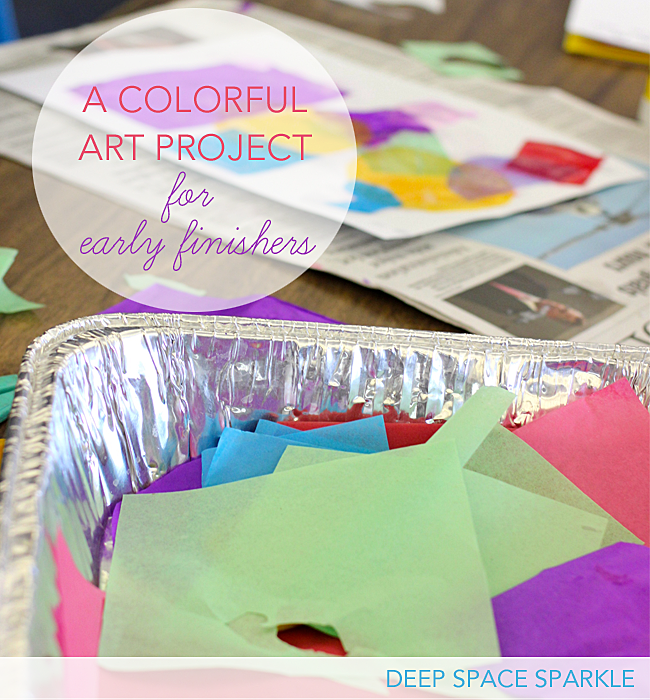
This is one such project and this is all you need: 12″ x 9″ white paper, tissue paper cut into circles or squares, watered-down glue (consistency of light cream) and a flat brush.
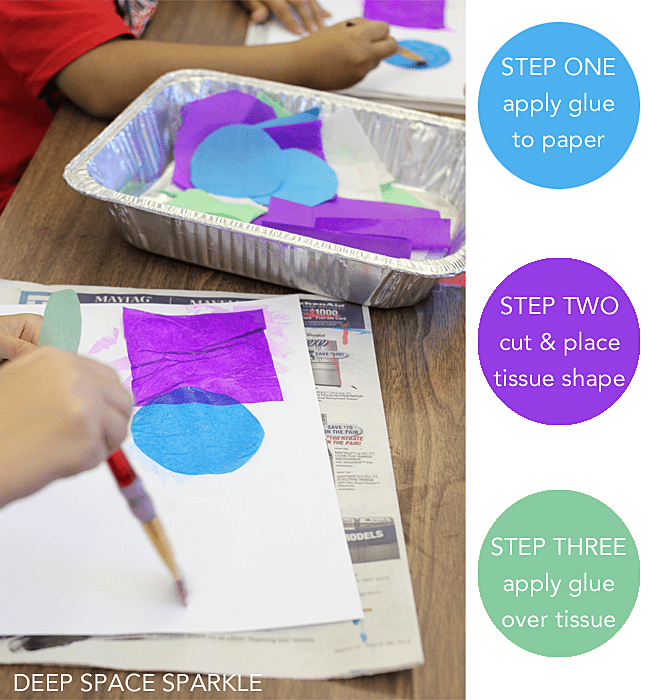
The lesson is very easy: apply glue to a small area on the paper, place tissue paper shape (pre-cut or cut by student) and brush again with the glue. I called it a “glue sandwich”.
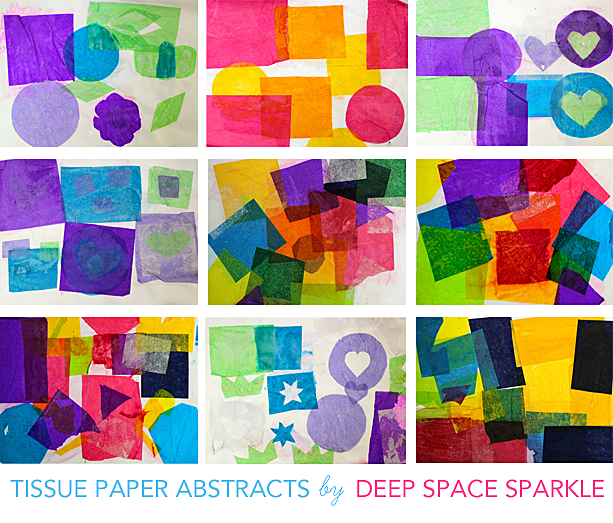
I set this lesson out for second through to fifth graders and the funny thing is that in the end, it was hard to tell the difference between the finished art.
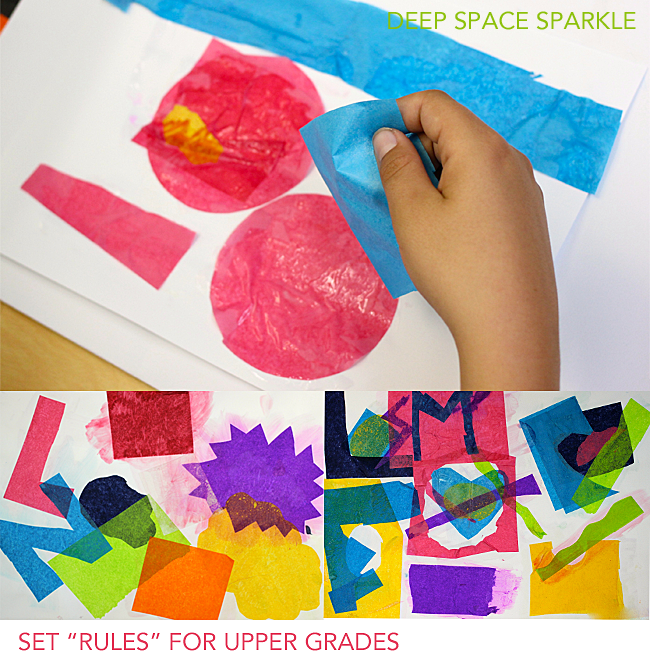
To allow for some learning, I set some perimeters for upper grade students: they needed to have 3 geometric shapes, 3 organic shapes and they needed to show repetition. Did they all do it? Nope. Some (especially the older kids) were absolutely entranced with the transparency of the tissue paper.

I didn’t impose any rules for my second graders as I figured the applying and layering was enough. In many ways, their art was far more sophisticated than the older kids. You can see the second graders works below that feature the purple and aqua tissue papers. The older kids created the milt-jeweled colors.
Have you done a similar project? What have you done differently?


I have done this with hearts for the younger grades around Valentine’s Day. To save time, I pre-cut hearts ahead of time. Sometimes by hand, sometimes with the die-cut machine. Because it’s only K and 1st, I don’t really have any specific design rules, just the experimentation with color, overlapping, and brushing with glue is plenty for them. For a special touch, I sprinkle over the entire thing with a bit of glitter, and it dries shiny and sparkly.
This is great! I’m in the middle of a printmaking unit right now and I’m having my students do this same thing if they finish early so they can make another print on the tissue paper collage.
As always you come to my aid at just the right time. We are on day 2 of watercolor Japanese lanterns and I KNOW this group will finish with lots of time left …. now I know we will have the early birds work on doing this in the shape of the lantern…..what could be more perfect than to make paper lanterns with paper?!
Success! We used some painted tissue paper scraps that were on hand to make the lanterns and put them on black paper. This is a K-2 class and the kinders were challenged (as expected) with the scissor work…but with a little instruction everyone made successful paper lanterns…some even did animal shapes like the ones in the story Paper Lanterns by Stefen Czernecki. Thanks for the inspiration that keeps giving and giving.
Fantastic! Thanks for the book rec too!
I like the idea for early finishers. It comes in especially handy now as we are finishing work for the upcoming art show. The kids do love tissue paper! However, it looks like a lot of prep time for cutting the tissue paper. I usually just pre-cut in geometric shapes. but I love these with all the cool shapes and even letters! Unfortunately, I’m not sure I would take the time out to cut all those cool shapes. I don’t have a die-cut machine.
Hi Melissa,
Try this: stack multi-colored flat tissue paper and use a paper trimmer to cut into squares, rectangles and strips. Then, plop a bunch of pre-cut shapes in each tray.
The kids make circles, letters, shapes with scissor.
I use regular laundry starch for “glue.” No mixing required, just pour a bit in some cups – and away you go. It’s much easier on the brushes, too.
Me too, actually. But have you noticed that liquid laundry starch is harder and harder to find now? I went to all of our community grocery stores last week looking for liquid starch and came up empty handed. I guess people don’t starch clothes anymore in Santa Barbara!
I love doing this too. Sometimes we cover the whole sheet with limited color schemes of torn pieces (instead of geometric shapes) and then use it as a background sky for a fabric collage (such as scarecrows or witches in the fall) or paintings (winter snowmen).
By the way, while you are right, it’s hard to find liquid starch in local stores, you can still purchase it in big bottles from I think both Nasco and School Specialty.
Hi Patty, So good to hear others needing these ‘finishing off’ days too with the inevitable few kids who have done it all! I give them the choice of decorating their art folios which they love doing. Another activity for this kind of day has been for them to have access to a bunch of comics or kid mags like K Zone. They cut out a character they like and paste into the middle of A4 sheet. Contour lines are then drawn with a Sharpie around the cut -out until the lines reach the sides of the page. If they want they can add a little speech bubble with some words that they have made up. Recently, also I hade my grade 4s use oil pastels to draw around the edges of pre cut geometric card shapes. (I just cut them from cereal boxes.) They place the shape onto ‘good’ paper and rub the pastel off, creating a nice smudged negative space. Overlapped shapes look good and then the whole thing is mounted onto A3.
Wow! Another great project. I’m going to try this one. Thanks so much!
I do a lesson with first graders where we draw a large fish in black crayon. Then they fill the scaled body area with torn pieces of magenta, turquoise and yellow tissue paper. This is their first intro to color mixing. They love it! I have even had students say, “This is like MAGIC, Ms. Ames!” I love my job! 😉
Oooh! What a great project! Do you have any pictures? Would love to see them. You could post them to the DSS Facebook page if you want: https://www.facebook.com/pages/Deep-Space-Sparkle/51340204099
I like adding glitter to the starch. I also pair something like this lesson to Wassily Kandinsky’s LAYERS. Occasionally they have layered the tissue paper over construction paper.
Wow! colorful art using tissue paper can attract anyone including kids and adults.
Love your site! For this activity do you use cellophane and tissue paper?
I used tissue paper. I’m not sure how cellophane would handle the starch or Mod-Podge. I would try first and then see how the cellophane reacts.
Thanks, my summer kiddos will do this to make — shape “beach towel” tissue paper collages! I was wondering what consistency to use on the glue. ~ Courtney
Hi Courtney,
I water down the glue so it’s like milk. It need stop be loose enough to spread over the tissue.