


After my post on Open-Ended Art lessons, I couldn’t wait to try a little color theory experiment. It seems as though we are a divided community of art educators, feeling that one approach might be better than another. I certainly have strong opinions on what works for me and my students but I sure do love to hear what works for everyone else. I received so much support for this site from this post but I also received some information on Choice-Based Art programs. I have a curious mind so it was natural for me to gravitate towards the teachers who offered a different perspective than my own.

One teacher, Kathy, who weighed in on our discussion last week favored an open-ended approach to art projects with I understood to be students taking what they know of techniques and materials and applying it to their art projects. This was her project recommendation:
Here are a few ideas: at the beginning of several sessions of painting, give students tempera with magenta, turquoise, yellow, white, palettes, smallish brushes, a sponge, small good-quality paper. Demo putting colors in to palettes with brushes and rinsing/wiping brush on sponge between colors to keep their paint tray colors fresh and thick. Then let them go mixing colors and naming the results. Invite them to write colors on the chalkboard when they make an amazing discovery, ie., Y+B+W=spring leaf or B+Y+R=monster slime, etc etc. Assign students to paint a sample of colors on their paper to save for future reference. We find that students who discover color recipes rather than copying color wheels gain an intuitive grasp of color and are far more adventurous and original in their future paintings.
It was Kathy’s last sentence that caught my attention. More than anything, I want my students to grasp color theory that is intuitive to them.

My sixth grade students had one remaining art class before the end of their art rotation. We had finished up all of our other projects, so a little paint fun seemed to be in the cards. I’ve been working hard on teaching color theory to all my students this fall and if you had asked me last week if I felt my students knew primary colors from secondary colors from monochromatic colors to complimentary colors, I would have said of course, but Kathy’s suggestion left me wondering if there was a better way…
What we did…
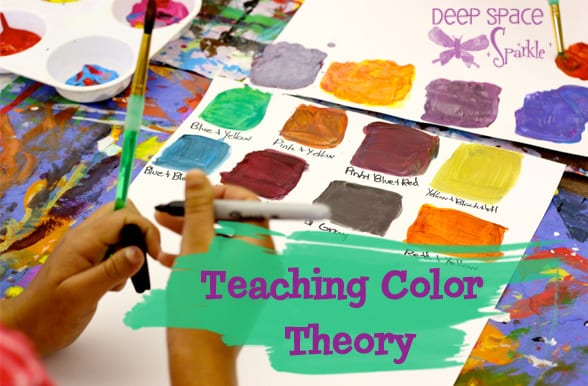
Children received a palette of paint containing turquoise, magenta, white, yellow and red. Each table has paint brushes, sponges and some water. I also included a waterproof black marker so each child could record their findings. I felt so scientific!
I was VERY careful not to tell the children what their project should look like in the end, but rather focused on what their goals should be, which was making as many different colors as possible.

I demonstrated some basic techniques about the way to mix paints onto paper and we all took a look at the color wheel to see how it could help with some of their decisions, but generally, I left them alone.

After mixing some paint colors together, the children recorded their “formula” on the paper with a marker. Some kids didn’t want to do this but many of them did. It wasn’t surprising which children took to the recording aspect of the lesson very seriously. They loved this part!

 When they came up with a great color, they were invited to come up to the whiteboard and share their color names. This is the part of the lesson that I thought the kids would love. It started out well, but towards the end, it felt slightly out-of-control with some of the boys taking the novelty a bit too far. Hmmm.
A few of my great artists were a bit stumped with what to paint. I consider this more of a reflection of my art room expectations. I only see the children 15 times a year, so I don’t have a lot of opportunity to allow the children to paint whatever they want. I strongly believe that if a choice-based art program was the foundation of my art room philosophy, these children wouldn’t feel the pressure that I sensed they did.
Of course, a few children didn’t fully commit to the process, either fooling around with the paint or just mixing everything together in the palette which was frustrating for their table groups. I still consider this learning and valuable.

 Would I do it again? Absolutely! But I’m not ready to swap what little time I have with my students for too many of these types of projects. I do realize, however, that there is so much more to choice-based art than what I did. I hope to investigate this open-ended art more, so we’ll see what I come up with!
What about you? What are your best open-ended art projects/tips/suggestions?
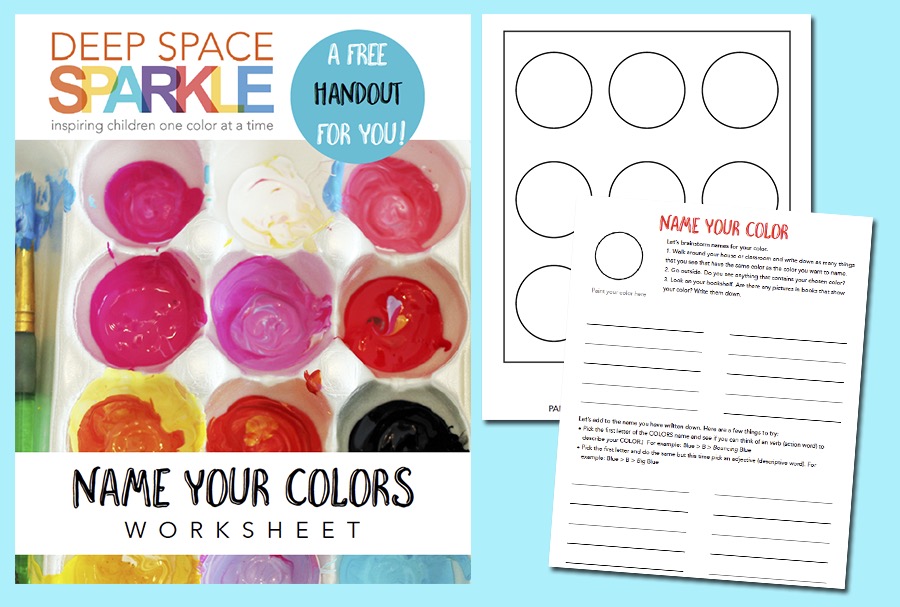
Want a free PDF guide to mixing colors? Download this guide by clicking the image below and we’ll send it to you!


I’ve done something similar, but limited the experimentation to green, believe it or not. I do this as part of a Henry Rousseau jungle painting- we do tints for a light blue sky background with swishy clouds, then we experiment to find as many greens as possible. We work with blue and yellow (duh) and variations on those proportions, then work with turquoise and yellow, blue and the green that comes in the set, yellow and blue and white and turquoise, then some red to get an ‘evergreen’ green, try out black, try out brown and green, etc, etc, etc, etc,… and discuss other color mixes along the way. We then layer in trees with various brushstrokes- we look at all his shapes for leaves, tree structures, etc. and last but not least, hide an animal. Long, Long, project, but so dense in information!!
I love the concept of limiting to one color palette. You just gave me the inspiration I needed!
I do the same idea with greens when I do Rousseau with my K-1 students as well, on a much more simple basis. The kids just love color mixing.
I have enjoyed a color theory lesson with my second graders in which the students begin with one color in which they paint usually a circle. They return to my table to add another color to their first one, then paint their second circle. Repeat until time runs out or they reach a point of no return, you know that murky color that always emerges. Anyways once the student have enough circles they place them in a pleasing arrangement on a previously painted paper. I think it’s a good balance between structured activities and open-ended ones.
I really like the idea of the kids creating their own mixtures and names. Looks like a blast. Then I, like you, would want to take our results and use them in a guided way, where everyone is working toward a similar goal, but may reach it in different ways. Right now my 5th graders are “creating their own camo” and it is very open-ended, but it is still structured in that they have to select an environment, a shape composition, and a color scheme. We’ll see how it turns out, so far so good.
Patty: I enjoyed reading your essay, and admire you for trying something new. It is good that you note the learning that is taking place even when the finished products don’t look like much. The product is the learning.
We observed (with 7-10 year olds) that there are vast differences in both maturity and interest in any art class. Because independent work was embedded in the set up, each student had his/her own small supply of primary colors/white. The children who were still in the (developmentally appropriate) mud making stage could do so without impacting children who needed fresh colors to make their own mixtures. I understand that some teachers may not have the containers to do this, but it is well worth working toward.
For a number of years my 4th grade students had demonstrations arranged in units. Each unit had a “have to” introductory lesson for everyone. The subsequent 5 demos were optional and students could choose to work in centers instead. So the color mixing was the have to for the painting unit and the sample page of their colors was kept in their portfolios for future reference. Since students had rather extensive mixing experience from first grade on, the 4th graders were tasked with creating colors that they might need for work they might wish to do, ie., a student interested in animals might create a spectrum of neutral colors, a potential landscape painter would choose others, someone interested in portraits would spend more time mixing a variety of skin tones, etc. Students interested in sculpture or altered books or mask making also had strong preferences for the colors they would need to embellish their work.
With older students a conversation could take place with the teacher or with peers during the end of class reflection on the “why” of their color choices. Doing an exploratory color mixing experience at the beginning of a painting unit also let me review set up of materials (we had strict procedures for this) ways of keeping colors fresh, ways to use opacity to cover mistakes and so on, along, of course, with clean up rules. These important issues were the focus when we were not concerned with making a “publishable” piece, early in the unit. It has been my experience that any sort of art making has a lot of nuts and bolts issues with which the students must become comfortable before they can give themselves over to making an important finished piece.
Choice studio work unfolds very gradually over time with students earning more choices as they show they are ready for them. The structure of the studio and the charge to students is that they are the artists in the room (instead of me!) and that they are expected to behave like artists. This is something that is developed over time, and, frankly, encourages an independent mind set that may not be available to students in the heavy duty test-prep of their other classes. So it appears to me that as a one-off, a first time with this sort of work, they did quite well, they made some very cool colors, and did a lot of creative thinking!
Once again, I think that it is wonderful that you are willing to put yourself in an unfamiliar situation and share your reflections with your online colleagues. This is the mark of a true professional. I am grateful that you permitted me to join the conversation.
kathy douglas
ooops! a quick postscript: if you visit our Facebook page
https://www.facebook.com/pages/Teaching-for-Artistic-Behavior-TAB/144118082280049
and go in to the photos section you will see a number of examples of students at work painting; the painters are from my classroom and are in grade 2 or grade 3.
kathy d.
I may be wasteful but every time I teach color theory I use paper plates as palettes. Each student gets their own paint and palette. That way the mudd making may continue without frustrating others.
What about aluminum foil for palettes. In my art for teachers classes at Bank Street college of education they did tray painting with us which has the kids using cookie sheets as palettes. At one point when I was doing this with kids I couldn’t find any good cookie trays to use so I started using aluminum foil. This way you have less clean up and you can add foil as needed
Great idea. Is it hard to transfer the foil with paint? Or do you lay the foil on the table and then fill with paints?
I just took an encaustic painting class for recertification. Our teacher said using a cookie sheet or aluminum foil was a great choice for color mixing as it gives you a neutral gray background so the colors are not affected by the color you are mixing them on. I haven’t tried it in my art room, but I’m going to next time we paint. I have the circular plastic paint palettes. I’m going to try covering them with aluminum foil. It might make clean up faster too. I’m a little nervous it will tear on some of my more…enthusiastic students, but we’ll see.
My cookie sheets are now so rusty after so many years of use that they’re no longer a neutral gray! But I color mix with my pre-k and kinders; each child gets their own tray, primaries and black and white, their own water cup, and barely damp sponge for drying brush.
By the end of painting unit, each child can make secondary colors, tints and shades and tones of each, and make a purposeful brown ( well, most can!). I focus less on finished painting product than understanding color.
I use old magazines for paint pallets when time is an issue. Then when you’re done, just fold the painted page in half and throw away. Plus if more space is needed, you can tear off the top page, put it to the side and use the next layer.
I’ve been meaning to get around to this lesson for a while. I hope I have a chance soon, it looks and sounds great! I was going to ask the students to label each colour, but hadn’t thought of adding the “recipe” too – a great idea : )
Hi,
I’m a Montessori teacher of ages 3-6 and I am really looking forward to trying this out. We have been dabbling with the colour wheel for a while now and I was at a loss for what should come next. This project I think is the answer. I tried it out with my four year old at home last night and she thought the making up the names part was hilarious (she kept it up all night). The colours were mostly lovely shades of brown but she seemed to grab the concept. She also carried it on today in school.
Thanks for the help!
Patty- I love this post. It goes to show that we can always incorporate fresh ideas into our teaching. The best teachers are always the ones who are willing to continue learning and try new methods. I taught a similar lesson last summer during an art camp and the kids loved it. I wish I had though of having them record their “formulas” and create cool names. Will do that next time.
I do a color mixing “contest” yearly with my fourth graders. I started this out as a lead in to tints and shades and ultimately a monochromatic painting. As the years have gone by, I’ve added more concrete color theory concepts into this and made this into a contest. Each class competes AS A CLASS. The goal is to create as many non-pedestrian colors as possible within a given time period. Each table group receives the same amount of paint (only primaries and black and white) and the same amount of time and one giant sheet of paper in the center of their table. We just mix colors and record them in small samples on the large paper all class period. I find that this is a great classroom management project as well: students want as much time as possible to mix colors, they discuss with their table-mates how best to get the widest variety, and we go over techniques to keep their colors as “clean” as possible to enable students to mix as many colors as possible. I talk about “disqualification” for starting before I say go, losing their self-control during work time, or continuing to mix and paint once I’ve stopped the class. (I’ve never had to disqualify anyone 🙂 Also, we talk about “muddying” the paint try and I have students come up with why that may not be the best idea if our goal is a large quantity of colors. Once kids have mixed all their colors (one class session), the next week we cut up the sheets and divide the colors into groups- i.e all yellows, greens, reds, etc. and then one group of kids tackles the neutrals. Once the colors are grouped, kids sort and get rid of duplicates. After that, kids group colors as a class into warm, cool, and neutrals and we glue them to a large poster under each heading. Each class then has a class count of colors mixed. I have found that this works better for me and my classroom management than when kids all work independently. There is a great level of accountability from their classmates and they are working as a team so there’s no competitive spirit in the classroom. When I have had kids work by themselves, they seem to not stay as engaged. I don’t know if it’s because of the shared experience they have while working together or what, but it’s worked better for me this way for 6 years! This is a natural lead in for our aerial view landscapes as color mixing and secondary, tertiary, or “non-pedstrian” colors are an expectation for that project. It’s great to develop lead in knowledge for future projects and once the kids are 5th and 6th graders, excellent prior knowledge on color mixing. I do like the recipe part of it and may try that next year. The product is nothing “pretty” but the kids are comfortable color mixing which leads to increased variety of colors in their future work but most importantly, an INCREASE in what they see in color and their comfort in making “risky” color choices in their work- what? Not all trees have to be green out of the paint tube?! 🙂
I love Smoldering Coal Red – what a perfect name for a color! I think kids should name the colors of house paints, because they’d be so much more fun then!
Thank you. I am an art teacher trained in regular school curriculum now teaching in a Montessori school. I have been trying to figure out the best way to bring more of the Montessori concepts into my class room. I think Kathy has a great idea.
I currently work at a student led charter school in San Diego. It is big on positive discipline and choice. Kinders currently are experimenting with color theory and producing monochromatic paintings. They are also continuously doing observational drawings and improving their work by having others in the classroom giving them feedback. It is my first year teaching art at the school and usually I am used as a tool to improve the projects that they are working on or exposing the children to different types of mediums. It is great to see the students discover how to use a material or learn from others in the classroom with their discoveries. I am coming up with more student led work, but it is tough because there is not a lot out there yet. I do know the students are more connected with art or learning in general when it comes from their interests. The method of discovery can also be used for clay, ways to manipulate it, what happens if there is an air bubble in it. how to stick it back together if it breaks, etc. A day can be used just for this understanding of how to work with it before creating a masterpiece.
Hi Patty!
Great experiment. I tried something similar with my 4 year olds, using only primary colors, black and white. I have noticed that they needed an overall guidance at the beginning. They asked, “how do you make green?” So initially I helped them by just saying that they should maybe mix blue and yellow. They soon discovered on their own what happens if you add more blue than yellow, and how the colors change upon mixing in white or black. I do love the idea of making up names, I did not think of it! I will try to have a similar exercise soon (after all the holiday decorations are made:)
Thank you!
I know this site presents quality dependent posts and additional information, is there any other website which presents such
stuff in quality?
“It started out well, but towards the end, it felt slightly out-of-control with some of the boys taking the novelty a bit too far. Hmmm.“
Interesting that you should point that out. Reminds me of my art classes when i was a little boy and how teachers would set limits to creativity… weird that art teachers would do such a thing…
If you don’t set some “limits to creativity”, students get hurt. I actually struggle with this. I am always getting into trouble because the students are too loud and sometimes too out of control.
At some point, some of the students who are playing with paint begin to chase each other around the room painting each other. The primary lesson they learn then is that wet paint on the floor is slippery.
I realize this is a really old post but I just wanted to comment and let you know how much I enjoyed this page.
I’m going to teach an hour long color theory class to my daughter’s 1st grade class. I bought w/my own funds some watercolor crayons, watercolor paper, brushes and color wheels to help them along. They get to keep the supplies. I’m really excited to do this, it’s going to be fun!!!
Great ideas, I am so glad I am taking this course. My students love creating their own colors but I have never asked them to Write their formula. On the calendar for next year.
I love this program !I,ll do it today,let’s see what will happened
!so exciting.Thank you for sharing!
Love the paint mixing ideas. As for choice based, I have seen first hand how important choice/ process approach is to students. In my current position I travel and share rooms so setting up for CBAE is not happening fully. So I give the open ended choices within the lesson. Often it is the choice of subject area, or options of materials. I try to just look at each lesson and evalute where I can be flexible. In addition I invite students to tell me if they have an idea that is different than my plan, I assure them I will listen and be open to their request.
So helpful!!
Looks great can’t wait to try it.
I think I will do this with my 5th & 6th grade class very soon. I like that they create their own colors so we have a bit more variety in the painted projects. But I’ll admit to being afraid of seeing 22 muddy brown projects, lol.
This looks l
thanks
Thanks for this! I love the come up with your own color and name it!!
Thank you so much for the amazing resources!
When I try to download, there is an error 404 message 🙁
Hi Elyce! Thanks so much for letting us know. Our offices are closed over the weekend but we will get that fixed for you as soon as possible.
I really like this lesson. I would like to get the worksheets but the link was not working.
Hi Johanna! This is Bethany from Team Sparkle. Thanks so much for letting us know that there is an issue with the link. We are working on getting that taken care of, so please try again shortly. Thanks!
Is this worksheet still available? The link doesnt seem to be woprking Thanks
This is Bethany from Team Sparkle. Thanks so much for letting us know that there is an issue with the link. We are working on getting that taken care of, so please try again shortly. Thanks!
As a Teacher I am always looking for new, creative and fresh ideas to use with my kiddos!
I absolutely need these type of lessons as I am not an art teacher, but enjoy teaching the elements