


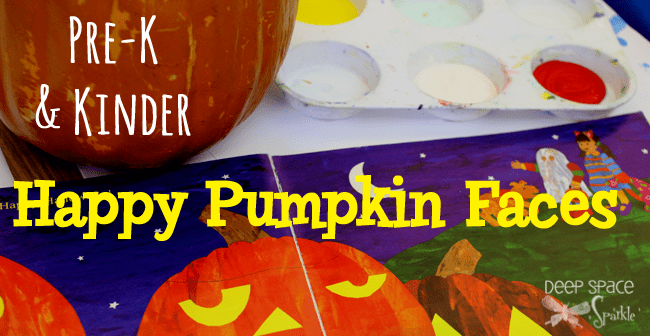
Although Jack O’Lanterns have a strong association with Halloween, it is the one “holiday” based activity that I do. Here are two lesson tutorials that I’ve created last year: Painted Pumpkin and Value Pumpkin lesson. There’s a lot of art happening in this project: color mixing, observation drawing, painting techniques and a little creative expression.
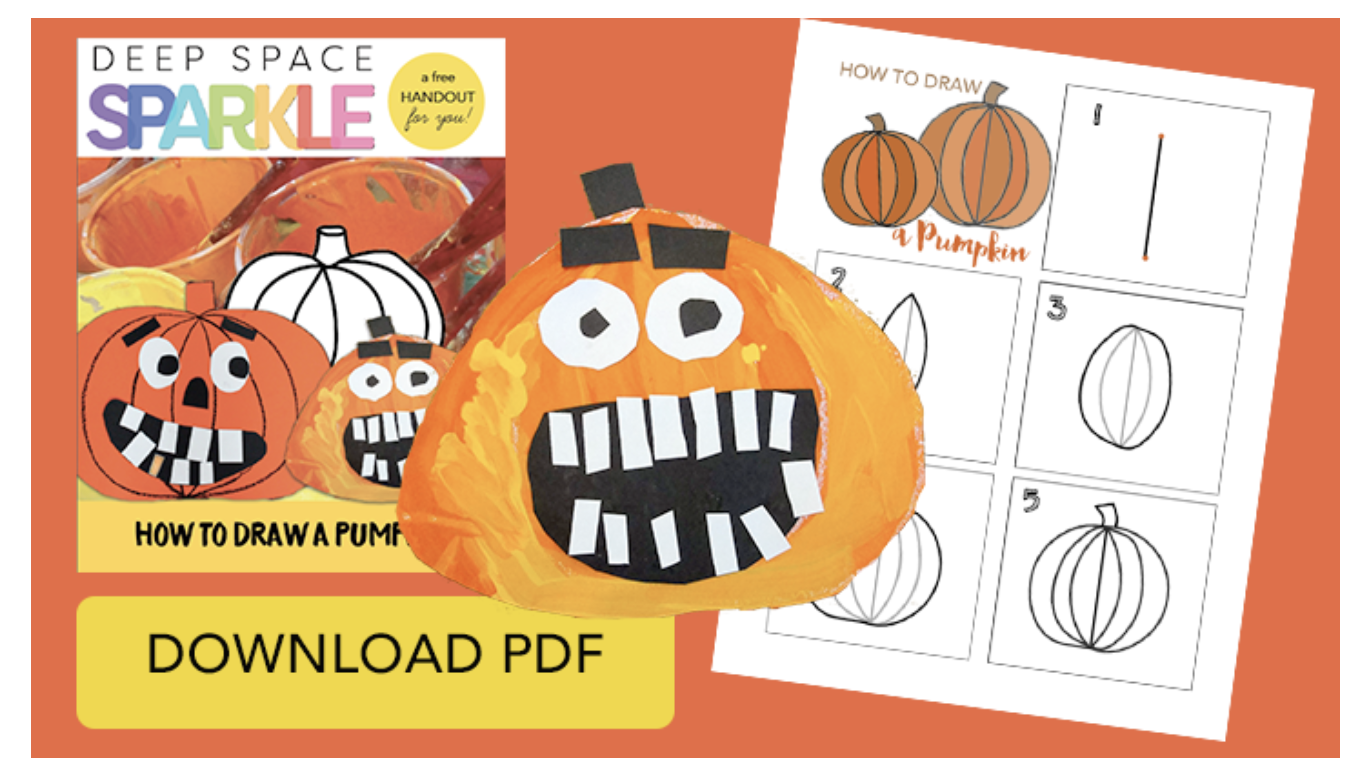
DOWNLOAD a How to Draw a Pumpkin Art Handout
*Click the yellow box below to enter your name and email for access to the drawing handout
Transitional Kinders
I have a Kinder group that includes a number of transitional Kinders- children who haven’t turned five by September 1st. These children are expected to complete two years of Kinder, but I believe it’s up to the classroom teacher to determine if the child is ready to move onto first grade. In my opinion, there is no better place for an almost-five to be than in art class, but honestly, it’s a whole new experience for me. I often have a few young ones in Kinder class but this class has many.
I love my situation as it provides a unique challenge to me as an art teacher. I don’t feel that a structured art class for pre-kinders or pre-schooler’s benefits the child. Sometimes crafts that develop the fine motor skills are better. Exploratory art feels like a better approach.
But, this is art class and there are children in this class who are at Kinder level, so I needed to figure out a lesson that works for both groups. I loved the Painted Pumpkin project that I did last year, so I did it again….
Drawing the Pumpkin
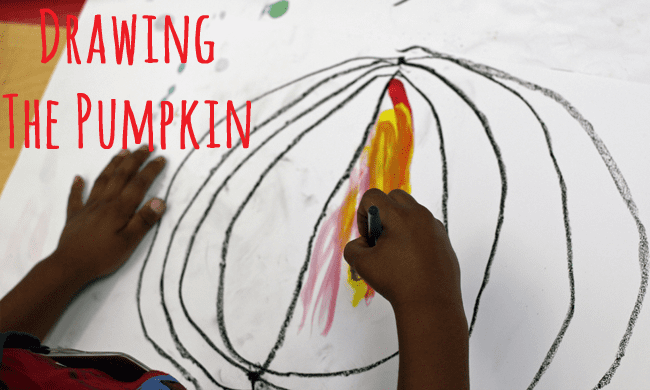
For this lesson, I sat the children down on the carpet and read them a pumpkin book (any one of the hundreds of books on pumpkin patches are fine). We looked at a pumpkin (they just visited a pumpkin patch) and noticed how the pumpkin just isn’t a circle, but a form with many segments (new vocabulary word). I showed them how to draw a segmented pumpkin without drawing a circle or oval. Then, the children sat in their special chair (assigned seat) and held up their oil pastel to show that they were ready to listen.
Directed/Observational Drawing Combo….
To draw a segmented pumpkin, the children used an oil pastel and made two dots: one near the top of the page and one near the bottom. They connected the dots using a curved line on both sides of the invisible line. Be careful when saying invisible line as some kids just hear “line” and draw a line from the top dot to the bottom dot (see above).
To make the next segment, place oil pastel on the top dot and draw another fat curved line to reach the bottom dot. Do again on the other side and then as many times as you want. Stop when your pumpkin is big enough.
Painting the Pumpkin
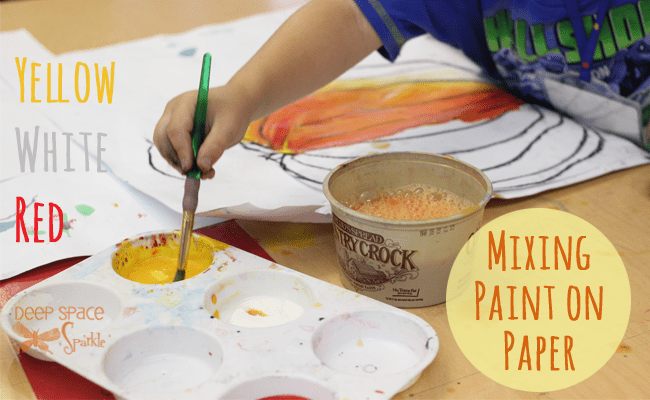
Place a palette of yellow, red and white on each table for kids to share. Starting with the yellow paint, children take a paintbrush from the water container and dip into yellow paint. Paint a section on the pumpkin with the yellow paint. Then, without cleaning the brush, dip brush into the red paint and scoop up a teeny tiny amount. Paint over the yellow section. Ask what happens. Do the same for the white paint: clean brush then dip brush in yellow paint and paint segment. Then, dip in white paint and paint over yellow. A lighter yellow appears. They can add red if they think the segment is too yellow.
How to Teach Young Children to Cut with Scissors

Okay. This is when things got a little hairy. Many of my students had never seen scissors before. Take a look at the photo insert above. This little guy wasn’t the only one holding his scissors the wrong way. The classroom teacher and I spent some time walking around and helping the children hold scissors with the thumbs up, the scissor end pointing away and opening wide. I’m pretty happy to report that with a lot of patience, most kids ended up freeing their pumpkins from the white paper.
Here are some tips for teaching a child cutting techniques:
– Smaller hands like scissors with enough room for their fingers, so make sure you have the right one
– Make sure thumb is pointing up, not down
– Hold cutting arm elbow firmly into waist and don’t move. Practice just opening your scissors without moving elbow.
– Use the opposite hand to rotate the paper, keeping the cutting hand stable
– Practice cutting ropes of Play-Doh
Adding the Happy Face
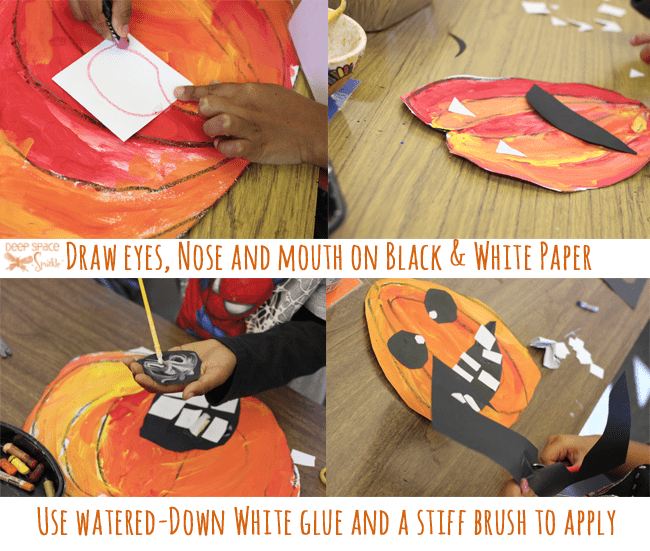
Set a tray of black and white paper on each table. Draw eyes with an oil pastel on white paper. Some kids drew triangles and others drew ovals. I encouraged ovals as triangles are more associated with Halloween. Add small black paper dots to white eyeballs. This is when the children notice that where they place the dots, the expression changes. Use black paper to make a big mouth (any shape) and add white teeth. Lots of cutting going on here and this seemed easier for most kids. Maybe the smaller paper was easier to manage.
Instead of squeezing white school glue or using glue sticks, I opted to use school glue that had been watered down a bit. I had some very inexpensive paint brushes to use as applicators. This is by far the BEST glue system for little kids. Very little excess glue and the white glue performs far better than glue sticks.
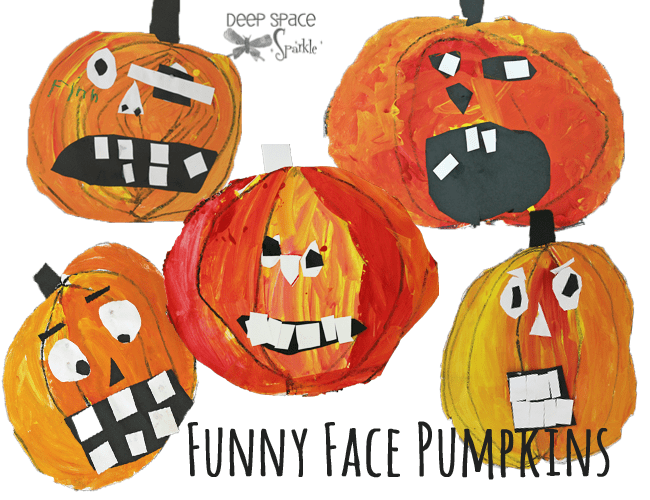
The children were very pleased with their pumpkins. Needless to say, I was too!
Have you done this lesson with your little ones?


I did this lesson last year with my 11 kinders and absolutely loved the way it turned out. It was by far the best product of the year!
love this!! Thank you thank you again and again PATTY
I am a homeschooling mama of 4 kids. I did this project/lesson with my three oldest (ages 7, 5, 3) today. I demonstrated while my 3-year-old helped me and all of my children loved it and were successful. Thank you for posting meaningful lessons that are not only fun and beautiful, but help us teach art concepts to our students. My kids are so proud of their jack-o-lanterns and I think they turned out beautiful!
I’m doing this project with my preschoolers this week. I lightly drew the pumpkins in pencil and had the kids trace the lines with white oil pastel. They usually draw things too small so this was a great way for them to do it themselves and still have a big enough pumpkin to work with. Painting was excellent – they love color mixing. Cutting and gluing tomorrow!
I love that you are doing this with your little ones. Let me know how it turns out!
I am an art docent in Washington state and we are doing this lesson with my son’s kinder class tomorrow! We are SO excited and looking forward to it. I practiced with my 3-year-old today and it was a blast! I will let you know how it goes with the older kiddo. Fortunately, we don’t have the same strict rules about holidays that you do where you are. Thanks for posting. Your blog is just fantastic and a true blessing to a volunteer “art docent” like myself!
This project was a HUGE success today. Thank you for the idea and tutorial! We did the entire project in approximately 45 minutes. I read “It’s Pumpkin Day Mouse” to the kindergartners, brought in a real pumpkin to discuss segments, had them use observational techniques with the oil pastel drawing, etc. The kids loved this and the results were incredibly creative! The only step we didn’t have time for was cutting the painted and decorated pumpkin out of the white paper. There just wasn’t enough time to let the paint dry and some kids are heavy handed when it comes to applying paint! The kiddos had so much fun cutting shapes for the faces that we figured they had plenty of cutting practice anyway! Incredibly creativity flowed out of those children today. Thanks again!
Somewhere I read about small plastic containers (with lids) filled 1/2 way with white school glue and then placing sponges on top of the glue. The sponge soaks up the glue and the kids can just dab their paper on the sponge and use that instead of glue sticks. Have you seen or tried this? Thanks for all your beautiful ideas!
Sounds like a great idea. Never tried it so I can’t say how well it works.For young kids, I like brushing on glue with small brushes and watered down glue.
We’re doing this lesson this week with our pre-k class of 3-5 yr olds. We’ve been adapting your wonderful projects for the last year and they always come out great! Today we’ll start with the guided drawing and begin painting. Tomorrow we’ll finish any painting necessary and start on the faces. Such a great project!
Our silly pumpkins turned out GREAT! So fun. We had the kids cut out circles and rectangles for the eyes and teeth, but we cut out the the pumpkins for them. One group used liquid glue and one used glue sticks – glue sticks are the way to go with the little ones. My little guys dribbled the liquid glue a little (to be expected) and the liquid glue did not dry clear since it mixed with the paint on the pumpkin. Learn as we go! Great project though – they loved it! We usually stick with process oriented projects but they really enjoyed this – we are going to branch out from now on! Here’s a link to our blog to see some of the finished creations! http://foxhillschool.blogspot.com/2013/10/silly-jack-o-lanterns.html
I found this a little late for this year, but I will surely use it next year if I’m teaching Kindergarten, or maybe first! What wonderful step-by-step directions.
Thanks for this wonderful idea of how to teach the drawing of the pumpkin! I tried this today with my 22 kinders and they LOVED it. I first modeled drawing the dots and curved lines with my pencil as you instructed above. Then I traced my pencil lines with black oil pastel. They went back to their seats and I was amazed how they just “got it” and all but 2 needed some guidance! We started painting but will finish next class and start working on the faces. So fun!!
Thank you so much for the very specific details on how you taught it. That is what makes it the most valuable to me!
We did this project with all the daycare children this week (ages 2-4). They turned out wonderfully. I love the step by step progression. It made it easy to explain and they could do it without any help from me. Well until the cutting out of the pumpkin, most of mine can cut but don’t stay on a line very well. So I cut the pumpkins out, they did the facial features. They all turned out great! Thank you for the inspiration.
I loved this sweet project with my JK students, especially because they are all so unique. We talked about colors and shapes and sizes and it was art, math, language arts, and science all rolled into a beautiful pumpkin! Thank you.
What kind of paper did you draw the pumpkin on?
Hello! This is perfect for my special ed students! I tried to download the free PDF but it’s not working. Is there another link for the handout? Thanks!
Thank you!