


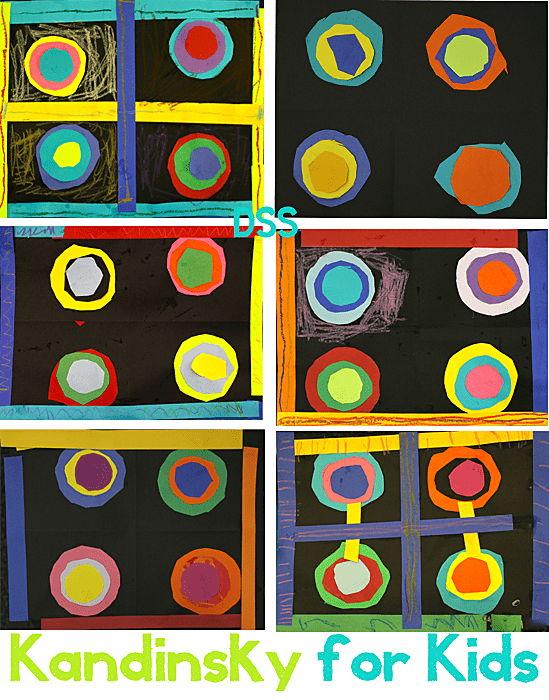
Russian artist Wassily Kandinsky’s paintings use color to show emotions rather than painting an object to look real. This concept is particularly intriguing to young children as they generally strive to make all their drawings look as real as possible.
Introducing young children to Kandinsky’s abstract artwork encourages them to see that art is created many ways. Here I have two kindergarten projects that play with a Kandinsky style with sulphite paper or tempera paint.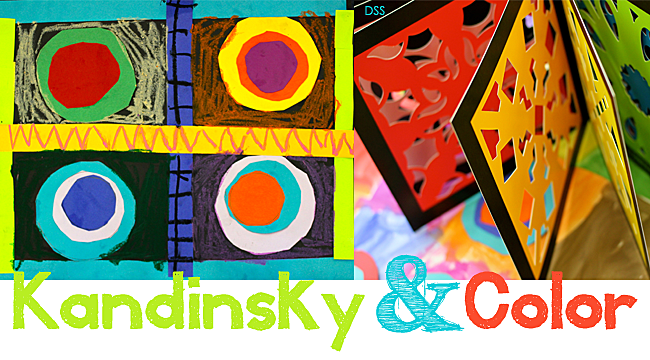
OPTION ONE: KANDINSKY ABSTRACT ARTWORK WITH SULPHITE PAPER
Pairing colorful paper circles together gives the kids a chance to see which colors look best together. To introduce this concept of emotion and color, I read the children the book, The Rainbow Book by Kate Ohhrt. It’s a perfect art room-read as it is short, colorful and provides one perfect sentence per color and emotion.
“When I feel GREEN, I am fresh and alert”
WHAT YOU’LL NEED:
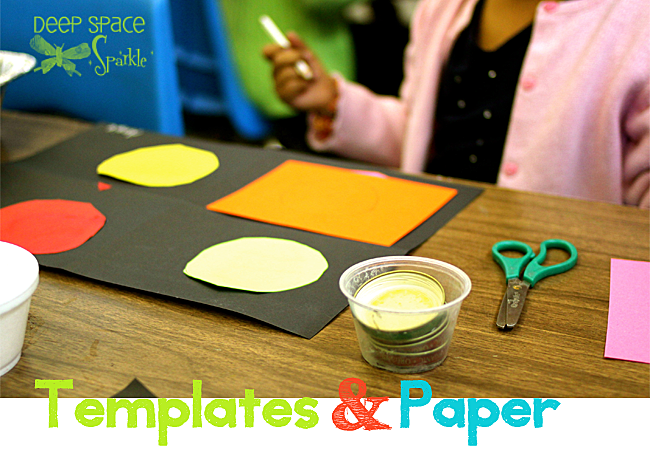
To start this project, use a cafeteria tray to collect supplies for each table. I line up the 5 trays and place a small bin of colored paper squares, a bowl of kid-scissors, small cup filled with pencils, various sized circle container covers and a small container of white school glue mixed with a bit of water. I like using brushes and glue when there is a lot of gluing going on as it feels easier for the kids.
THIS IS WHAT WE DID:
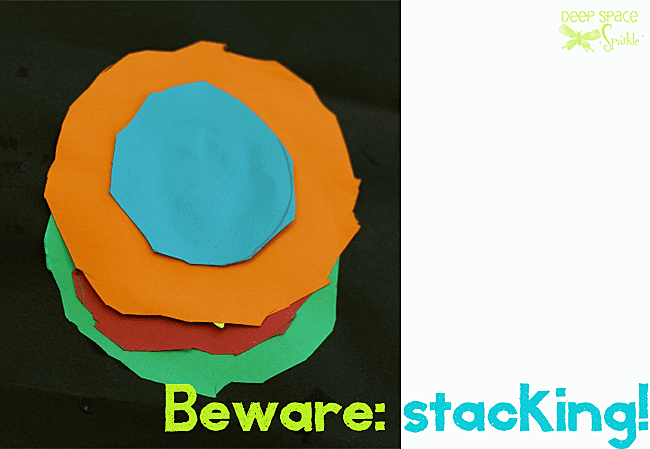
To prep the black sulphite paper (12″ x 15″) for the circles, children fold paper in half and in half again to create 4 sections. Then, they pick their 4 favorite colors and trace the biggest circle template onto each color and cut out. This is a challenge for many of my four and five year olds but resist the urge to cut out the shapes for them. Its great practice.
Glue the four circles to each section on the black background.
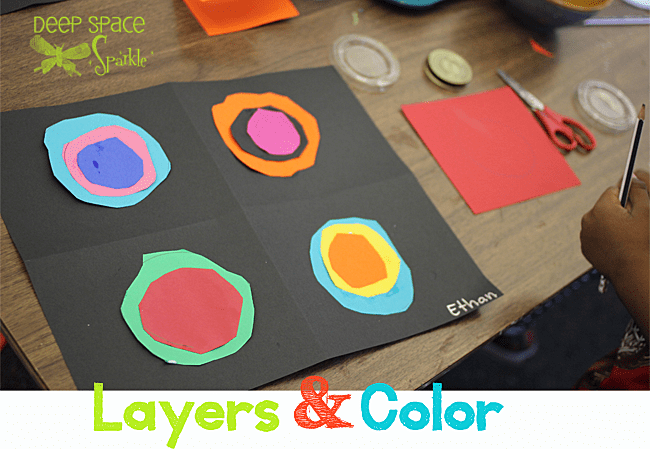
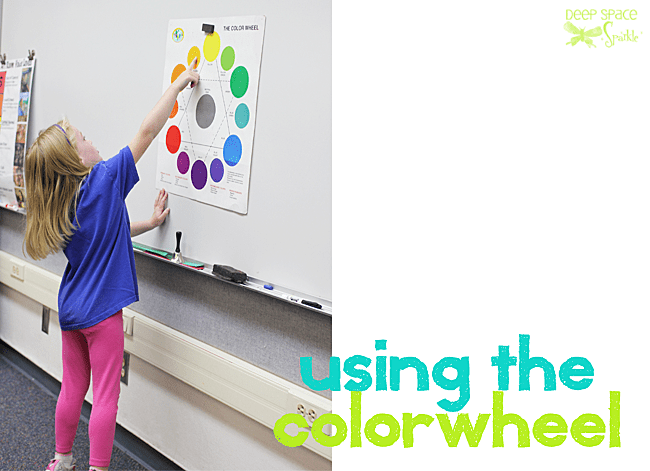
Once the kids have their first circles glued down, have them select another color. In my demonstration, I show them how to use the color wheel to select the opposite or complementary color. They place their finger on the color they have glued onto their paper and walk their fingers across the wheel to the other side. Whatever color is there they chose a paper color that is similar. A few kids really got this and selected their colors carefully, but many grabbed whatever color was closest to them in the tray.
Adding layers of circles is a concept that can be confusing to some kids. They get that they have to cut out lots of circles but some feel its best to glue all the circles on top of one another. This doesn’t happen often, but be prepared for it.
As a final embellishment (mostly for the kids who finished early) , I allowed them to use oil pastels and strips of paper to decorate the outside of their papers.
OPTION TWO: KANDINSKY PROJECT WITH TEMPERA PAINT

I’ve also recreated this Kandinsky project using tempera paint. Judging by the intensity of my kinder class faces, I gathered they enjoyed this art lesson a great deal. The goal is to teach the children color-wheel basics. Begin with three colors of paint (red, yellow and blue) and see what happens. It’s really not about blending the paint perfectly, it’s really just about blending to see what happens.
WHAT YOU’LL NEED:
12″ x 15″ white paper
Yellow, red, blue tempera paint in a 6-paint palette (I use Tru-Ray)
THIS IS WHAT I DID:
I thought a great deal about how to teach this blending lessons and I tried a few different strategies. The best way to start, it seems, is to have the children fold their paper in half lengthwise to make a crease. Unfold then fold again in the other direction, then again.
The goal is to create 8 squares. Now, this part is optional, but if you want, have the children dip their paintbrush in the yellow paint and paint along the crease lines. This defines the eight squares a bit better.

Now the painting begins. Have the children dip their paint brush in the yellow and in one square, paint a small dot. In another square, paint a ring or a large circle. In another square, paint a circle so big it touches the edges of the square.
Then proceed with red paint. Clean brushes first. Paint a dot in one square (it could be a square with the yellow circle). Paint a large circle then paint an even larger circle in another square. Encourage the kids to use the same squares as in the previous step. This way, the paints will touch and therefore blend.
You can see where this is going. Next comes blue and you do the same thing all over again.

Inevitably, a few kids will begin mixing colors, or use a color different from the rest of the class…no biggie. Let them explore the paint in whatever order they like.
I know some classroom teachers do not like this as it demonstrates all too clearly that the students can’t listen and follow directions, but for me…well, I just don’t think it matters. They’re in an art zone and will think differently.
The timing of this lesson is tough to predict. I teach 5 kinder classes. Two classes finished in one 35-minute session and the other three did not. My recommendation is not to rush it.
This should take 2 classes @ 35 minutes. The first class for the primary colors then the second class for secondary colors (created by mixing, not poured from a bottle).
Third and Fourth Grade Efforts…


ARE YOU A SPARKLER? Over 300 art lessons are available inside the Members Club. Access to videos, resources & trainings for one low monthly fee.
CLICK THE IMAGE TO SIGN UP FOR NOTIFICATION OF OUR NEXT ENROLLMENT


Hello. I’m not a teacher but your blog is fantastic. Art teachers are my heroes.
Here is a link you might like. http://www.picassohead.com/about.html
Thank you
Sharon
I love picasso head and one year I had access to a computer lab, and used the site with elementary students. Be careful because there is inappropriate content in the picasso head gallery. I found out the hard way…
This is awesome! I’ve ordered the book The Rainbow Book you mentioned. This will work perfectly as we go into a study on emotions / feelings. YAY! Thank you, again. 🙂
So glad. You’ll love the book. It’s so pretty and if you ever do a paper cutting lesson, it would tie in well with that, too.
Great project.
We love the way this project gets children engaging with Kandinsky in such an embodied way!
I had my kids draw the circles with water soluble markers in either warm or cool colours. Then they had to put the opposite colour in the centre. I then had them use a wet paint brush to turn the marker in to “paint”. We used baking parchment paper because of the smooth surface. I tried this on other paper, but the marker soaked in and did not move with water. The kids thought I was a genius.
This sounds so fun!
I love this!! I am a private art teacher, teaching from ages 4 – 40! I’m always looking for new inspirations! Can’t wait to teach this to my kids today. Thanx sooo much for sharing this. xxx
I am a small home childcare and every summer, we do the summer of art. Your fee, although worth every penny is out of my budgets reach. I like to highlight and learn about an artist for a week and do different art sessions based on that. To make things even more challenging I am a mixed age group between 2 and 10 years. I have looked at your bundles for Paul Klee, watercolor and pastel, clay and 45 minute art. Do you have any other bundles that would highlight an artist, like the Paul Klee bundle? Also, do you have any promo codes? Thanks for taking the time to read my email.
My very best art bundles (all 40 of them) are available for members in my membership program. The monthly membership costs less than a bundle in my store so I would encourage you to look into it. Here’s a link to the information page:
I also have a free video series starting tomorrow (thursday, Dec 28) You can sign up here: https://deepspacesparkle.lpages.co/create-your-dream-art-program-video-series-l6/
Hope to see you there!
This is a wonderful way to teach anybody how to mix colours and allow children to express themselves uninhibited!
Adorei a atividade e principalmente por ser embasada na tecnica e criatividade de um grande artista!!!!
Fantastic ! Thank you