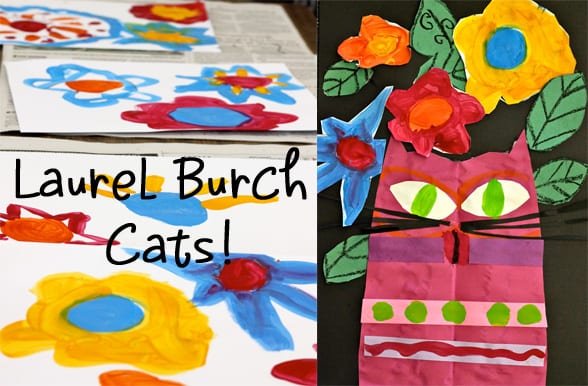


LAUREL BURCH CAT ART PROJECT

I’ve been admiring this art project for a while now. VK Bowerman’s Laurel Burch Cat project is colorful and fun. VK doesn’t have a website, only a Flickr account, so I can’t provide a website. But please visit her Flickr page and prepare to be inspired by wonderful work.
I studied VK’s project and visited the official website of Laurel Burch. Between the two, I was able to introduce this California folk artist to my second and third grade students. The project requires a few steps and lots of different sized papers as well as colorful paint.
Art Supplies
- 12″ x 18″ black construction paper (background)
- 12″ x 9″ colored construction paper (cat)
- 12″ x 9″ white construction paper (painted flowers)
- 12″ x 9″ green construction paper (leaves)
- tubs of tempera paint (palettes are fine)
- medium paint brushes
- black tempera paint
- scraps of black paper and other colors for whiskers and cat decoration.
Creating the Cat Silhouette

1. Take the 12″ x 9″ colored paper and fold in half. Students cut a cat shape from the paper, opened it up and pressed it flat.
2. Using tempera paint, children painted faces and lots of patterns on the cat. They also used paper to add eyes and strips of color.
3. Cut strips of whiskers and eyelashes from black paper scraps.
4. Here is a work in progress. Isn’t he cute?
Making the Leaves and Flowers

5. On the green piece of paper, draw big leaves with the oil pastel. Then you could use the black tempera paint, but by using the oil pastel, children don’t have to wait for the paint to dry before cutting out leaves.
6. Using tubs of tempera paint, paint bright, big flowers on the white paper. Set aside to dry. Actually, paint the flowers first then create the leaves. i have it backwards in the picture! By the time the leaves are drawn and cut, the flowers will be barely dry enough to cut.
7. If you need to wait until the next class to assemble all the pieces, clip all the pieces together (black background, cat, leaves and painted flowers on top)
I really enjoyed watching the children create these cats. The energy in the classroom was such that children moved from one step to the next at different stages. I didn’t touch on any specific art technique with this lesson, mostly composition and fun!
I hope you give this a try. A mood booster for sure!

Love this lesson? See more related Laurel Burch lessons in the Color Theory bundle inside the Members Club. Click below for MORE…


VK BOWERMAN is/was my mentor in college! I student taught for her before graduating in 2004. She teaches Art in Perrysburg, Ohio for K-5 school. She’s EXTREMELY talented and the majority of my lessons come from her! I can send you the link to her school’s website where she also posts art projects, but I’m sure she’d prefer to be asked before you “BLOG” to everyone the link. Let me know! 🙂
Wow! What a small “art” world! I’d love for you to share the link with me…you can email me at patty.palmer@cox.net. I’ll contact VK (what is her name?) to see if she’d be willing to share.
Thanks!!!
HEY!!! I am so excited you are inspired! I love your site! And your photos on Flickr! My close pal is Laura, AKA, paintedpaper. She is my local collaborator, I see she is your friend too! Sharing lessons is the key to great art rooms! It is so sweet of you to mention me on your blog! Your cats look GREAT! 🙂
Yippee, I see the party is just started! Now How can we have coffee with Patty over in So. Cal and us in Ohio! 🙂
We need to go to Cal for a “professional development meeting”. 🙂
Yes! Anytime!
Hi Virginia! So nice to “meet” you! Yes, I’m a big fan of both you and Miss Laura. I think we should capitalize on Laura’s idea and plan to meet when any of us are in Ohio or So. Cal! Do you have a blog or site?
Nice to meet you too! I do not have a site or blog right now. I have been just using Flickr. I love the idea of having a comprehensive place to store my lessons and notes on each to share, just have not gotten organized to do it. Your site is very inspiring and popular here in Perrysburg, Ohio! All the art teachers are checking regularly to see what you are up to! Laura is also a great inspiration. She is more tech savvy than I, but maybe I can talk her into some assistance. 🙂
I would love to meet! Maybe Laura and I need to take an “professional development” trip to California!
A few more pictures of mine can be found here…
http://faculty.perrysburgschools.net/~virbowerman/Fort_Meigs_Art/Home.html
this link is an abandoned site I created. Unfortunately, the iweb program could not be supported like I had thought. Not to mention, the tech support at school for a site is zero right now. I would love to do something like this again… maybe I will. 🙂
I should mention, I got married this summer and will probably change my name on flickr at some point to Pacer.
Have a nice weekend!
I just love this art lesson and would love for you to send me the link. Thank you 😊 Julie
Hi Julie! The Laurel Burch Cat Art lesson does not have a link. Instead, Patty covers all the steps to create the beautiful project in the post. Enjoy and let us know how it goes with your students!
I was also inspired by Laurel Burch and your lesson. I had my students make 12 by18 inch painted paper-one to share and one to use as a cat body. some of my little artists traced a cat template I provided, basically a head and ears with a large body. they cut out paper snouts and noses and eyes, glued them on and added detail with marker. I then took the extra paste papers(or painted papers as you call them) and cut them into strips. I also cut slits up the body of the cat–do you see where I’m going here? My little artists wove the bellies of their cats with all sorts of crazy papers. They were wild and fun! Thanks for the starting point!
these Cats look amazing. I am a big fan of your work, i have gotten many great ideas for art lessons from them. I love Laurel Birch, and i never thought to do a collage. I will have to try that next time. Here is my Laurel Birch project: Laurel Birch
I love what your students created. The colors are so rich and each cat is very unique.
Love it.
Cheers, Neko
I love this lesson. I made a tutorial for my students to do this lesson:
https://www.youtube.com/watch?v=pszWoi_8kFM&feature=youtu.be
IMPRESSED — RETIRERD ART TEACHER AND GRANDAD
Great! But it taken a lot of time.