


This is a favorite art lesson of mine for spring time. I typically do this lesson with my third-grade students but the results would be fantastic at any age.
Supplies:
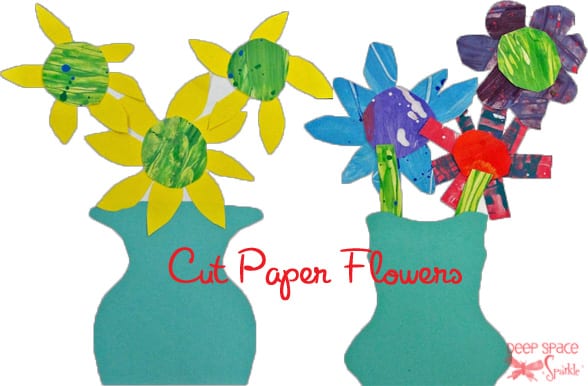
– Colored Paper (I used some leftover “Eric Carle” painted paper from earlier in the year.)
– White paper (this is 9″ x 6″ but a larger size would work equally as well)
– Scissors & Glue
Instructions:

For ease of set-up, I set out pre-cut squares/rectangles of colored construction paper, a white background paper (although a black background is quite effective), scissors, extra paper and glue sticks.
Even though most of my students have made a symmetrical vase before, I demonstrate the process again because it remains a challenge. (Fold paper in half, hold the folded edge, cut vase shape)
After pasting on the vase, the kids paste paper circles for the centers of their flowers. Because our paper size for this project was small, three centers seemed to make the best composition. Next, demonstrate how to make different types of petals…heart shape, standard shape, abstract, etc. Leave it up to the kids to come up with clever ways to make petals. Stick petals underneath flower centers and glue.
Some kids will finish before others so they can decorate their vases if they choose.

Related Posts: How to Make Painted Paper


These are fabulous! I can't believe I've been teaching art for 5 years and never new about all these "blogs"….You've created a whole new world for me. Yipes, I even started my own blog-after being inspired by you and the others.
THANKS tons for sharing and posting–the more art our children are exposed to–the greater our world becomes. Really!
I love this one! The examples are so fabulous. I'll be linking.
Love your site!!!
Lovely! I look forward to using this project with my art kids this fall…
You have so many fantastic ideas! Thanks for this one, and the link to the list of Paper Cut Flowers for Third Grade. Your candied paper Cut Flowers for Third Grade are so pretty!
Patty, These are FABULOUS
I would love to try this for my Mother’s Day project for the whole school, I think all grades could do this.
Here’s my problem, I teach K-5, 21 classes meet for only one hour to one hour and 15 for older. Only one time. I can’t do a two day project. So how can I paint the papers ahead of time so they are dry to cut out?
I can’t paint 500 students worth of papers. Plus the painting and texturing is half the fun for the kids.
I was thinking maybe I could pre-paint the first day’s classes (3 classes) and then have the kids come in and begin by painting papers (which would be used for the following day’s classes and so on for each class. Then do you think there would be enough time to clean the table up and then cut the vases and cut the flowers ? Or am I being too ambitious? Maybe we could first meet outside on the grass and paint and splatter there. Hmmm… This is always my problem grand ideas and not enough time or money.
Any advice?
Hi Robin,
I typically do this type of project at the end of the year when I have lots of painted paper scraps to use up. I know you are trying hard to make this project work, but you should consider alternative ideas. Number one, don’t use painted paper. Use gift wrap, pretty bags, scrapbook paper and regular construction paper.
I would caution you against doing the same project for every grade level. The symmetrical vase is a hard concept for Kinders. You may want to hand out rectangles or other shapes for them to use as their vase.
Whatever you do, don’t paint the paper! That would be art madness! And besides, it wouldn’t be theirs.
Here’s another tip: use 8″ 6″ papers instead of full size. Takes less time to fill.
Good luck!
Thank you Patty, as always you are such a blessing to all of us. The reason this site is so helpful is us is because when you answer other Artists’ questions it not only helps them but it helps everyone else who is reading it. Please know we love you for that.
Do you have a suggestion so I can plan in advance how to get the paper painted by the kids or does it have to be a two-day project?
There are so many cool things here using painted paper scraps. I don’t think the teachers would appreciate one of their only 6 classes being used just painting paper.(but oh, how many fun things I could do with them once I had them!)
I misunderstood your first post. I thought you said you only had one class with the students. Creating painted paper is truly a valuable art lesson. It’s not just about slapping paint down on a paper. It’s tactile, expressive and children learn about color mixing and patterns. My Eric Carle Inspired Lesson PDF has all the details on how to do this with a large class.
You should try it. It’s a two class process for me.
I do a painted paper session every year with my 1st and 2nd grade classes and it’s their favorite art experience.
You may need to plan your art classes with this in mind next year if it’s something that interests you.
Thank you Patty , I went back and re-read my post. I can see how the way I worded it sounded like only one class. I meant, I have to start and finish each lesson at one session. I can’t do a two day project.
I teach the whole school either 5 or 6 times a year, depending on how much the PTA has raised for ART.
I will purchase the Eric Carle lesson and try to incorporate it next year. I have enjoyed your other PDF’s they are fabulous.
Since we home-school, we have time to make personal things as gifts. I like incorporating art with gift making or to replace a card, as we can.
We just had a family friend lose her dad. Instead of sending a common ‘sorry for your loss’ card, we will make one of these vases, each member making a flower, and add something like ‘At a time when you may feel overwhelming sadness, we hope this will make your heart smile even if only for a moment.’ and then we sign it and attach that to the back.
We’ve many folks say how much they appreciated the art and that it did help. They found it cheerful and comforting. Some have framed it and have kept it hanging for quite a while.
There’s something special about children’s art. It’s simple, carefree, sincere, beautiful, and touching.
Thank you for your wonderful lessons. We’ve done many of them and each time both our children and us enjoy them.
Sincerely,
Anne 🙂
I used to do this with wallpaper & fabric, from discontinued showroom books that were collected from donations made by shops around town to the school art program It was win-win, because these were going to be thrown out anyway, and this way they could be recycled instead.
I think children are not the only ones who will and do appreciate these wonderful arty ideas. I’m interested in learning
This looks like a fun project for Mother’s Day!