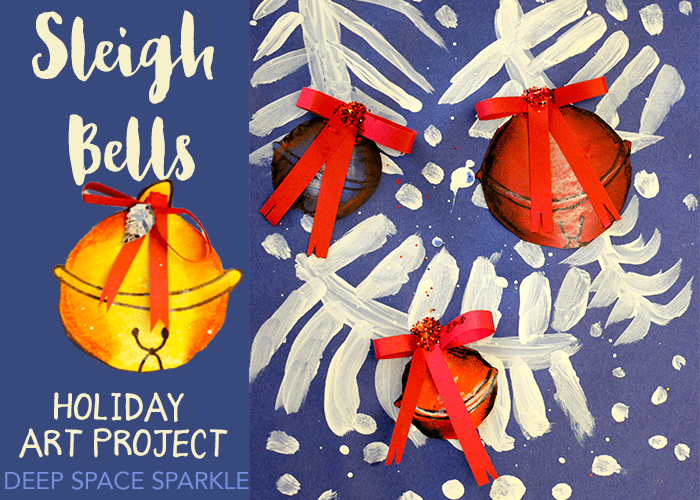


Create a pretty holiday-themed art project using colored paper, marker and chalk pastel for the sleigh bells and colored paper and white tempera paint for the snowy background.
I created a short video to show you how I taught my 3rd grade kids how to draw and color sleigh bells in order to show form. This was a transformative project for many students as the circle shape was made easy by tracing a plastic cup and so everyone was able to create a pretty cool looking bell.
Want more holiday art project inspiration? Check out all our holiday-inspired art projects for your holiday season celebrations.


Great lesson! You are a lifesaver. I have really been struggling to come up with a idea for our homeschool group that could suit all the ages. I think this will be perfect.
Thank you for this awesome Christmas gift!
Thanks so much! I wanted some art to tie in with our Polar Express unit…love the bells….
I love the finished cards, they are beautiful!
beautiful, and fun, again!
Thanks Patty for sending all these goodies! Happy Holidays!
Thank you for all you do and for all the great ideas! My students will love this!
A wonderful way to spend a foggy morning in Virginia. Thanks for helping me to teach my kids to LOVE art!
I did this with my homeschool children today – eight children. They loved this and we had so much fun. Each child did a very unique picture. Thank you for sharing this with us!!!
Patty-this is great! Love the sleigh bells–I’ll tie in 3-D form and value. Was this a two day project or one day lesson for your 3rd graders? (We have 50 min. art classes each week)
I think it took about 2 ½, 45-minute art sessions. Most kids finished during the last class and spent the time catching up on unfinished work. Depending on your students and class management, you could probably complete in 2, 50-minute classes.
We are in summer here in New Zealand but sill love the clip – kids very keen to try it. Thanks for all the cool ideas!
Love this lesson as I do so many of your inspiring lessons. Thanks so very much for sharing.
Hi Patti!
This project is absolutely darling for the holidays! Thank you for sharing this. I am planning this project next week for our art class. My kiddos will enjoy making them right before Christmas break. I can’t thank you enough for all the lessons that you create and share, especially for free. Because of your talent and generosity, I am able to incorporate beautiful art into our homeschool and treasure the many memories spending time together creatively! I look forward to your newsletters and blog entries as I can wait to see what you will be sharing next! These are truly a great gift idea to make and share with someone special!
Merry Christmas!
Karen Henry
Thank you, Karen!
We completed this art project today and it was such a hit! Thank you!!
Awesome! Awesome! Thank you!
I can’t access your video, although I did earlier today. did you just change things? help! I love this project!
Okay…very weird! Let me check it out. (???)
There is no lesson or video showing up…
Fixed 🙂
I love this project so much…and your story twice as much. Those children were lucky to be your listeners…..what a great bit to know about someone…a real sleigh!
Sparker Team….I really like all the Holiday Projects….but can I make a request……any chance since you have the 5 non religious projects, can you create 5 religious projects for us homeschooler’s. I have been having a tough time coming up with some.
Hi this Hannah from Team Sparkle. We haven’t planned any yet, but maybe we can add it to the list in the future for those of you that are able to teach them!
Hannah,
What about an advent candle using construction paper and the same techniques used on the bells. You could even still do the paint splatter or put it behind a window using white oil pastels.
Hi Sheri!! That’s a wonderful idea, the menorah project has a great walk through video on making candles you can easily adapt that into an advent candle project- making a wreath or even an orange (German Christingle) for the candle to stand in if you’d like a cultural reference. Happy Holidays! -Hannah (Team Sparkle)
So cute and easy!! Thank you!!
This project looks simply JOYOUS‼️ I love the steps and medium incorporated .
Thank you for all your good inspiration.🥰🎄
Thank you
Thank you this is awesome
I’m trying to access this lesson. Can someone help me with this, please? Thank you!
Hi Heather! We are happy you found us. This lesson along with many other holiday lessons are now available inside The Sparklers’ Club Membership. The Sparklers’ Club is an affordable and flexible pay as you go monthly membership—perfect for anyone who teaches art to students aged K-7. To join the Sparklers’ Club waitlist and learn more about The Sparklers’ Club click here: https://deepspacesparkle.lpages.co/the-sparklers-club-waitlist/