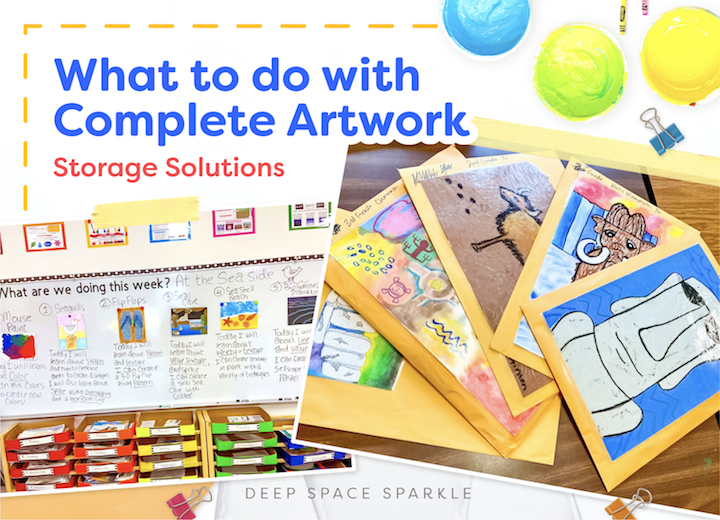


The end of October means that you’re moving full speed ahead, nose to the grindstone and the artwork is piling up. Your time is split between so many things and perhaps you’re wondering if you’ll ever be able to dig your way out.
We’ve all been there but with a little bit of organization, you’ll be able to manage the madness.
I promise!
Let me share a few finished artwork storage solutions that can help you feel a bit more zen…
Like many of you, not only did I want to keep every project until the end of the year, I needed to. The reason: art shows.
We had a district-wide students art show where one student was picked from every class and I needed to have a piece from each one. We also had our school-wide art show and a few other pop-up opportunities to put work on display, so I needed to have a piece of art from every student.
I had 56 classes that I rotated between every two weeks. I could have sent some work home but in order to be able to make a selection from the wide variety of art that we made throughout the year, I wanted to keep the art in the art room.
Creating Table Folders and Art Portfolios
I have seen teachers use pizza boxes, large manila mailing envelopes, even giant ziplock bags, but whatever worked best for me was simply storing two-dimensional student work and even portfolios in table folders.
I kept three-dimensional work in copy paper boxes or cardboard bottle flats that I could snag when the water machine was being refilled.
Table folders can be made out of a number of different materials and as elaborate as you’d like. If they’re pretty durable, you can even reuse them from year to year. Depending on what you use and the size of the artwork that you are storing, the artwork may overhand the edge. This is okay!
For several years, I used pieces of colored 12″ x 18″ construction paper. The colors I used corresponded with the “table colors” I had in my classroom. I simply folded the paper in half like a book and it basically became a sleeve that students would place their art in during cleanup.
I’ve also used large laminated pieces of construction paper as well as legal size file folders that I found one year on clearance at the store. At the end of class, students put their work, finished or unfinished, into the folder and I picked them up.

Artwork on Drying Racks
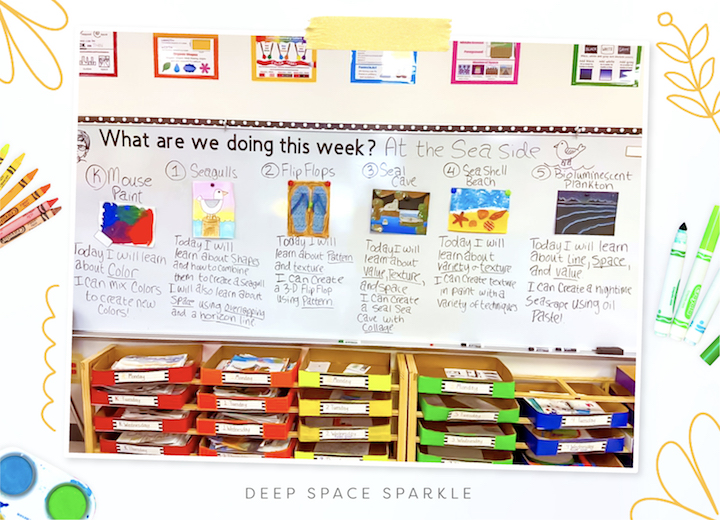
When students work with paint, place their artwork on a drying rack. After the paper is dry, gather the stack at the end of the day and place it directly into the class folder or clip it with a class clip.
If you have extra time, sort the art into table folders and pass it out when you see the students in class. This helps by putting a face with a name rather than relying on your memory or looking up their table assignment on a class roster.
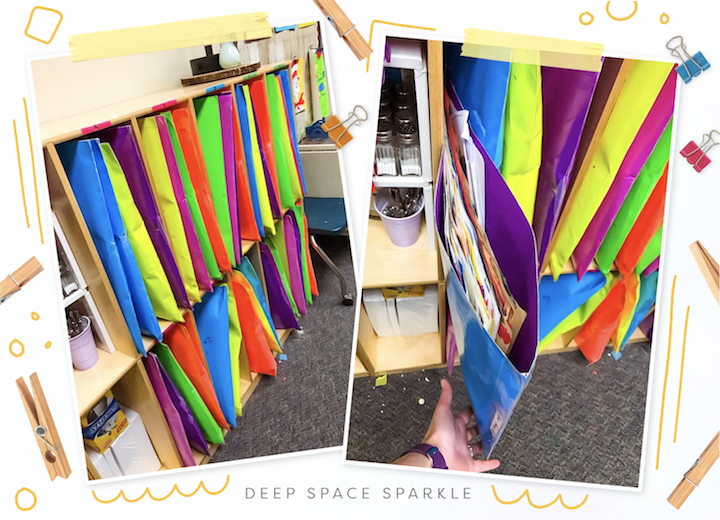
Class Folders/Clips
Class folders can help you keep track of individual table folders. They can even be made just like the table folders. I made mine the same way that I made the table folders excepts I color coded the class folders by grade level, which made it easy to see and grab when I was in a hurry.
Instead of class folders, clips with teacher’s names work well, too. Clothespins or binder clips labeled with the classroom teacher names are options. If you go the binder clip route and are worried about it damaging the paper, just make sure to wrap a piece of scrap paper around the edge that you clip so that the clip has direct contact with the scrap paper instead of the artwork.
Storing Class Folders
Depending on your space and your furniture, finding an out-of-the-way space to store class folders can be a challenge, too. Cubbies will work if you turn folders upright. Flay files or extra space on large drying racks also work. Just make sure that you are laying down a “slider”, or laminated piece of old 12″ x 18″ or 18″ x 24″ paper depending on the size of the rack, on the drying rack first so that your folders don’t end up falling through. You can even designate a cabinet or spare drawer somewhere if you have one that’ll work. I always made sure to pull my class folders for the day before students arrived in the morning and have them in the from of the class, just so they were ready to do as soon as I needed them.
Storing artwork can definitely be overwhelming but with a little bit of organization, it can become manageable. What works best of all is whatever system that you find that works best for you!
Regardless of whether it’s sticky notes or boxes, there is no one size fits all, especially when there are so many factors involved.
For some more added help, download my clean-up checklist poster to create an easier clean-up routine with your students:
What type of system do you use to store finished artwork in your art room? I would love to hear about it. In the meantime, check out these Sparklers ideas/suggestions:
Catie: “I laminate one of my demonstration examples and glue them onto large envelopes that I store my art projects in!! It works great!”
Meagan: “Each class period keeps theirs in a crate! They know to come in, get theirs and go sit and get started. Some days are smoother than others and we had to practice a bit haha my largest class is 25.”
Allyson: “First time Sparkler here (year 9 teaching art)! I’m excited to present the Seaside Bundle this week! Wish me luck! I moved the suggested grade level down since we seem a little behind after the Covid year.”
Lorraine: “I use these. Each one has the teacher’s name on it. I don’t do huge artworks because of class time.”
Melissa: “At the beginning of the year, I have them make a portfolio. It’s a legal size folder. You could also get BIG construction paper, fold it in half and then tape up the sides. The work doesn’t have to completely fit inside. A lot of their work sticks out the top. This just keeps it all together. I then have the big boxes and put all their completed work in their portfolio, in this box. Everything fits in there.”
Hope: “Back when I taught 36 classes a week, I would cut large sheets of butcher paper (color-coded for each grade level and folded in half), and I kept each on its own shelf because after a few months they were super heavy. I don’t have much storage now and only 10 classes, so I use giant cardboard portfolios from Blick Art – one for each class. I write the class on the outside of each portfolio and keep them in a used print rack I got at a garage sale. For sketchbook storage, I have a plastic bucket for each class. The sketchbooks are clipped by table (clips and tables are color-coded so I can toss each stack on the appropriate table quickly and not have to call everyone’s name).”
Are you interested in becoming a Sparkler? Click HERE to learn more about the Sparklers Club membership and be notified of our next enrollment period.


I fold a poster board in half tape the left side making a table folder for each table. Tables are numbered/color which corresponds to the construction paper square I tape on the table folder for the kids to write their names once they are assigned to a table. Tables stay the same all year. I can reuse these table folders for several years. The students make a portfolio out of poster board, folding it in half taping left side writing name at top left, writing teacher and grade and taping a tiny square that tells me which table they sit at. This has worked very well for me over the past 20+ years. The kids can’t take any art work home until the last day at school. I have 3 art shows, new ART up for end of October Parent Teacher Conferences, an open house at the end of January and art show in May.
This is a great system, Cynthia. The best part is that it works for you. I tried SO MANY systems until I found the one that really worked for me but I really like yours!
Have taught art for 26 years and have tried a variety of methods . What works best for me is a designated file cabinet that is only for art work each drawer is a different grade level. I binder clip the art together. Using hanging folders per project I think would work great. I do not like to keep ever art project, I did it for years and it is too much, so what I have done is I have a theme for my art show for example “Faces of ( name of your school) ” where all 600 kids do a self-portrait I have different grade levels do them in different styles with a variety of mediums. This has worked great for me! I do keep certain pieces of art from kids for other art displays in the community and our district wide art show but this really has helped cut way back on the amount of art I store. Students are excited to take home their art when they are done so much more then when they get them months later. They love the “you make it you take it” lessons. They can show their family what they have been working on and remember the lesson better. Also our school population is becoming one with a more and more of a transit population so if I keep there art work they may never back.
Thanks for all the great suggestions !
I’m a parent, and I’m wondering if you have any suggestions for digital storage of completed art work, eg a digital portfolio on cloud storage. Or is that a ‘sacrilegious’ suggestion… I hope not!
Hi Michelle!
Oh, I totally get it! It’s really hard to toss these precious pieces but what to do with them all?
Here’s what worked for me:
1. Keep a rubbermaid or storage container for each child and add any memorabilia, art, etc that you wish to keep. Not necessary to make big decisions about what to keep but I saved mostly art that really expressed who they were OR nicely finished pieces.
2. Frame any pieces that you love. You will always love them and in fact, I still have my kiddos art on my walls. I look at them everyday and love them.
3. Make a digital album of all your child’s pieces that you both love. I don’t always save all the art, but it all (or mostly) goes into a digital album (which are really so inexpensive now!).
Most important lesson now that I can look back….save as much as you can because one day, your child will open up that rubbermaid, sort through their childhood art and memorabilia and be so grateful that you saved them.
We use Artsonia to digitally document projects.
In class, I use the large manila paper folded in half for table folios, they are colored according to group color and labeled according to class. I use the cubby bins like these https://www.weareteachers.com/classroom-cubbies/
and use the paper trays like these to hold the folios.
https://www.worthingtondirect.com/early-childhood-furniture/80xxjc-11wx1312dx3h-paper-tray.htmutm_source=google&utm_medium=productsearch&utm_campaign=product&gclid=CjwKCAjw2bmLBhBREiwAZ6ugo6nViZF2vtu6d8xXvW45IqUl59loL3PNDRqfdnWR9rP30yaih8BNRoCPhUQAvD_BwE
I could just put in each bin, but the paper trays hold the art workbooks or sketchbooks. Inside my table folios, I place a 3prong plastic color pocket folder like this https://www.amazon.com/Colored-Assorted-2-Pocket-Fasteners-Tear-Resistant/dp/B0838D12DW
with a clear paper protector sleeve inside to hold the small paper materials they need for their project. This way they have when needed and won’t fall out of the folio. The pocket folders also hold worksheets and their objectives/directions/handout etc.
Hi Jodi! This is Bethany from Team Sparkle. Thanks so much for all the great suggestions. You’ve got some great organization happening in your classroom!
I use 12×18 plastic boxes I found at Walmart. Each class has a box.
This has worked brilliantly for me :
I use Manila filing folders for each student With marker I write the student’s name, class room number , home teacher name and art seat location on each folder.
The custodial staff gives me large boxes used for rolled black garbage bags used for large black garbage bags. I have five classes per day. I use one black garbage bag thick cardboard box with insertable side flaps to securely store about three classes of folders. So I need two of these boxes per day as I have five classes per day.
I also write quick comments on a paper within each class in each group of class Manila folders. You remember a lot that way. Instantly. Very expedient in a face paced schedule.
My rotation is one of a six day week. The garbage bag boxes stack brilliantly, are strong, and close securely with strong insert flaps. Boxes are easily labeled with markers. Stack by day. Two per day. Great to pull out in a hurry and know all the information you need to start the entire day for each individual class. Even if you have 800 students it works brilliantly.
Manila folders cheap on Amazon. They take a lot of a beating. And the kids like them. Before kids come in, you can throw them out on the tables. You can have kids collect them and put them in a smaller cardboard box at the end of class. Then you put them in the large cardboard box of that day after they leave. Nothing becomes lost. It is fast.
I have less than five minutes between classes. I have transitions between classes of less than five minutes. Sometimes transitioning between first and fifth grade.
Even though Title 1 Tier 1 school, this is the best system I have discovered. Kids to outstanding work exhibited throughout the school district and cultural institutions. Kids love art! They know you really care about them and their art.
The best system for me to really understand each child and their beautiful art. They know you care.
Wow that is a brilliant organizational tip!
Our librarian lets us display our clay projects on the very top shelves of the library! This really helps keep the projects safe! We glue the projects to old CD’s or card board pieces that are covered with tin foil or painted and the names of the students can be seen. Later when we have an art show the projects are displayed and the students take them home.
Our cafeteria staff save “good” trash for my art classes. One year they gave me all the cardboard strawberry crates. They are made to stack! I stacked 10 in a column, cut one of the sides out, and used a long strip of packing tape to secure the column from top to bottom. This made a shelf for one grade level. Next, I collected the smaller cardboard trays that sports drinks and sodas are shipped in. I slid these trays into the shelf and labeled each on the exposed side with the homeroom teachers’ names. I have 40 spaces big enough for large projects and they are organized by class. They take up less space than a table, are easily accessible by students, and look neat even when full. Did I mention it was also FREE? Happy crafting!
Thank you for sharing tips on student work storage. Laminating is a brilliant idea for more durability. Also the tip adding a scrap paper with the clip so not damage the work!
I had learned from a FAEA (Florida Art Education Association) workshop how to transform brown paper grocery bags into student portfolios. I can send a picture if interested. Also sometimes the big grocery store chains will donates to schools the brown paper grocery bags. Yea, all things budget friendly.
I did see an idea on Facebook where a teacher collected white pizza boxes and had the students decorate with their names and brilliant colors – colored , painted, whatever. they were easy to stack and store and had names on the front also for quick, easy access!
I wish I could comment more on the things that are shared on your site. This site has helped me so much over the years. I wish I could post a picture of how I store works. I have 22 classes (500+ students) and I have had 35 classes (7 grade levels in the past). For 35 classes I had these long bins labeled by grade level (color coded) with cardboard dividers that had teachers names (also color coded). I had them on a 5 shelf rolling rack. It worked brilliantly. I am currently using copy boxes (2 classes per box) and labeled by grade level (color coded). I got this great electronic tool for cutting cardboard that works really well. (This system is also on a rolling rack.
My post office gave me a stack of Priority Mail cardboard boxes. I cut off one end, then stacked and taped together with packing tape. Beer flats slide in perfectly! They end up looking like small chest of drawers. I keep the “drawers” on the top of my storage shelves. I’m pretty tall, so they are easy for me to reach.
I send home a note near the end of the year and ask families to send a white poster board, folded in half, with their child’s name and class written in pencil. I staple the sides with my electric stapler as the poster boards come in. I say, “Anyone who can send an extra or two is appreciated!” I always have plenty. These are put in the storage cubbies I have for each classes’ artwork. A week or two before our last class, I have students volunteer to hand back the stacks of art (even kinders!). They decorate their poster boards with scented markers and have their name and school year written clearly on one side. Our 12×18 pieces fit perfectly along with all the other pieces and the poster board is sturdy. The top of the portfolios are open so I tell them to carry them under their arm.
I teach STEAM for two K-6 elementary schools. Since a lot of classwork isn’t specific art we don’t have as much ‘finished product’ as a pure art class. 40-minute periods mean I store the works-in-progress in wire baskets that hold 8.5×11 paper. I also use the lids or boxes from the copy paper.
I appreciate your idea to save art until the end of the year. I like to send work home regularly since students are usually excited.
Each class has a bin with their class name. In the bin each student has their own labeled sketch book for their work. Unfinished work is stored in the class bin until completed and glued in the sketch book. Becomes a portfolio for each student by the end of the year.
Thank you so much for all of your help! These new lessons has made melook at my classroom with so many new possibilities. ❤️