


Everyone has done a watercolor birch trees art lesson. They are such a lovely tree, stripped of their leaves and shimmering with black and white bark. Most kids in Southern California have never seen a forest of birch trees, unlike my 10-year old self who collected the bark to someday build my own birch-bark canoe like the Mi’kmaqs had done. But this lesson is not just about birch trees. It is also a lesson in color and in particular, winter color. Again, this is a bit foreign to my students who live in a perpetually sunny, color-filled world, but it’s an important concept when learning how to paint a birch trees watercolor project.
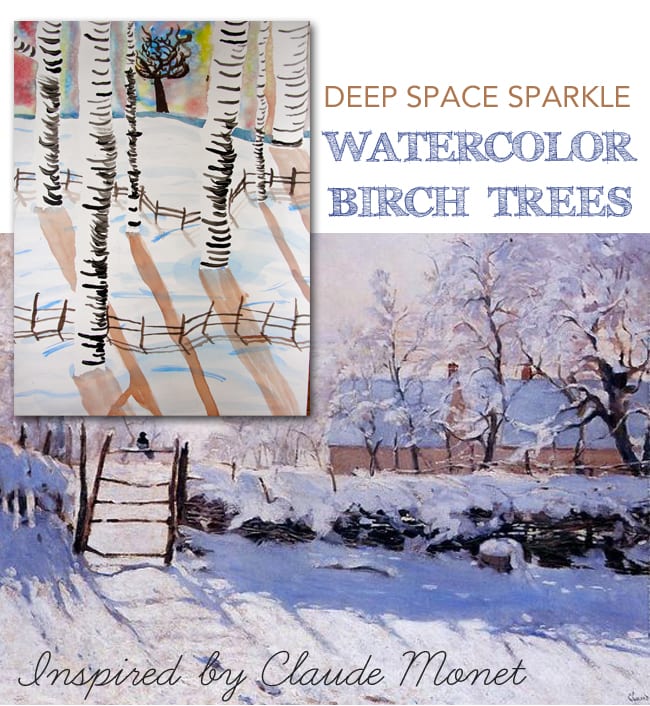
This is not a lesson that originated from me. I wish I could find the source but it has long since disappeared from bookmarks and menu-bars, lost in space two computers ago. The original author tied this lesson to Monet’s painting “Magpie”. I think it’s a wonderful example of how an artist uses minimal colors to create a winter landscape with watercolor birch trees. Do you know who created this lesson? Even though there are no watercolor birch trees in “Magpie” it’s worth talking about Monet’s color palette.
Supplies: 9″ x 12″ watercolor paper (school grade “Biggie” Brand or Canson), watercolor palette including white (if you don’t have white watercolor/gouache use tempera paint), masking tape, salt, small and medium size watercolor brush.
Apply Masking Tape

Tear strips of masking tape in half lengthwise (not easy) and use ripped or torn edge for the outside of tree. Place the straight edge towards the middle. Do again so there are two torn edges creating the tree. Add branches if you would like. Smooth down with back of fingernail. Make sure ALL trees extend off the top of the paper. If you don’t, it will look like a lumberjack swept through the forest with a power saw.
Paint a line across the trees near the top (horizon line)
Painting the Sky

Mingle two or even three colors together to create a winter sky. I like blues, reds, and purples but the children will know what colors they like. It helps to lay down a layer of water so that the colors blend easily. As soon as the color is on, sprinkle salt onto the paper (right).
Painting the Snow and Shadows

Painting snow can be a bit tricky. I suggested that the students mix a bit of white paint with a touch of brown and paint over some areas of the painting. You could also choose blue but brown makes a better contrast to what is almost always a blue sky. Some kids painted over the entire area, some didn’t. I’d resist the urge to “police” this choice as the painting will come out similar enough, you want to encourage as much individualism as possible.
Time to explain shadows. On the white board, next to my sample painting, I drew a sun in the top right corner of where my painting hung. From there, I drew a line to demonstrate where shadows would fall. Kids got this right away, so the next step is to paint shadows. Whatever color they used for the snow they can use for shadows. Only trick? Paint all the way off the paper.
Using a small brush and black paint, draw trees along the horizon line. Paint right over the masking tape.
Adding Bark

The quickest and easiest part of the lesson: Bark. Peel off masking tape. If it tears, don’t worry. Just glue a wayward piece down (glue stick, not white glue). Using a small brush and the black watercolor paint, paint small curved lines across the tree. Add a fence along the horizon line and in the foreground too. Now step back and admire this beautiful piece!
Sixth Grade Watercolor Birch Trees “Magpies”…

*This post contains affiliate links
For more fun winter holiday art project, check out more in our Winter Art Lesson Library


Hi Patty,
I’d like to think you saw the reference to Monet’s Mapie on my blog. http://dreamdrawcreate.blogspot.com/2010_04_01_archive.html
I too have done this lesson many times and it is a great lesson for my students here in the North East. I would like to add a suggestion in terms of technique which I have found to be very succesful. In place of the tape, which is costly, I use thin cardboard as a squeegee. The students mix a wash of black paint and water in their watercolor trays and then dip the edge of the cardboard into the wash and drag it acorss a piece of white drawing paper. They repeat this several times working their way across the paper. When they return the following week they use their scissors to cut long vertical strips of paper for their birch trees. This method also gives them many choices as to which part of the painted paper they feel is most succesful in terms of representing their trees.
When it comes to adding the texture, the horizontal lines on the tree, they may choose to either draw them with a black thin sharpie or mix a black wash and then dip the sharp edge of their cardboard into the wash and stamp the lines across the trees. I always remind them that I do not want to see “ladder trees” and that they are to be mindful of keeping this element interesting by varying the spacing and not always placing the horizontal lines directly across the tree. Once these two steps are completed they glue them down to their background paper which has already been painted to represent either a sunset or sunrise.
I hope you will find these ideas helpful. It is always my favorite winter landscape project.
Enjoy,
Janis
Hi Janis! I saw the lesson about four years ago and I think it was through Artsonia. Did you ever post the lesson there? Love the lesson and your idea of using cardboard.
A hint for tearing tape, put the tape on your pant leg, pick it up a couple of times to remove some of the “sticky”, (prevents it from sticking to the paper) then tear the tape while it is adhered to your clothes. You will have much more control of the tape and it won’t get tangled. This can be done on students shirt if they are wearing shorts.
LOVE THIS!
Love your idea for tearing masking tape lengthwise.
I have done these with my second graders! Love that each one becomes unique and successful!! I have to say I love the raw edge that the torn tape can give to the trees!! I like how these have a variety of color choices, very beautiful!!!
Hi Patty,
I did not post the lesson on Artsonia. I used the term “like to think you saw it on my blog” loosely as I know it is a popular lesson among our peers.
I’m glad you liked the suggestions I offered.
Keep up the good work.
Sincerely,
Janis
WOW I LOVE this! I can;t wait to try it my next 6th grade cycle!!!
Hi Patty, I tried this fabulous art activity with a small group of 9 year olds. I’ve been working with them for several weeks now, so thought I’d introduce the concepts of foreground, horizon line and background. We began by looking at some real paintings and having them point to where the land meets the sky–the horizon line. (I had an arrow for them to stick on the painting). We discussed these questions: “how do artists make things look like they are in the distance? Why do some things look closer than others?” (ie: scale or size of objects, placement, overlapping, etc) The art results are at my Children’s Gallery. http://jodieblaney.com/page/childrens_gallery. It was a bit challenging for this age group, but they enjoyed the activity and learning points. Just scroll down a bit to find the Birch Trees….thanks again. PS the grade 3-5 drawing practise sheets are awesome. I’d recommend them to anyone!!
Hello Patty,
Thank you so much for all your lovely art activity. We enjoy every art lesson that we find here. We did that lesson yesterday and i have righted a post on my blog about it. I did a little translation for the french people that comes visit my blog (I’m Canadian and my blog is in french) hope it’s ok with you. I also put a link to your blog so that more people can discover all the wonderful art projects you suggest.
Once again, a big thank you
A fan, Claudia Ü
http://aufildesjours-claudia.blogspot.com/
I love your blog Claudia! I once lived in Montreal (Ville Ste Laurent) and worked for a clothing company called Bedo. Ah, those were the days!
Thanks for linking…I’ll add your blog to my art links as well.
If you like the masking tape effect- you can also try contact paper which tears off the painted paper much easier. I like the “squeegee cardboard” effect the best personally. I then teach about negative space as my students paint a watercolor wash of sky between the the trees and their branches.
thos are sooooo cool. ur sooo good peps!
Big question, I’ve tried to use masking tape in a project before and it had the habit of ripping the paper. I was using pretty heavy paper too. What do you suggest as a good alternative?
The heavy weight paper might be the culprit. It tends to have alot of “tack” so the tape is grabbing a hold of it. Blue painters tape is more gentle so you might try that.
Secret to stopping the paper ripping is to de tacky the tape. Tear off the lengths you need and holding onto the two ends , place it over your clothing . It picks up the fluff off your clothes and do it a few times on different areas and it will reduce the grip considerably. . A little bleeding under the tape just adds character. When removing carefully peal the tape of to the centre from both sides of the tape then kind of pinch it together as you remove it.
Hi Patty, I’ve been experimenting with this project. But having a real difficult time with the tape
tearing a lot of the paper off. I changed the weight of the paper from 90lb to 70lb then to medium
tag board. Nothing seems to work.
Any help would be wonderful. thanks
Cetta
Try painters tape (the blue kind).
I just did this with my grade 2’s last week and to help the tape come off easier, we first stuck each piece on the leg of our pants and pulled it off again 3 or 4 times. The fuzz left behind made the tape come off with only one or two small tears.
Thank you! I’ve heard that tip before and it’s a good one.
hi Patty and other lovely art teachers, I taught Water colours to adults for over a decade . The de tacky of the tape over clothes is the answer . But pinching it together as you remove it also helps . Tape down the paper if you are using watercolour paper around the edge as it helps stops buckling once it drys it will no longer be warped. But you need to pull the tape away from the edge but not towards the centre but to the edge of the board. If it does grab it will only take away from the edge only.The blue painters tape is better but often twice the price.
Wish I was clever enough to video it and do a demo but I am a bit challenged by digital technology.
Excellent tips! Thanks Jeanette.
I love this project! In fact I have selected you as one the top 5 winter art projects on my blog! LOVE IT! https://artreekids.wordpress.com/2015/01/07/top-5-winter-landscapes-art-projects-for-kids/
They did awesome!!! What a great art project! I’m going to do a version myself!
This is a wonderful project to try, I don’t have students but I tried it with my sister and our projects are now hanging on my fridge! Thank you for this Patty!
Totally hear you. I LOVE this project and really enjoyed making it for myself.
I’ve done this lesson many times with fourth grade. I usually do a blue sky and then use oil pastels so you can smear the bark. We don’t add a fence but a bird or two on the branches. Students love it.
If you use painters tape it won’t tear the paper when it’s taken off.
very doable and the children will feel good about the end result. Your step by step instructions were very helpful.
How would you adapt this lesson to k-4 th graders
Hi Mary Beth,
It’s for 3rd grade so most 2nd and 4th graders could do the project without any adjustments. For K and 1st grade, I would use oil pastel for the trees instead of paint. Otherwise, it would probably work just as well for them. Very adaptable lesson 🙂
Hi all,
I just finished this project with TK-1 students! It took 3 days. I pre-taped the frame and had pre-torn tapes in different lengths. I helped a few of them but most were able to place their own. It was a great lesson on so many levels and provided problem-solving and decision-making opportunities…as well as learning patience and following dierections. They turned out fabulous!
You are GOOD! That take some patience bit I bet the results were amazing. 🙂
I love this! I am doing Monet this month of January 2023. I am going to try this with my Kindergarten kids, yep, Kinders. They love tape and watercolors. And they know shadows from our Solstice experiment outdoors. I have a different idea on how to do the birch markings…We’ll see! I look forward to this, thank you again for the wonderful art ideas.
pretty fun
I took this ideas, and changed it a bit with my Kindergarten class. I did the taping, they did the rest! They mostly loved the effect of salt on the watercolor!