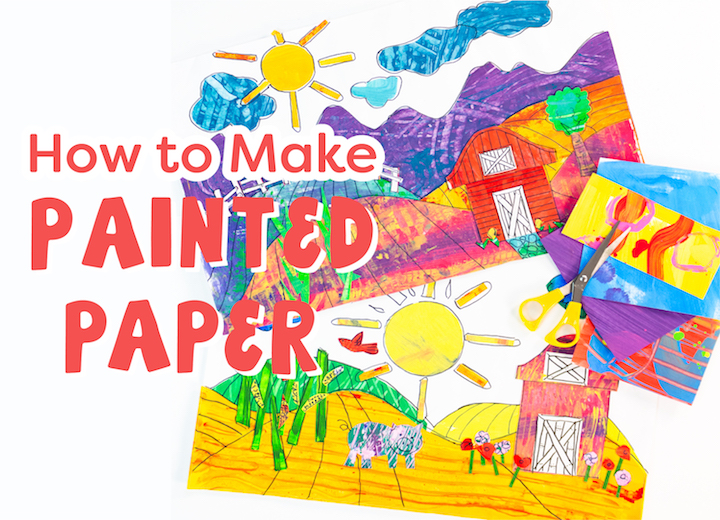


Painted paper is my very favorite art supply and you make it yourself!
All you need is some paper, paints and a paint brush.
Purchasing texture tools is optional but if you want some for free, look no further than your recycling container. Plastic forks, plastic containers/cups and even old sponges make the best texture tools.
Making your own painted paper sure beats the heck our of store bought craft paper and you could use almost any paper to experiment on. In my classroom I stick with the school grade, tried and true construction paper (I use Tru-Ray Sulphite Drawing/Construction Paper).
Click the yellow box below to download a free painted paper set-up guide for you…
WHAT YOU’LL NEED:
– Liquid tempera paint
– 12″ x 18″ sulphite paper
– 3-4 tubs for mixed paints for each group
– 3-4 paint brushes for each tub
– Forks or other store-bought texture tools
Prepping the Paint
The paints needs a little attention before you dish it out to the kids. One of the best purchases I made in the last two years was a stack of clear plastic tubs (with lids) and my local restaurant supply store (Smart and Final). Best $7 I ever spent. I use these tubs to store mixed paints. Don’t just pour standard yellow into a tub; add some white. It’ll make the yellow creamy and bright. Instead of plain green, add some white and yellow for a cool lime. Experiment with your mixes and don’t worry about formulas. This is the fun part of prep work! My favorite combos are:
Red + Orange = Tomato Red
Green + Yellow + White = Lime
Blue + Green + White = Seafoam Green
Have some fun with paints and don’t ask me for precise formulas (hee hee) You can do it!
Set-up
Okay, this can be a daunting step for many teachers (not so hard for small groups). Each child needs a work space, so lay out paper placements (beat-up, painted-on 18″ x 24″ papers) on each table.
Place a white sheet of 12″ x 18″ sulphite paper on each placemat.
In the center of the table, place 3-4 tubs of pre-mixed tempera paint (more on this later) and a tray of texture tools.
Pace 3-4 brushes in each paint container. I know. That’s a lot of brushes but just resign yourself to the fact that you’ll be cleaning forever later.
Painting the Paper
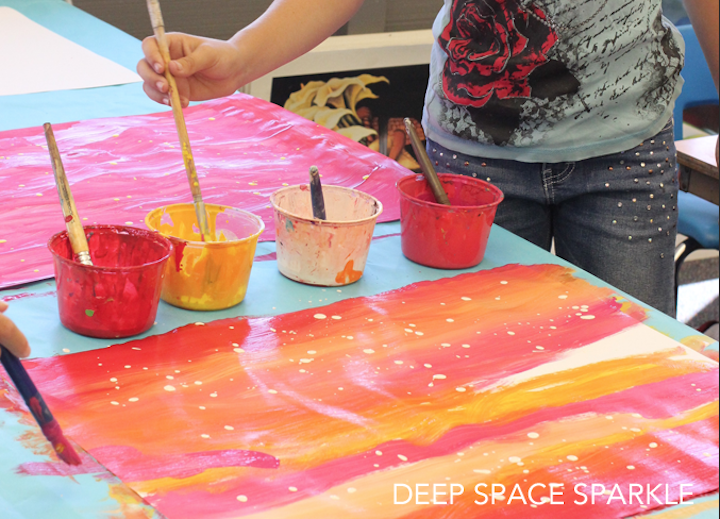
Before I let the kids go at it, I gather the whole group around one table and demonstrate the steps.
First step; pick one color and paint the entire surface on white paper with big, long strokes. After the first layer is applied, put your brush back and chose a second color. Do anything you want with this paint color: swirl, dot, make stripes, go in circles, etc.
The tricky thing is not to mix the colors over the entire surface. Of course, there will be many kids who will try this so don’t stress. This is what art class is all about. Experimenting. It’s way too fun not to blend and mix, so if this happens, resist the urge to ask the child to start following directions. I mean, who really cares?
You can stop at two layers, but why? There is so much more fun to be had!
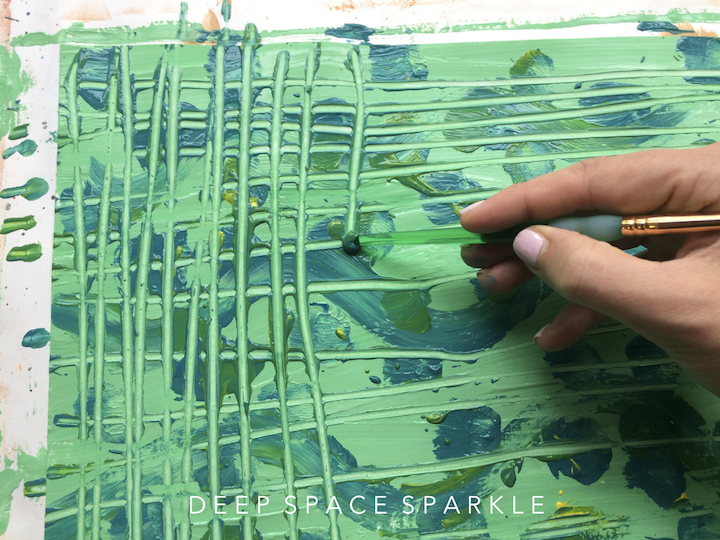
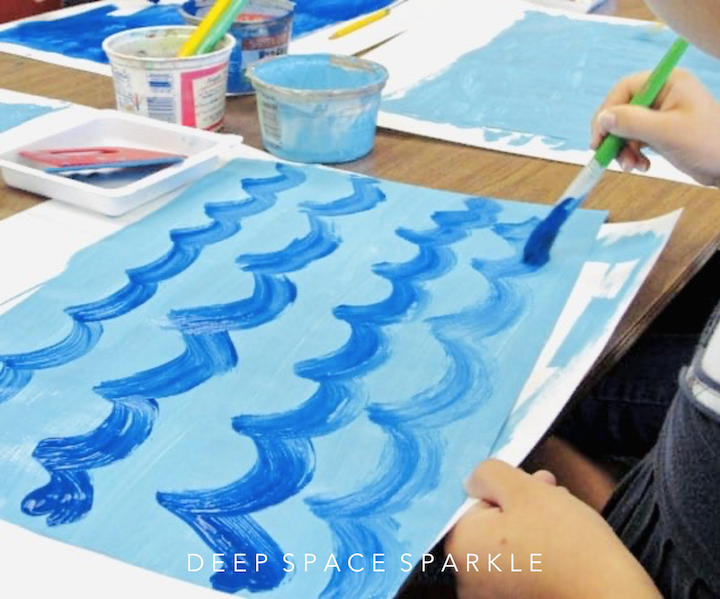
Add another color and this time, try texturing the color once on the paper. Use a fork or store-bought texture tool to drag the paint into lines. Kids LOVE this. It really is a joy to watch children (and adults, too!) playing like this. I’ve never had a child not want to texture paint.
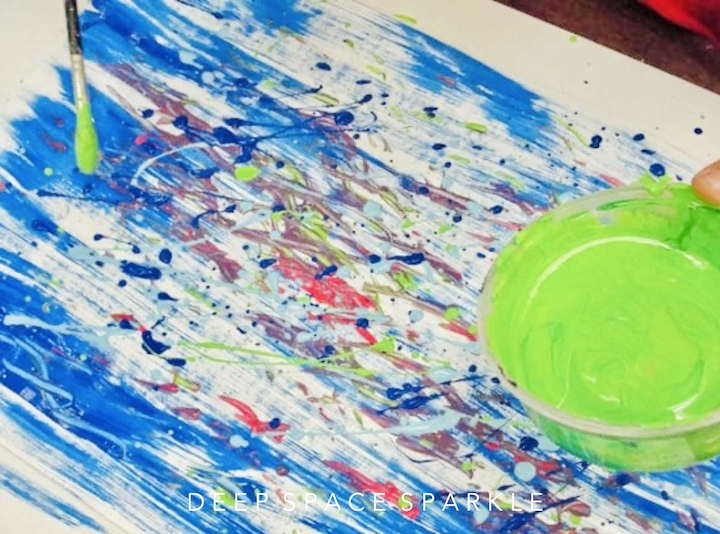
If you haven’t had enough, consider adding some SPLATTERS! Yay! You don’t need to bring out your splatter boxes here as everyone at this point is already covered in paint. Trick with splatter painting is using your finger to flick the paint off the brush. If the paint is watered-down enough, dripping can sometimes be the most effective.
Drying, Names and Other Fun Stuff
Okay, now the problem part. The kids are done with their painting.
Where do you put it? For many year I did not have a drying rack, so I lined the painted paper around the perimeter of the art room. I still do that if I need an overflow option, but essentially, I carefully place all the art onto a drying rack
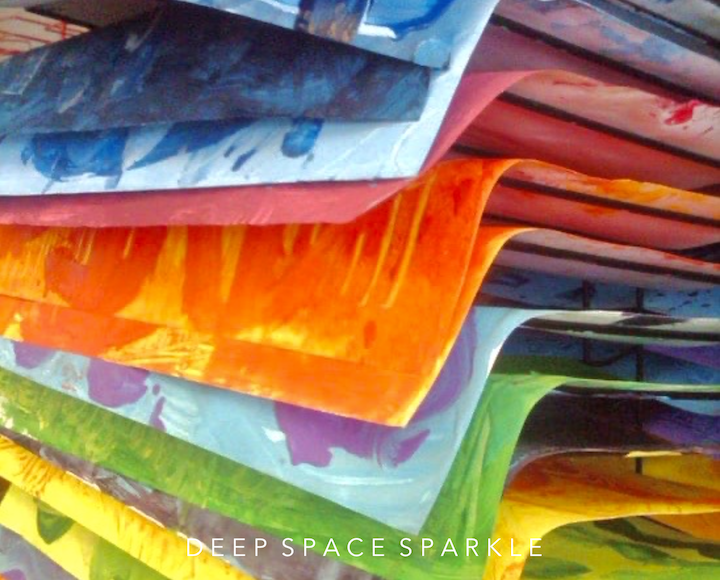
It really helps to have a rack that allows the trays to swing up. If you don’t have this type of rack (like me), it can take a bit of angling to get the soggy paper into the skinny space. If you’re really having problems, try placing a dry sheet of paper under the soggy one. It will help stabilize it.
You may be curious about names. There are a few painted paper projects that require I place names on the back. My Repeat Fish Art was one of those projects. Generally, I tell the kids that this is a shared project and everyone will use each other’s papers for the next part of the art project.
Incorporating Painted Paper into Art Projects
Sharing painted paper is by far the easiest to manage, so I plan ahead.
When I set paint on each table, I do so in color schemes. One table might have blue tones while another has red tones.
After a child has completed one painted paper, they place their artwork on the drying rack (with the teachers help), select a fresh piece of paper and move to another color table. Sometimes the option to move to a particular table isn’t available. I suggest that the student find an open space and go to that table despite what colors are on the table. There is usually no problems associated with this method.
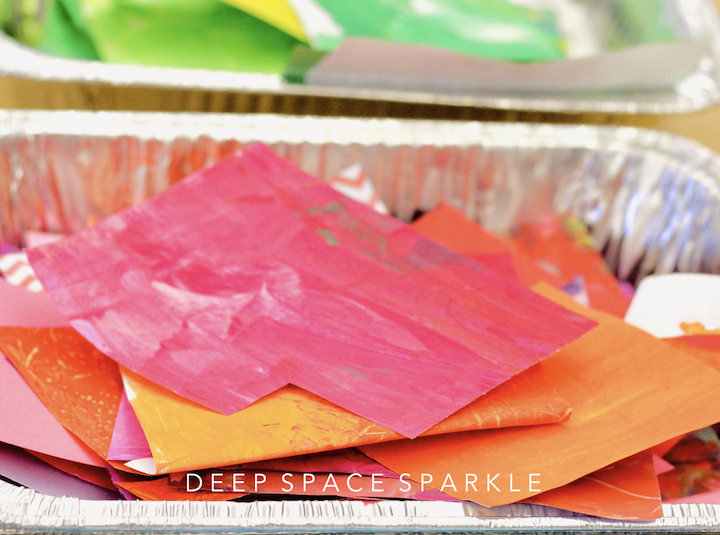
Once the painted paper is dry, I use a cutter to cut all the paper in half. This makes the pieces easier to manage and it gives me an opportunity to sort into colors. I place stack of similar colors into trays (I use aluminum foil trays that I buy from a big box store).
There is no doubt that is by far the messiest project you could do. It’s also the most worthwhile. There are so many projects that can use painted paper. It is such a valuable resource to have in the classroom not to mention what it teachers the students: art is messy and fun!!!
Click the yellow box below to download a free painted paper set-up guide for you…
Here are some of my favorite painted paper projects:
How to Make a Spring Flower Paper Bouquet
Painted Paper Dancing Duckling
You can also check out our glitter paper tutorial here:


“This is what art class is all about. Experimenting. It’s way too fun not to blend and mix, so if this happens, resist the urge to ask the child to start following directions. I mean, who really cares?”
Yes! Thanks for including that. 🙂
Agree – I’d be lost without my textured papers. We love doing just for the fun of seeing what we can come up with. I now have a textured tools basket that I’m always on the lookout to add to. There is always a stash around here for art projects.
Watercolors work well for this project also. The children mix their own colors in thier paint box lids. We then use the papers to create our own Eric Carle Style big book like The Very Sad Stag Beetle or the Very Friendly Dragonfly. Very Fun!
Yes I have done it with watercolors teaching them cool and warm colors.
We do the same using crepe papers.
We make unic flowers in this way…….
Imagine……..
PITSINA
KINDENGARTEN TEACHER
FROM GREECE
I LOVE this idea! This is also a great idea for the painted pictures that don’t end up with names on them and you just don’t know whose they are! Instead of throwing them out, incorporate them into your piles.
Exactly! I have a lot of those anonymous pictures!
I have the same kind of drying rack that you do. I found that placing laminated pieces of poster board cut to fit the drying rack is a great time saver for these kind of papers. You can just slip the poster board out and lay the paper on it then slide it right back in. I’ve been using the same laminated poster boards for the last 3 years.
Our school in China has limited resources for art. I collect all the glossy packaging of copy papers from our copy room, and I use them as placemat ,mixing acrylic paint (I spread out the left over paint on the same paper to dry up for other projects),print making,and a few more usage.
Excellent idea. That glossy packaging is everywhere and perfect for acrylics. Good tip!
Hi Patty,
when you said resign yourself to cleaning brushes-no kidding- the outcome is always really worth it though! For stability for the drying rack, I use shims (the free cardboard between the paper towel/toilet paper stacks at costco. They are really big (40X40 ish) so I cut them in down and they work great!
Fantastic tip with the shims. I will ask my student’s parents to save them. Someone else had the idea of laminating paper. That would work really well, too. Now I just need to do it!
I use large pieces of cardboard as a “shelves” for floppy work. I am currently using old cardboard looms that are beat up enough not to work well as looms anymore. They are always in the drying racks and the kids know to pull out a “shelf,” put their floppy painting on it, and slide it back in. It was a lightbulb moment for me and has saved me years of frustration with this issue.
Excellent idea! Thanks for sharing.
I added your blog to my Top Ten post!
Go here to pick up your reward button
http://www.teachingblogaddict.com/2011/05/top-10.html
Love your blog … have a fabulous week!
❀Barbara❀
Grade ONEderful
I use newspaper when I do my Eric Carle collage projects. It’s great because I have an almost endless supply of free newspapers and it holds up well to the paint. I’ve used regular white drawing paper before, but the newspaper does a great job acting like the tissue paper Carle uses.
I enjoy this type of activity as much as my students. My favorite paper making activity is gadget printing. I often cut up my own explorations and put them in the collage box. It’s pretty exciting when I see kids pick my specialty papers to incorporate in their art! I also cut up orphaned art they’ve created for the collage box and it’s even better to see them using that. My new favorite toy that I bought myself for Christmas is a die press and texture sleeves so my students can create textured paper for their projects and collages. And we’ve discovered that’s fun to draw and paint on too! Recently one of my kindergarten students made a bracelet from the textured paper. Another wrapped textured paper around a piece of wood and glued it on as part of a sculpture he was making. Making your own art paper is just one of the fun parts of the process of discovering and creating!
I am so hooked on painted paper for collage work and love your projects. I am so excited to be getting a huge drying racks-50 shelves with enough room for 2 18×24 papers on each shelf. And it is of the spring-loaded variety. I took over this position from my hubby and he had asked for one for years to no avail. I got it year one. Here is my trick–my room is so small that I began rolling kraft paper out in the hallways and leaving work to dry. My need was simply made ever so obvious.
Thank you for posting this! I am using it this week as my first project I will be doing with a group of kids! I have always wanted to do this and you explained everything very well. Thank you!
I taped together pizza boxes for a drying rack, then cut the ends off as a opening and place a laminated sheet in to slide wet work in and out. Cheap and does the job easily. Love your art projects. Just finding time to try them all is the problem. I love that you have divided the projects roughly into grade levels – as I teach K-7.
Pizza boxes! Great idea, Sylivia
I really want to do an Eric Carle project with painted paper…but I teach from a cart and have only 35 minutes per class… would I be crazy to try this? We have already done chalk pastel and watercolors (messy, but no one died).
Of course you can do it! Make your paper ahead of time, cut into 9 x 12 sheets and allow the kids to go at it! Much less prep than painting. Let me know how it works out. Can’t wait to hear what you do!
Where did you get the handled yellow & blue texturing tools?
Hi! I did this with third graders today, and it was fantastic!! I’m really looking forward to cutting up those dried papers and making art with them! Thanks!
Would this work is tempera cakes?
*with
Hi Claire….there is less opportunity to create texture with a medium like tempera cakes. It’s best to have a wetter paint that doesn’t dry as quickly. I’ll be going through lots of these technique details in my Aligned Art Teacher series. Video 3 is about techniques. Are you signed up? https://pages.deepspacesparkle.com/l11-long-workshop-series-registration-page/
I’m using this my first day of school with my k-2 class.
Thank up for this lesson. I would love to use the stencil you used for this lesson. Did you include the stencil you used .? I can not find the link on this email .. Thank you ahead of time.
Hi Kara! I use a variety of texture tools when creating painted paper. You can use household objects or buy texture tools similar to what you see in the pictures at any art store like Michaels or Dick Blick.
This is so exciting! I love art stuff. I’m not artsy. I can look at something & recreate it (my version) but just thinking outside of the box & magically coming up with something to create – that’s where I’m lost. I’m a teacher’s aide for K5 & I get stuff off of pinterest all the time for us to make. We even stopped going to our regular art class because the kids liked our classroom art time better than actual art class. I’ve been asked to host an art camp this summer for our school!!! I was like “WHAT”!!!! The headmaster also asked would I be the official art teacher for our K3, K4 & K5 classes for the upcoming school year. This is terrifying & exciting all in the same breath! I absolutely love this site & I’m amazed at all the things to learn! I pray this is my go to for everything!
Congratulations! With the new position you should look into joining The Sparklers’ Club.
The Sparklers’ Club is a membership program that supports teachers who teach art to kids. Students thrive when you are well resourced, supported, and freed up to be your most creative self. The next enrollment begins in August so join the waitlist now at https://deepspacesparkle.lpages.co/the-sparklers-club-waitlist/
I love it! As a veteran teacher I sometimes forget to experiment. It feels like there is nothing new out there but seeing it presented so clearly reminds of how much fun it is! Thank you for the “refreshments!”
I cannot access the link with the Painted Paper Set-up. Could you please send that to me. I love your work and get so many wonderful ideas from your site. Thank you.
Hi Bonnie! Everything is working on our end. If you click the download button and add your email address we will send the lesson directly to your inbox. Be sure to check your Spam or Junk folders to make sure it didn’t end up there. Our downloads work best with Safari and Chrome browsers. If you continue to have trouble please reach out to support@deepspacesparkle.com.
What a wonderful idea to use up extra paper and paint – and keep kids creatively engaged! Thank you – can’t wait to try this!