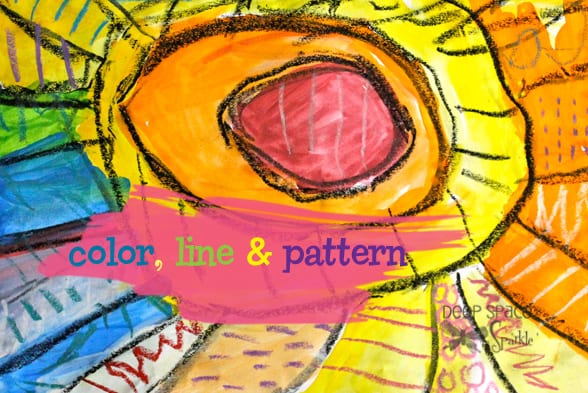


COLOR, LINE & PATTERN ART PROJECT
Kinders started their year exploring lines, patterns and color. On the very first day of art class, I read the children Art by Patrick McDonnell. It’s a perfect story about creating different types of lines. Then, it was time to paint!

Supplies
For this project, you’ll need a few basic supplies: 12″ x 9″ white sulphite paper (I cut my big sheets in half), tubs of liquid tempera paint (if you only have puck tempera, you can use this), oil pastels (including black), colored pieces of sulphite paper, long paper scraps.
The drawing is very simple: start with a black oil pastel (please don’t worry about smudges or fingerprints) and draw a circle in the middle of the paper. Then, create petals by drawing curved lines towards and off the edges of the paper.
I use clear, plastic tubs of pre-mixed tempera paint to set on tables, but anyway you dish up the tempera paint is absolutely fine. Children can pick a paint color and color in each section or shape that they created. Some children will chose a very minimal palette while other children will explore every color. I love seeing the color combinations! (40 minute class: end of day one!)
Most children will have completed the painting on the first day, but if some children still have white spaces, I don’t bring the paints out again. Instead, I allow the children to use oil pastels to color in their empty spaces. Outline the flower (or whatever it ended up becoming!) by looking hard for the original black oil pastel line and retracing them.
Set out trays of oil pastels and children can add patterns directly on top of the dried paint. Some will scribble, others will be very careful. At the beginning of this class, make sure to show what type of lines the children can make (swirls, dashes, zig-zag, bubbles, etc). Teach the children how to add these to their pattern art project.
You could stop at the last step and everyone will be quite happy with the experience. However, if you have a bit more time, have the children practice their gluing skills by gluing their artwork onto a sheet of colored sulphite paper. Stress the relative importance of placing the art in the middle of the picture. 
Again, you could stop at the last step, but I had a stack of old “place mats” that needed to be recycled, so I cut the large 18 x 24 sheets into strips. Children selected their favorite “colors” and glued to the edges of their background paper. This is a great exercise in squeezing glue bottles, overcoming frustration with squeezing glue bottles and learning how to glue straight! Don’t you love these bottles?
I absolutely adore these little people. They are super creative, eager for anything and are very good listeners. Here are their color, line and pattern art project turn-outs. Click for a detailed lesson on how to teach Color and Line & Pattern.


Very nice project. I love when simple instructions produce such a great variety of results–especially from young children. Thanks for taking the time to post your projects. It’s great inspiration!
What a beautiful result – so colorful and individual! The border finishes them off really well 🙂
Thanks! I wasn’t sure if we needed the border but truthfully, we had some extra time!
These are gorgeous, Patty. And I love the borders! When I retired, quotes were collected from students to surprise me, and a couple of children said “Mrs. Brown says that everything is better with a border!” I don’t know if I actually ever said that (sometimes we used borders for technical reasons – to make sure artwork would fit in the appropriate size mount or mat, or to create ‘handles’ to make it easier to carry wet paintings, and to keep paintings from curling) but hey, in the end, I guess I do love the way a frame sets off artwork, and using the old placemats for this was a perfect complement to the artwork.
This is awesome…I will need to do this with my grandkids for sure. I think they will be surprised at how well it turns out. They love to paint. I just have to get over the mess factor. Thanks again for the instructions.
Wow – you covered a lot of media in one kinder lesson. Paint and pastels and glue? In September? Fabulous!
Yes, starting with painting on the first day can either be a nightmare or fun! Lucky for me, it was fun. Truthfully, I have come to favor starting the year off with a bang as it gets kids excited right off the bat. Then I’ll slow down and start reinforcing art “standards”.
Patty, I’ve been lurking here for months enjoying all of your projects but this one is over the top and I just have to say it! My 1st Graders’ theme is Fall at the moment and this will knock them out. I’m going to adapt it this week to work with large leaf shapes instead of flowers with line details inside and painted fall colors. As an experienced artist but a new teacher putting together a gr. 1-8 curriculum, your site has been a blessing. Cheers!
Thanks, Ros! Turning the flower into a leaf is much more inspired. Wish I had though of that! Have fun with the lesson!
I love getting the kids started right with paint! They are marvelous and it allows them to experience so much of the art room, paint, oil pastels, glue, the drying rack, hand washing, brush washing whew! I could only dream to do this with my kinders this year. We are just getting used to school and sitting in a chair and respecting each other. Honestly, this project makes me want to run for the suburbs where I can paint! I hope my daughter has art experiences like this in Kindergarten, fabulous.
Thanks Erica…where do you teach? Are your classes large? I understand the management end and I’m lucky. Our school is small (only 400 kids) and our Kinder teachers are very, very good with getting the kids settled and on track. Always a few kids (we are considered a low-imcome school), but never an entire class.
Those simple and innocent strokes makes it more beautiful and very artistic.
I love the results of the colors!
I LOVE this. I am going to do it with my Kinders. I have used many of your activities with my little ones. My colleagues think I am SO talented. I tell them I,ve got Patty!! Your ideas are awesome and they work. Thanks heaps for sharing.
Rhonda
Thank you for your inpsiring ideas. I am in my second year at Uni completing my teaching degree and about to go on prac. My mentor teacher has asked me to do the art lessons but carry them over for 3 lessons and incorporate line,pattern and colour but do not use paint (as it is messy)! I have been searching and searching for a lesson that I could drag out over three lessons and this one is it!! Although it uses paint I don’t care about the mess .Instead of using already prepared strips, I have made it so the kids make them so this extends it a bit for me. So come next week I will be starting the lessons so wish me luck that it all goes to plan!
I’m so pleased that you have decided to use paint! So sad that people consider paint an off-limit material.
I love this lesson. I will def will be using on this very soon. Thank you Patty
I had never thought of using the “placemats” to add to the artwork! Wow~can’t wait to test it out!
I am a first year (but older) teacher. I love this lesson and can’t wait to try it. I love the addition of the strips for a boarder! Perhaps I can throw in a little Jackson Pollock roller ball fun in with this project to create the boarder. I love it. Two lessons become one art piece! I will let you know how it turns out :-).
I am teaching art/music/drama/theatre at an elementary school this year, but am only certified in music. I have one quick question: how do you store artwork with oil pastels so that it does not smear? Thanks!
I don’t take any special care with oil pastels. I don’t find that it smears to the point of needing protection. You could always place the artwork between sheets of newspaper though.
Could black crayons be used for the base drawing? I ‘m teaching this great lesson Tuesday and am low on black pastels….
Thanks for any feedback.
Cak
Oh yes. Black crayons are perectly fine as is black paint. I like oil pastels as the kids don’t have to press too hard to achieve a nice line.
Gorgeous results!
I love your work and ideas. Extremely grateful. It was helpful for my lesson on lines. Thank you
I think that is a wonderful activity for children to develop motor skills and experience a new technique with multiple colors. Thanks for sharing!
I’ve been getting your emails lately, and I might add, right when I needed them! I think yours is my favorite website! I’m just praying I can get my hands on enough of these materials in order to do this activity and others you have. This fits right in with how I like to approach art with children. I’m teaching elementary art. I am so glad I found you! You’re directions are so well laid out. Can’t thank you enough!
Hi Catherine,
Thank you for such kind words & praise. We are so happy you enjoy the lessons and found our Sparkly spot on the web.
I will be sure to let Patty know how happy you’ve been with everything!
Thank you,
Melanie from Team Sparkle
Love this activity. What a fun way to introduce line and color to Kindergarten. Thank you.
Very nice lesson and exercise for children to create interest on art by exposing them with filling colours and automatically have an idea about importance of line in art. nice lesson madam.